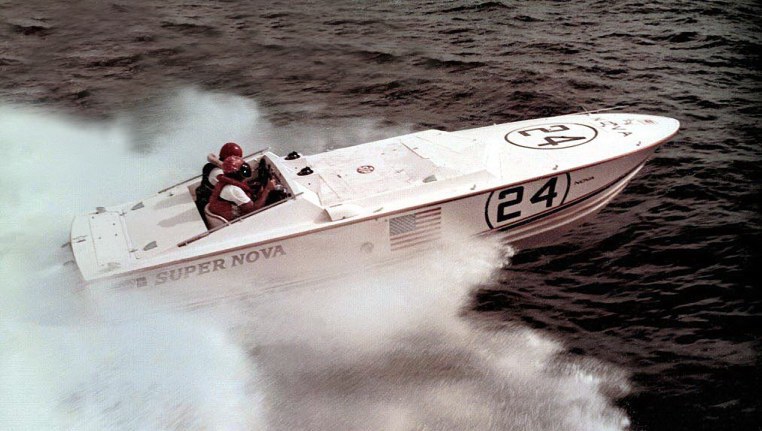
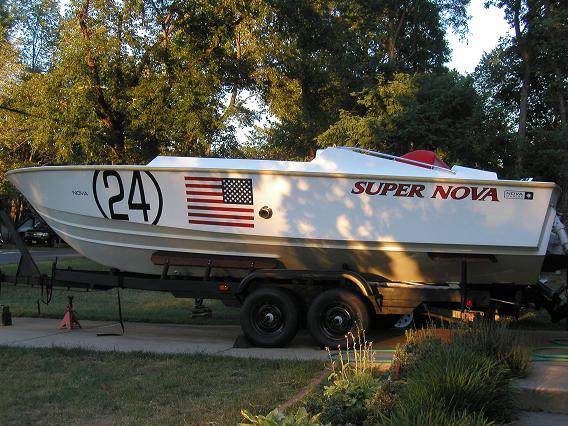
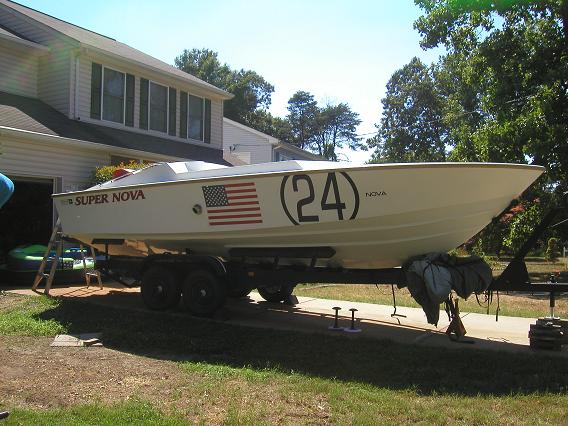
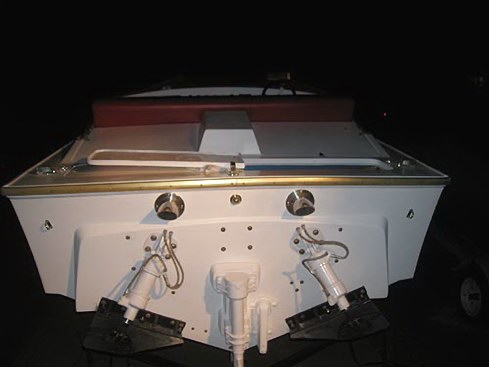
THE SUPERNOVA 24 RACE BOAT
____________________________________________________________________
____________________________________________________________________
____________________________________________________________________
New Year
1/6/2010
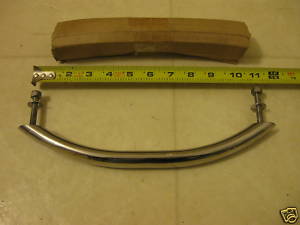
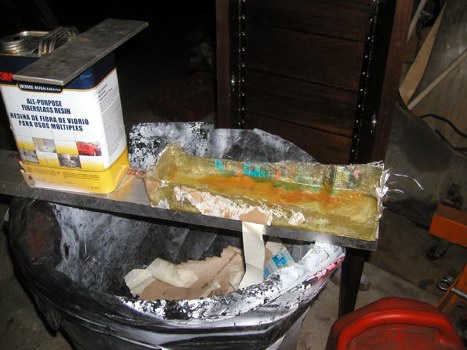
The intake finally came in. This Craigs list buys are a pain but worth it in the long run. $125.00 for a $250.00 intake is not that bad. It was a perfect silver when it got here. Brand new paint. I put a hand on it and it left a print. I think its going to look pretty good black.
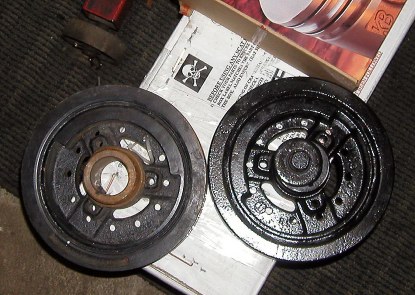
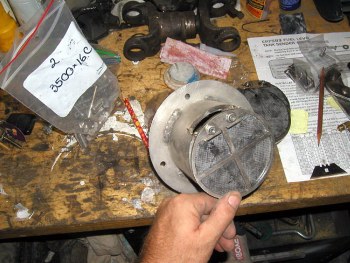
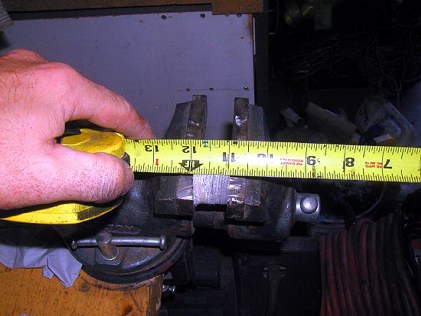
The other night I am sitting here dicking around on the computer and I get this idea to see if there is any difference between the Mark IV and the Gen V balancer. Again most sad no and a few said yes there is so I had to find out.
Notice the slot cut in the bottom of the balancer on the left.
Now I could have just took the balancer off the 2nd Gen V knowing it came right out of the truck intact and was the right balancer but after all this time I only have one motor together and damned if I was going to take it apart now just to answer this balancer question. So I hit eBay and see listings for the different years. Hummm. I'm thinking, here I go buying a marine block. I love it when people ask about them. So for 50 bucks I get it to my house and set it down next to the Mark IV balancer I have ready to go out to the House of Balance for the stroker. Yes sir there is a difference and if I remember right it looks like it is relative to where the flywheel was lightened at.
Already have the old one off and just waiting on paint to dry on the new one to be installed.
____________________________________________________________________
2/19/2010
The balancer went on and came right back off and back in a box to be sent back to the seller.
One of the pulley bolt holes was stripped out. There is no reason to mess with it so I did the email thing and surprise, he sent me a new one. Now you would think it was over but noooooooooooo. The new one had a grove in the surface the seal rides on. Now this is the 3rd balancer on this motor that has never been started. So to end this little drama I took the Mark IV balancer that is perfect to my balancers and had them match it to a Gen V. No more issues and I should be able to get back it in a week or so.
Mike Brown is giving me hydraulic steering that will need some work. I've been on the hunt for a piston cylinder to move the tiller but no luck yet. I've found a couple but for way to much money. Theres still time for this.
I did pick up a (like everything with a twin engine boat) couple MSD 6T # 6400 MSD Ignition Boxes. They are supposed to be for severe off road conditions and I guess a boat is about as off road you can get.
I also pressure tested the exhaust manifolds. I couldn't find any leaks so I have two sets ready if needed. I would like to find another, better set but its nice to have a fall back if needed.
And a few other things but for the most part there is just a few items left on the big list to get and then its just waiting on spring and couple small side projects.
____________________________________________________________________
Come on Spring
3/6/2010
This winter never seems to end. I'm pretty much on hold until the weather breaks.
I have been doing some shopping. Like I found a good connection for metal plate and I recently made all new backer plates for the motor mounts.
Got everything sorted out to see what I have and what's missing. I still have a list but I do have a lot to get started with. The list is coming down to the things I knew was going to be tough to find and they are not disappointing.
Found a driveshaft on eBay, I was sure it was going to fix everything that was missing but to my surprise it is perfect in every way for the rear motor. Sadly the one I am trying to piece back together after taking 2 weeks to get apart is the front shaft. It's a different size for some reason.
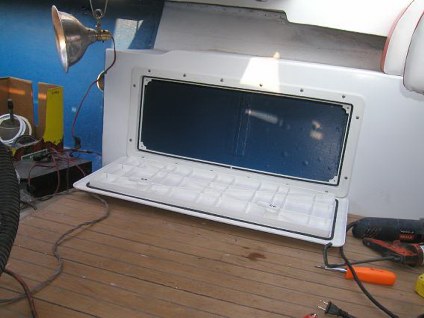
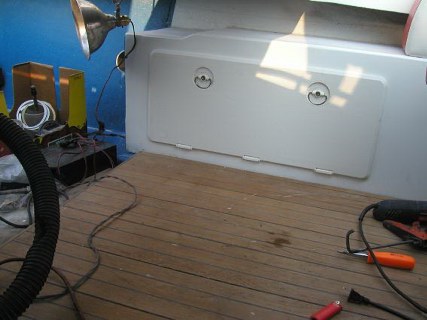
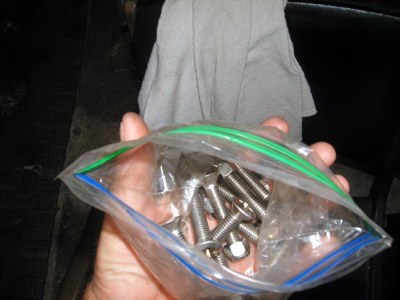
I also picked up the last of the deck hatch pulls.
I still have to figure latches and supports but with these I am half way there.
____________________________________________________________________
3/23/2010
Believe it or not I had another issue with the last balancer and I got fed up. Took out an old Mark IV balancer and had it rebalanced for the Gen V.
So....... with this ring I the finish (until I start them  ).
).
____________________________________________________________________
Spring 2010
6/1/2010
Boy did Wayne come through!
____________________________________________________________________
6/15/2010
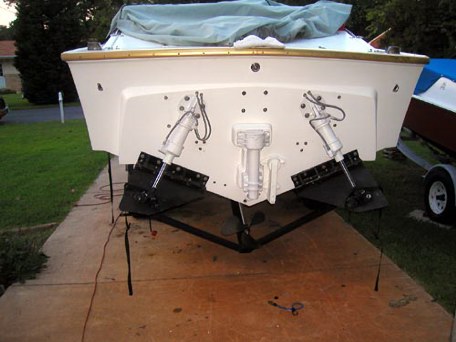
The weather has been crappy so there hasnt been much test driving the last couple weeks in the 19 (that's been the holdup on the race boat) so I thought I would get started on a little thorn in my side for the last few months.
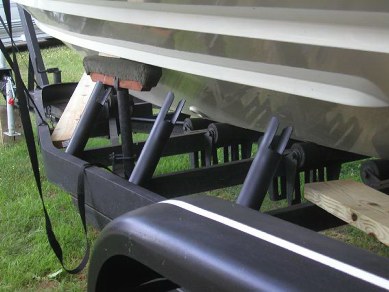
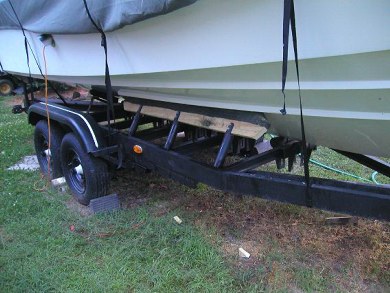
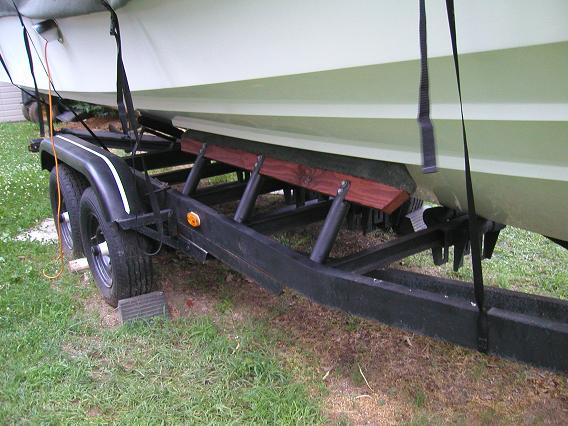
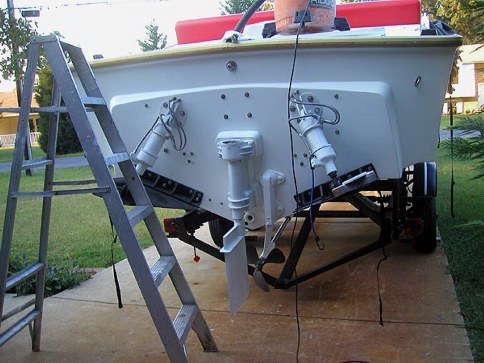
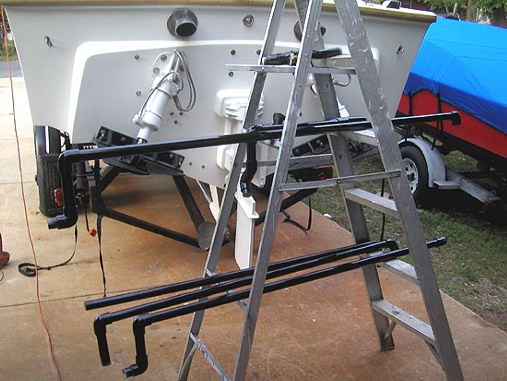
I never liked the way the trailer supported the front on the boat. Just one pipe stand and two feet of 2X4 on each side holding up the front end of the boat and there is still left to install a 454 over top of the same support. So with a couple trips to the Home Depot I built some bunk supports.
Little more solid.
I still have to get my neighbor to do some more welding. Like I said before, I have been looking at it for a few months and in that time I found I want to overkill it big time just to be safe. That and it will need to do some traveling. Maybe not across the country but across the state is a must next year. Its going to the St Marys classic boat show next June.
Along with that its more behind the seen stuff. New wiring harnesses. I was going to do my own again but it was to easy to buy these. All color coded, wrapped and ready to go.
Two Mercruiser trim pumps for the trim tabs. They are not normal tabs at all. They require 2 lines and flow both ways. The only simple way to fix it was to is just use to separate systems for each trim tab.
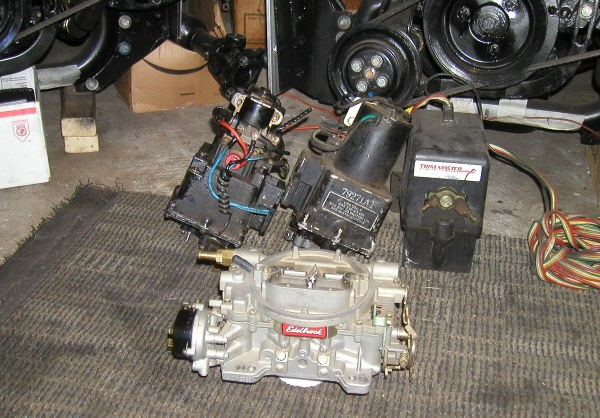
I forgot about the 750 Edelbrock
____________________________________________________________________
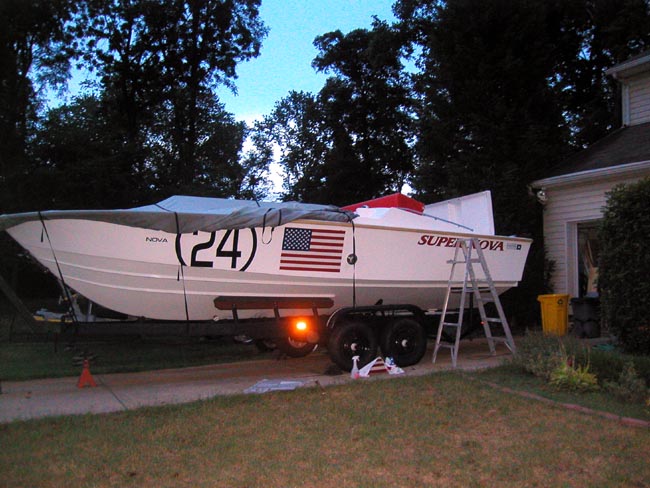
Back In The Driveway
6/20/2010
It's back in the driveway despite having some issues with the 19 still. The water pump is going bad.
Now to come up with a game plan and some gas tanks.
Mike if you are following, Can you ask your dad what fluid went in the trim cylinders and then there is the year. Is the boat a 1968 or a 69? It's titled as a 69 but who knows when a title was issued.
____________________________________________________________________
6/22/2010
Dont really have a sense of direction at the moment. So just screwing around I started with a little chrome. Needed to find out what I have and what I need. I cant do it all due to decals needing to be installed and there is no reason to have them in the way.
So it was just handles and such. I needed to get them installed so I could have a way of opening the hatches without going down under.
Tie downs so it wont life off the trailer.
Also I am getting the trailer set up for some more welding. After looking at it for 9 months I want to have a few welds done to it that are needed. I figured last year when I fixed it that most of this stuff would come back out. Nothing like when I first got it but it can use the front roller being moved (they are all welded on), some support on the front post, some welds on the seams and a couple cans of flat black paint.
____________________________________________________________________
6/24/2010
Getting ready for the big day. Saturday my neighbor is coming over with his massive truck mounted welder. Its not like it happens everyday so Im trying to get everything I can ready that I can think of. The major focus is going to be the trailer but while we are at it I might as well get some of these little things also.
Then there is these. This is my 3rd attempt at building something that would hold up the hatches but at the same time not allowing them to blow over. Another thing was they had to look like they would be backyard enough and used in 1969. They didnt make stuff like this back then so if you needed it you were building it. So I did. After they are welded (they are epoxy-ed together now). Welding may be over kill but if you have ever been smashed into a motor by a falling hatch you understand why I am doing it.
____________________________________________________________________
6/28/2010
The weekend didnt go as planned.
It started off with the gas tanks. Hot as hell and they didnt want to come out. At one point I had about every power tool I could think of in the boat. I found the best tool was a metal cut off wheel on my grinder. Didnt smoke and would go through just on layer at a time.
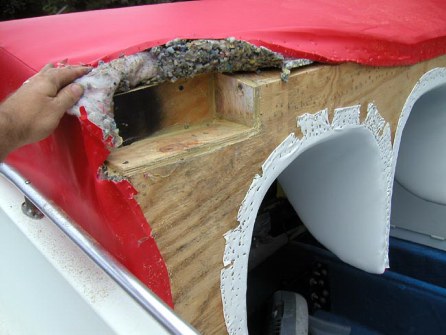
Now to make level platforms I had to take a chunk of the outside stringer out. Nothing much and I did re-fiberglass the stringer back in once it was cut and before I built the platform.
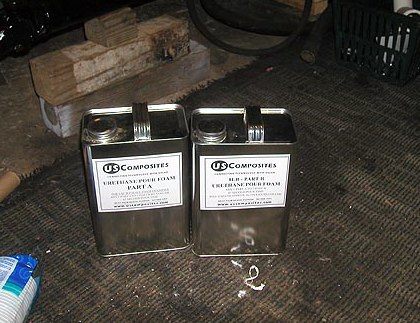
It did open up a can of worms. Somehow this outside stringer got wet and, of course, rotted. Only about 2 feet up it but it all had to be dug out and then filled with the last of my miracle 2 part foam. Once cleaned out it only took a minute to fill and I was back on track.
Before the platforms could go in and after I cut all the tank baffles out I had to get the ends of the tanks put back on. I plan on using them for storage boxes. I would have taken the all the way out but they hold up the seats. Not only that but I will need a place for dock lines, bumpers, anchor and such anyway.
After about 20 hours of this hell I got the tank anchors glassed down and the platforms installed. By this time it was 7 pm Sunday night and I had run out of glass and mat. Good thing to because I had run out of steam also.
While this was going on Saturday my neighbor came over and burned the hell out of the trailer. Spent about 3 and half hours on it and hes good. Herd a lot of cussing and banging (that could have been from me) but when done all the rails down both sides have been redone, new mounting post for the short front roller. The winch post was reinforced and welded to the trailer. New front jack (the old one was a POS, I guess you get what you pay for) and a few other things I cant remember at this point. Sadly on any other weekend it would have been awesome just to get that done and then to hit it with a grinder for any of the rough spots and use some of the 9 cans of flat black plaint I have waiting for it would have made a great weekend. But the trailer still has burn marks (funny how far the heat travels through the paint when making a weld) and Im not done the platforms yet (the corners need another layer of glass) and as I sit here at work knowing I didnt put the top on the boat last night we just had a huge rainstorm. So we will see what happens tonight after I stop at Home Depot for more supplies.
Everything looks better with a little paint.
A couple more coats and some touch up and it will be ready to cram a gas tank in there and cramming it in looks to be in order.
____________________________________________________________________
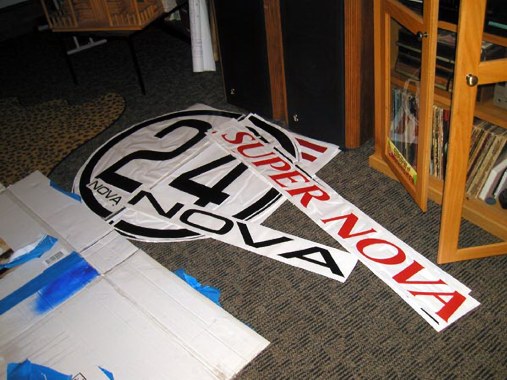
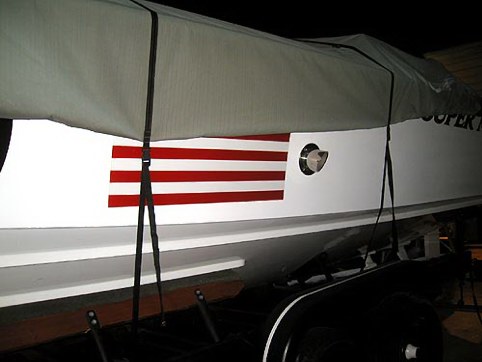
7/6/2010
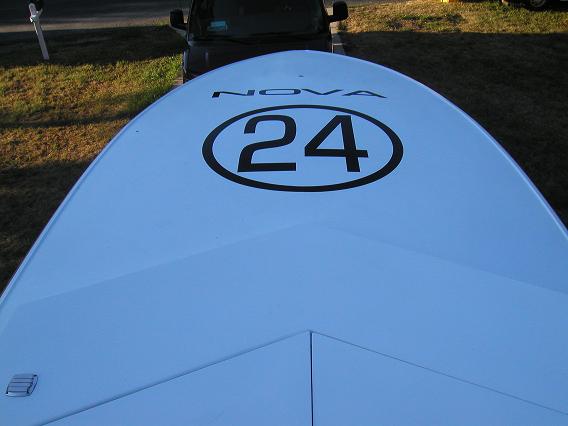
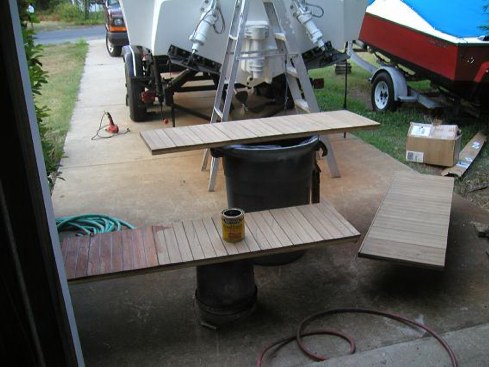
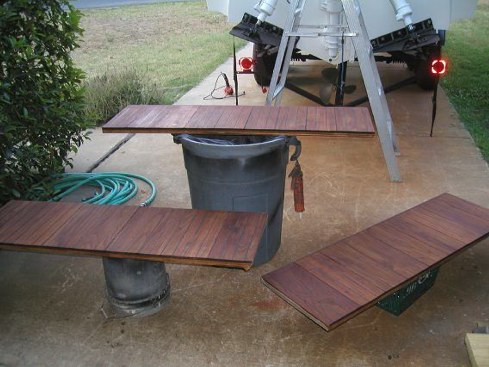
To be honest the #s on the sides needed a little tweaking but its as close as its ever been. The flags are a little bigger then they were (I could not find the size after months of looking) so things are not perfect but nothing is perfect on this boat like it was in 1969. Just way to many variables. Also the side that has a clear shot (port side) is different then the side that the race boat picture at the top of this page was taken from. The next thing is my pictures look a little weird. For some reason my camera has always had issues with things like the #s. It always makes them look a little weird and out of square. Last I had everything measured out and plotted on a blueprint program and then found I pretty much had to eyeball the whole thing because it was wrong.
The 2 SuperNovas, when I installed the second layer I had to split the words so they wouldnt run off. I think they may have stretched or shrunk a little but it worked out.
The clear release tape was great for positioning things. It was a real bitch to get off though. It kept wanting to lift the decal no matter what I did. By the last 24 I figured out a better way of getting it off by splitting the clear cover into strips and pulling it off that way. A pain but worked out in the long run.
Then there was the one time the wind grabbed one of the decals before I could get the juice on it and wrapped it around its self but that worked out also.
IMHO Not bad for my first time doing decals. The biggest thing I have ever done in the past was a bumper sticker so Im happy a 1000 times over. I didnt even cover the boat up last night. Its the 4th of July weekend might as well display it proud.
As for the flags. I may have to change the one. I have already had a question on the port one, why is it upside down, I think they meant right to left but I dont know, I kind of like it that way. Artistic license.
All and all pictures do not do it justice. I've had 10 folks stop and talk about the boat after the decals were installed. This is a whole new game and I'm lovin it.
____________________________________________________________________
Looking Like Something
____________________________________________________________________
7 / 7 / 2010
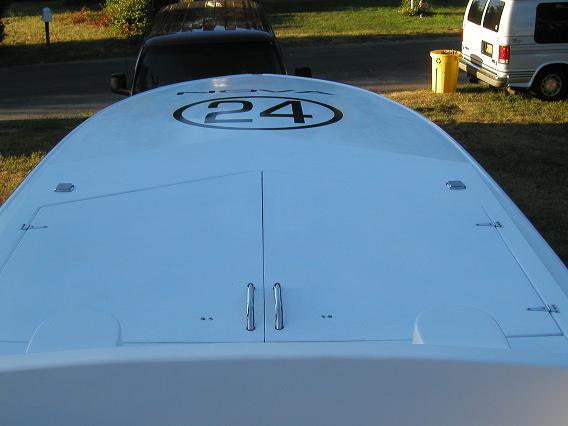
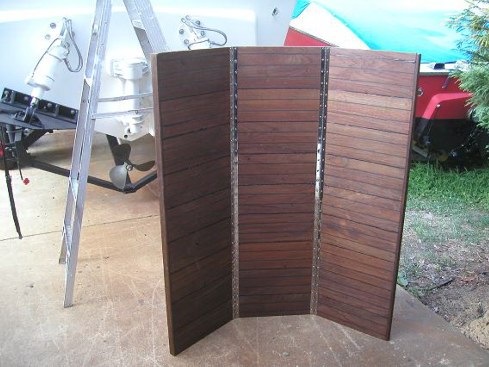
Along with a hundred other things I've got the hatches installed. Another mess.
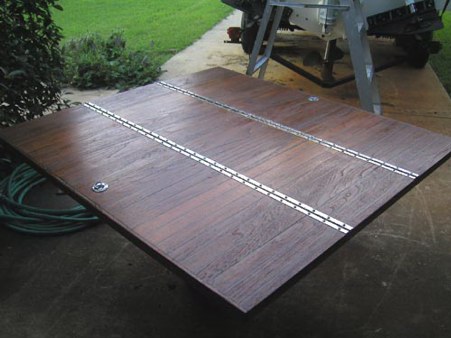
I also started to remake the deck. One piece wont work if I ever want to see the v drive and stuffing box after it's installed so I cut it in 3 pieces and after some refinishing I plan on using some piano hinges to put it back togther. This way I can fold it up when I need access. I'll hold it down with car chrome hood pins and clips bolted to the stringers. Pull the pin and roll it up.
____________________________________________________________________
7/8/2010
Did some more work on the deck. Still have some more seams to fill. I wish they would have butted all the plank seams but they put some "grout lines" between the boards and filled them with some sort of rubber. The stuff I'm using takes a day just to tack up so it will take a couple days to finish.
Besides that I sealed the edges of the decals and built a new top support. I never like the little plastic mushroom supports. And on and on.
The last set of risers came in for the exhaust and the throttle cable brackets also. I'm on schedule for motor installs in August.
____________________________________________________________________
7/10/2010
Ghost made an appearance at Shanty Town this past weekend and in his infinite wisdom fixed something I had been working on for months.
I've been fighting to get the dump valve for the ballast tank open. It started with months of soaking it with PB Blaster and yanking and banging on it now and then with no luck.
This spring I started with the same and after a couple weeks still nothing. So being it was glassed in place I whip out with the sawzaw and cut it out as careful as I can with a sawzaw. Got it in the garage and started soaking it again with this bad ass cleaner. The shit will burn your hands if you use it right out of the bottle. Two days and still nothing. G looks at it and says, pour some Draino in it and moves on to other things.
At this point I will try anything. 1st day all kinds of crud comes out but it was still stuck. Soak it for another day, tap, tap, tap and it opens like it was never stuck. If I close it tight it still sticks a little but its soaking again and Im looking forward to the results and I owe someone a round at Restless Ricks!
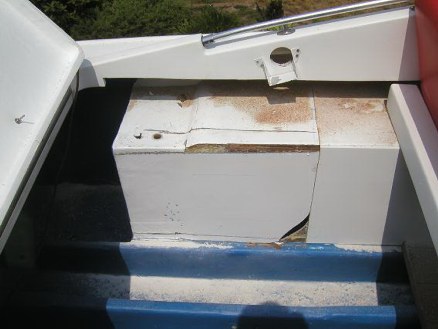
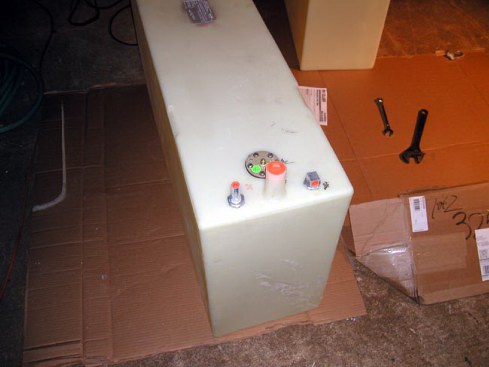
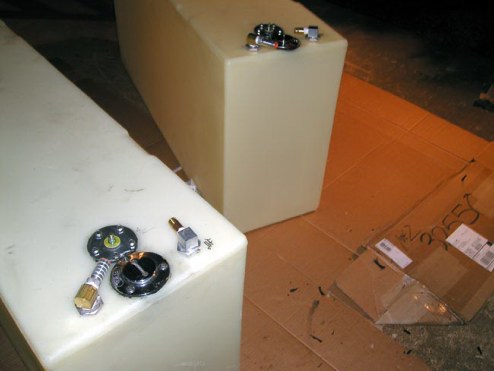
The gas tanks came in today and like always I drop everything to start the install. You would think it would be as simple as slipping them in but nooooooooooooooo.
Parts have been removed from the boat. A drill, sawzaw and a grinder with cut off wheel have been involved. As well as a hammer and chisel. I thought they were tight but they ended up to tight. So after 3 hours modifying the hull for the tanks I then had to modify the tanks for the hull. The only way this is going to work is to have the fills for the tanks under the rear hatches. Not a bad place. They will be near the transom for ease of pumping gas. And the sender, pick up and vent can all be accessed by just lifting the hatch.
But to do all this the neck of the new, brand new, like UPS dropped them off at 5pm new gas tanks would have to come off and a flush mount fill would have to be in its place. To get all 50 gal out of the tank the fill would have to be pretty much flush with the inside of the tank also. Lot of cutting, grinding and the such to make a deck mount fill a plastic tank flush mount fill. First I heat gunned the neck to it was almost jelly and used a razor knife to cut the new hole. Real easy when that soft. The stuck the neck in and let it cool. Home made rubber gasket, RTV and a couple fat screws and after an hour or so they were installed. Then the new, in place of the new, sender was measured up and installed. They match my gauges and Im not playing the gas guessing game with the wrong sender gauge combo. With height being the most important factor the vent and pick up had to be changed to a 90* angle instead of coming straight up. About midnight I think they are ready to install but Im sure something will be needed to be cut, ground or just in general, f_ed up to make the final fit.
Most of the reason that things went the way they did is the size of the tanks. They are just that tall that there is no other option.
Either way the pick up in the tank has to be in the back and the pick up and fill are side by side so the decision was kind of made already.
____________________________________________________________________
7/11/2010
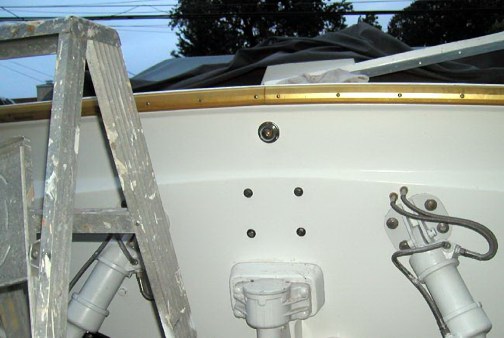
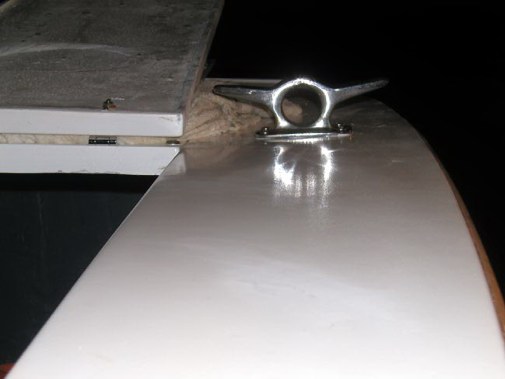
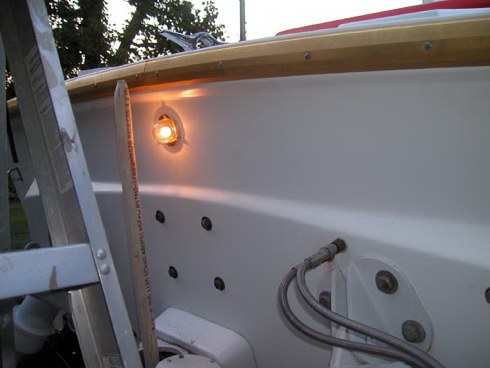
Yesterday was a total wash out. About the only thing I could do was a couple things on the rear end of the boat. Got the rear light installed and the rear cleat. Had to build a pipe holder for the all thread that attached to the transom. When having all the welding done to the trailer I had it welded up also. A couple SS bolts and some washers and it was done. The rest of the day was spent fooling with the deck and cleaning the garage.
Sunday came and I got a couple more things done that I should have done the day before. Started with the tanks. Like I thought I ended up spending another couple hours grinding and cutting to get them to fit. Tight to say the least.
Didnt come out like originally planned. The fill ended up under the rear hatches. Not so bad. At least I didnt have to alter the outside of the boat so if you didnt know they were there you wouldnt know.
Being that I didnt get no where near done what I wanted this weekend and also wanting to get as much of the cutting I can done so I can be done with the dust, I decided to go with the compasses. 15 minutes and there they were.
____________________________________________________________________
Rollin Now
7/12/2010
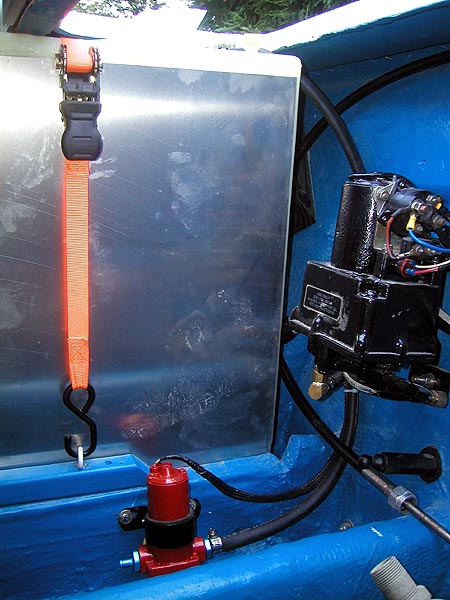
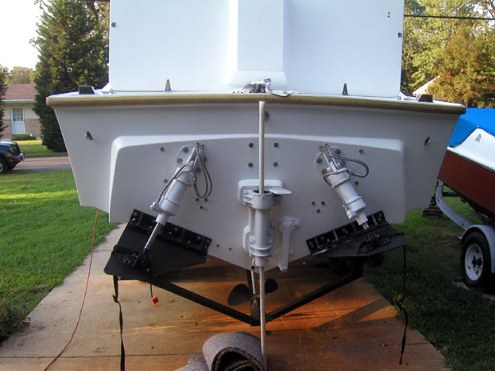
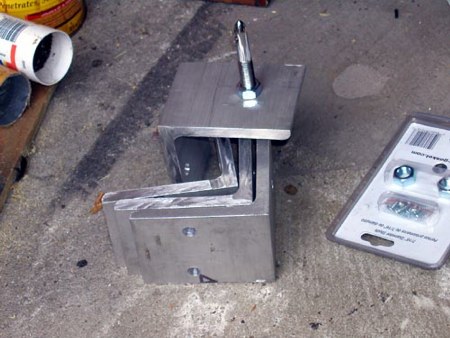
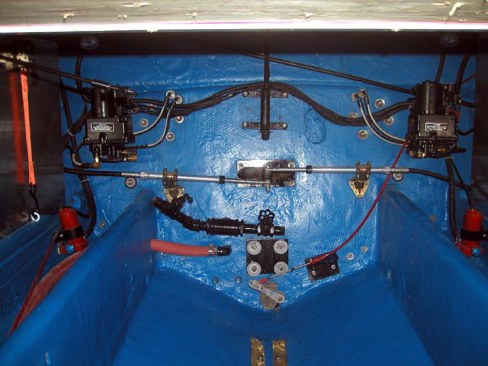
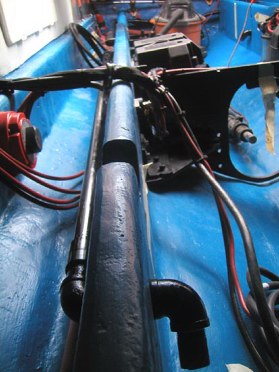
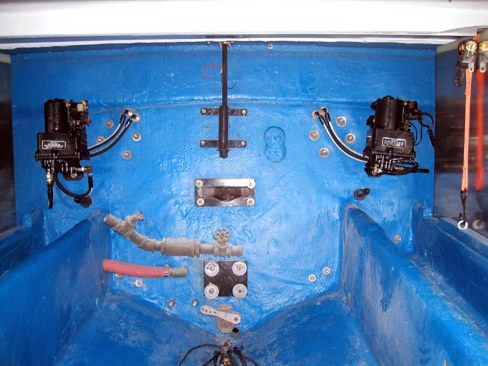
Started the trim tab system tonight. The first thing I had to do was build brackets so I could bolt the pumps to the transom. The 2 pumps I bought had the mounting brackets removed. 150 bucks for new ones.
A chunk of flat bar from Lowes and some beating, banging and cutting I had something to work with. Also I could offset the bottom and top so they will sit more level when the boat is in the water. 2 weeks of this little stuff and i should be good to go for the last of the major project.
Then there is more SS screws. 10 of them with nylon nuts. 20+ bucks. They are for the trim tabs. Just to get the right attachment bolts, nuts, bushings and washers all in SS has a grand total of $37.00
Just for the tabs.
____________________________________________________________________
7/13/2010
I didnt work on the tabs today. It stopped raining so I busted into a few other things. Had to make a couple stops on the way home so one thing lead to another.
This was a easy thing. One of the stops I made was at "EJ metal to go" and picked up a couple sheets of aluminum. Having the gas tanks so close to the exhaust made me a bit nervous. So if the exhaust gets to hot or if something flies off the motor or if it gets to hot and then something flies off the motor like it has before its not going into the gas tank. It will also help keep the fuel cooler.
And as you can see in the picture above, the bolster hits the tanks and will not go all the way back to the hood and left a gap between the two. So after being one of the first things I got done I had to chop it up to make it fit like it should. After getting it cut out a rebuilt in I had to let it set over night so all the liquid nails would dry up. Tomorrow I will get the vinyl put back together and you will never notice the notch.
Then there is this. Got tired of everyone saying flags backwards and being that the only ones that are available are the right hand it become an issue. So with some creative splitting of the extra right hand flag decal I had left over I installed it. Didnt really want to have a split flag but at this point there is no other option. One more the flags backwards after all the other great decals (thanks again Onesubdiver) were installed and Im goin postal.
____________________________________________________________________
7/15/2010
Yesterday I finished putting the bolster back together. It now slides back to where it should and there is no gap between the hood and the rear cover. It took some time and when I was done there wasnt much time to do much more so I grabbed a couple of the remaining hood locks and started installing them. Got to the second to last one (so I installed a couple with no issues so far), predrilled all the holes and then the crap hit the fan. First a screw broke off and then a chunk of fiberglass blew out on another screw. Not a good end of a day. I fixed the broken screw already. The chip will have to wait until I get some more paint. I have nothing, not a drop left over.
So today I started on the trim tab system. The brackets seemed to work well. Its almost finished. I need a couple hose fittings to finish up the one on the left and the one on the right just needs to be straightened up a little but I think it will work out as long as the pumps are good and the tabs are good and the pumps will work with the tabs and
.
Then the flappers came in for the exhaust. I wont even tell you how much they cost. I will say, a total rip off for what they are but nothing else would work with Ferds hardcore exhaust tips. If I hit a pier with one it will knock the pier over. They weigh about 5 to 7lbs each. Normal flappers would have worked on the rear exhaust but on the side a couple waves would have ripped them right off. Brownie apparently used insanely high risers to solve the problem. I dont have that option so this is what Ive got. I just have to notch the end of the tip so when welded on (theres that W word again) I still can get to the screws to replace the flapper when/if needed.
____________________________________________________________________
July 18, 2010
It dont look like much today but with it 97* all day it was a slow day. I suffered through getting the rebuilt gate valve installed and fiberglassed in. It seems to work fine now. I also took out, cleaned up and reinstalled with new sealer, the dump port. I noticed the when water sat in the bow (my driveway slopes down) it would drip on the outside. Thats cool but if there is nothing in the tank then it had to be coming from the outside of the port. If it would leak out it would leak in when in the water so it had to be fixed. I think this 9 month long gate valve ordeal is almost over. Just need a sacrificial ½ wrench to make the lever work and attach to the cable.
Now to dump that tank and a couple of other things I need someone to build this for me. Its a cover for the dash. I plan on using straight sticks of ¼ aluminum (Ill round them off and dip them a couple times in liquid rubber for handles) with a pivot point behind the dash to move the cables back and forth. Its only has to move the cable three inches so it shoulder be to hard.
Started the dash. Ive got to get this steering thing straightened out soon. It and the lever station is all thats left besides wiring.
____________________________________________________________________
July 18, 2010
I know I was working on the dash but due to time management I had to do something else.
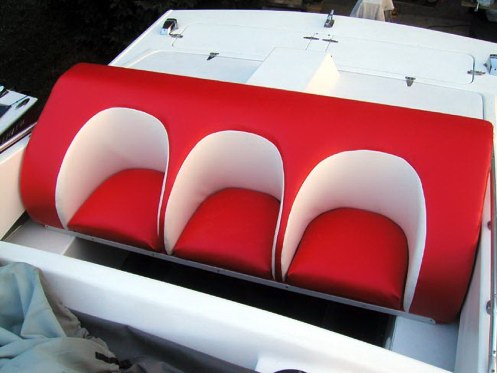
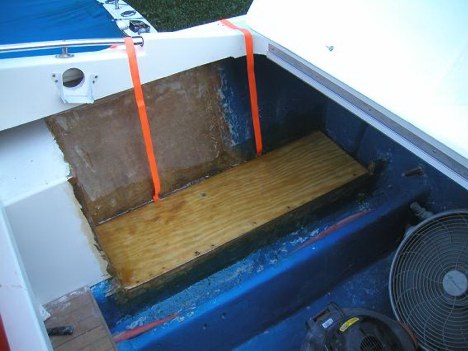
One of the things I wanted to this weekend was the seat. I knew it would take a few hours and once started I wouldnt want to stop and start it again another day. Just like yesterday, I wanted a full day to get things right. Today it was work in the 95* day.
I picked up a sheet of ¾pressure treated plywood (37 bucks), 6 tubes of liquid nail (12 bucks), inch and a quarter deck screws (8 bucks), three inch deck screws (9 bucks), six foot of inch and a half angel iron (20 bucks), I had a 4 inch and half aluminum angle for the rear of the seat and all the screws (aprox 25).
Eight hours later, look what I got.
Glued and screwed to pieces of the plywood together to make it a inch and half thick then cut the pattern out I drew on it earlier.
Strung new vinyl around the visible edges.
Glued and screwed the base to the bolster.
So many screws.
Being this angle was not going to sit on the boxes due to the fuel tanks being in the way its just screwed on with 2 and a half SS screws into beveled, counter sunk drilled out hole in the metal.
Real solid.
The front angle had to be recessed into the plywood so when screw into the wood it would all be flush and sit flat on the boxes on the sides. Now cutting a recess grove for it with a skill saw is something interesting to do.
It sits flat, all the screws are counter sunk and I was standing in the center seat and it was super solid.
____________________________________________________________________
7/24/2010
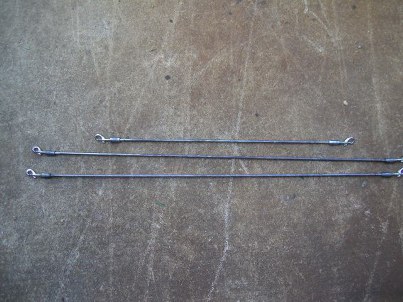
Bit of a busy week. Ive been left to try to put something together for the 24 I wasnt expecting. I was hoping to be able to use hydraulic steering but it was not cost effective. Even with Mike Browns help it still would have cost an arm and a leg to put the rest of it together. So Ive decided to go with duel cable steering like (I think) was originally in the boat. It still has the posts on both sides so if not Ive been fooled.
So Ive hodge/poged it together. Just short an 18 cable to complete it. There has been a lot of hunting going on.
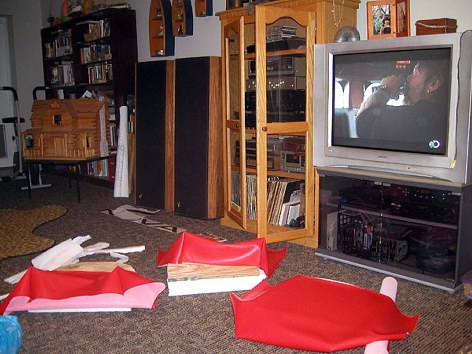
Of course I couldnt hold off on these. After spending all day Sunday building the base it had to happen. They fit a little loose but should drain well. I industrial Velcroed them down and if I dont like them I can always change them later when its cold out.
Then there is this.
Three full nights after work as the major project while other little ones happened around it.
Concept, design, prototype and production in those 3 days. I figure that all these have to do is move the cables back and forth so why have some huge thing that only half works like a controller would? This way I have control over 3 cables in a minimum space.
This was ¼ inch aluminum sheet left over from the gas tanks. A stick of ¼ rolled steel bar, all thread, nuts, bolts, washers and some plastic dip from Home Depot. Oh, and the paint, something like 20 bucks worth. 3 coats of black primer, a layer of that chrome paint that just looks real bright silver, 3 coats of my metal flake engine paint and last 10 coats of clear. You cant look directly at it in the sunlight.
Even though I got away cheap with the cable pull (if you call 3 days and 50 bucks worth of stuff from H/D cheap) this is the deal of the boat so far.
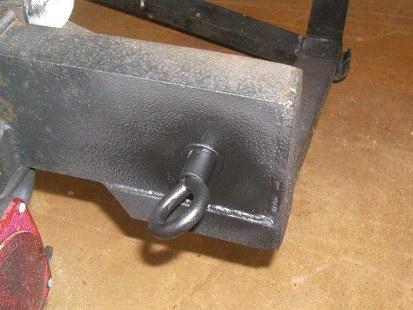
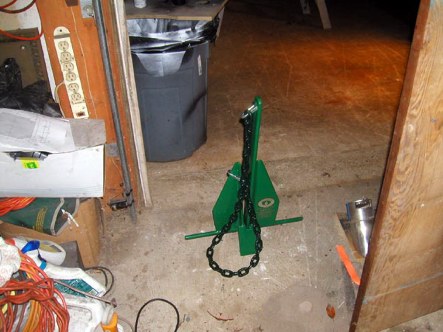
A brand new 13lb, rubber coated anchor with chain, delivered to the house
wait for it
..40 bucks.
Its green but who gives a crap when it in a locker or 20 feet under water.
____________________________________________________________________
July 25, 2010
Being it was hot as ... .. out today (it was 95* at my house by noon) I got a late start and then spent the better part of the daylight hours in the garage until the sun got behind the trees. The only noticeable thing I did was install the steering wheel and the lever .....what ever it is. With only one trip to the Depot. I have the cable holder built and the paint is drying on it in the garage. I think at this point all the dash is cut out. Even thought it doesn't show in the pictures the ignition holes are cut out also. The end of the dust would be a great thing.
When the cable bracket is installed the bracket and all the leavers have been drilled out so I can add a spring to each of them. That way they will naturally want to close which is a good thing.
____________________________________________________________________
July 25, 2010
Still jumping around. That time management thing. I was better off doing the gages being I had more time. Everything short of adding the wiring harness that goes to the motors and being it's a premade harness it's a simple add. The next couple days is cables and wiring.
____________________________________________________________________
July 28, 2010
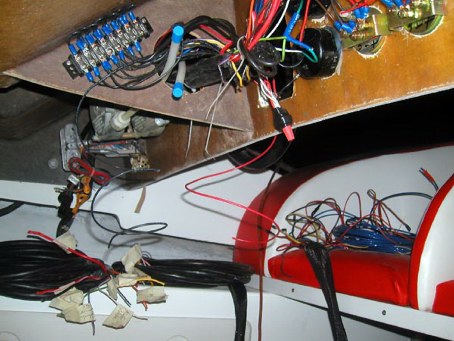
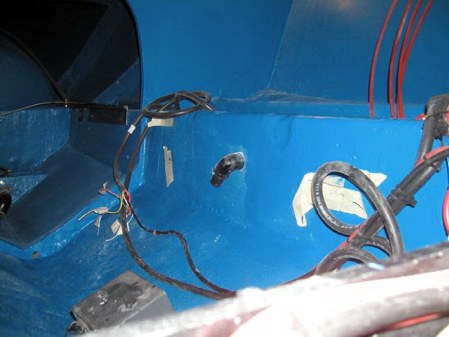
Just some of the 545 feet of wire I have used so far. 10 runs of wire form dash to transom just for the trim pumps alone. Two gas tanks, two motors, lights on bow and stern, interior lights (it's dark under there), fuel pumps........ and this is just the basics. No radios, navigation or depth finders or new fangled things like that.
____________________________________________________________________
8/3/2010
Its little things for now.
One of the things was getting the cable pulls hooked up to the actual valves they are supposed to work. Took a little bit hooking things back up like they were 40 years ago. All and all I think it came out well. After finding the position the cables needed to be in I got the pulls all hooked up, added some springs to the pulls so there natural position would be in the closed position and then came the big test.
I was kind of surprised that they worked so well. They stay open when left there but will close easy enough and stay that way until moved again.
Then more electric work. Fuel pumps are in and for the most part the dash is done. Ive also ran all the wiring for the interior light. They havent come in yet but should be an easy hook up when they do show.
Bow chalks are installed and it just goes on and on. The one nice thing is I am starting to run out of things to do.
Steering should be done by this weekend. Along with the controller. As long as the cables come in for both. From there, I will have to look around but I think I may be ready wrap all this comfort BS and it will be time for the power to hit the glass.
____________________________________________________________________
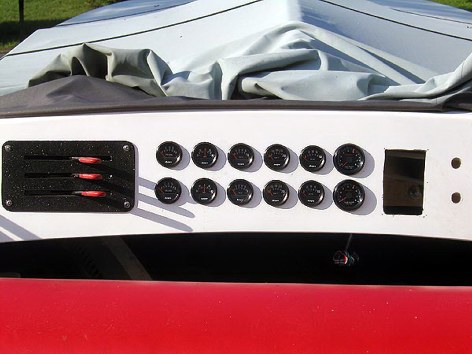
August 06, 2010
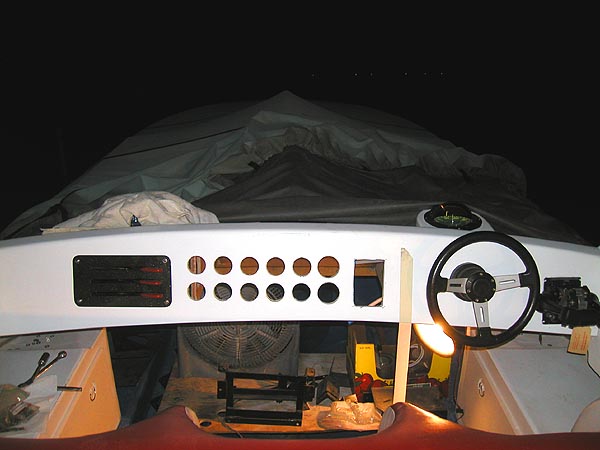
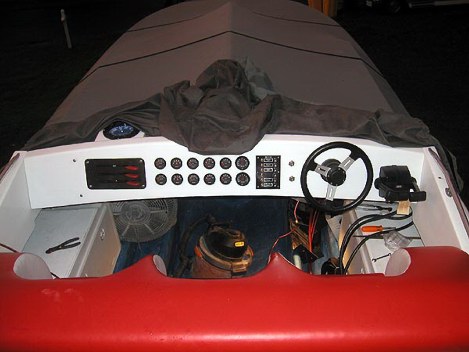
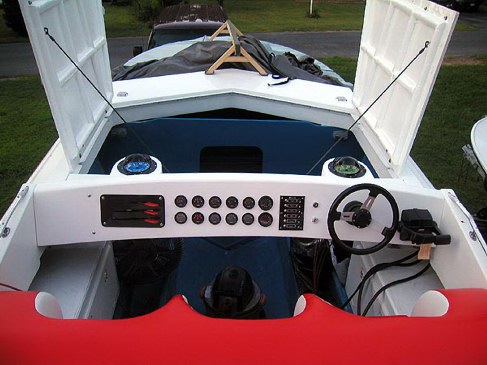
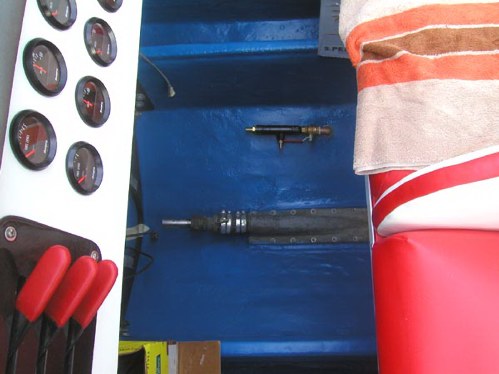
Well its been a year today that I brought it home and I finished the dash.
Got the cables hooked up to the controller yesterday and then got all the wiring hooked up (it has trim tab buttons on the end of the throttle lever). After I got it built I stuffed it in the dash and bolted it down. Turned out pretty good.
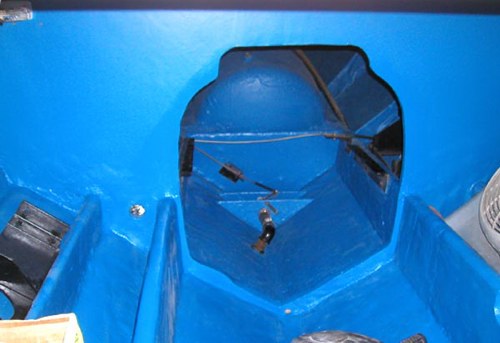
With that the dash is pretty much finished I still have to center the steering wheel but that has to wait until I get the tiller hooked up.
Speaking of the tiller. The little time I had tonight I got the most part of the steering bolted down and hooked up. Even tough I cant put the tiller on due to a missing driveshaft support strut has to go on first it is all ready for it.
____________________________________________________________________
August 11, 2010
First things first.
I had to get the rest of the dash installed. Once the cables came the first thing I had to finish was the throttle controls. That way I could get the trim tab controls wired up. The best thing about this is I could finish the dash completely!
Now that everything but the leads to the motors was installed it was as easy as hooking a couple ends to a battery and its alive.
With a couple more ends installed it was time to test the tabs. The first one was as easy as filling the motor with fluid and running it up and down. There is still a little air to get out but it always take some time to get it all out after they have been drained. The tab works fine. Maybe a little fine. It extends a little to far, like turn it around backwards if not careful. Maybe not that bad but it pop rubber bushing out left and right.
The second one was not so lucky. I think there is something wrong with the trim pump. It will run forever in one direction and do nothing and in the other it will work in one direction but over heat. I contacted the seller and for the first time this year he sent my money back. I was shocked.
____________________________________________________________________
August 21, 2010
Bought another trim pump just before I left. Thought it would be here when I got back. It's still sitting in the post office. Cant get it until Monday.
I need the V drive before I can set motors. Just a couple more complications.
____________________________________________________________________
August 29, 2010
I have had so little time since back from vacation I havent got much done. I have to rethink this work thing. 40 hours of vacation followed by a 70 hour work week to catch up. Just sad.
I had some minor issues with the dash lighting to be fixed. One of the gauge lights had a short from the factory. Nothing like fixing something that is brand new.
I cut and drilled the angle aluminum for the mounts for the deck. They will be bolted to the stringers and the post will stick up through the deck with pins to hold it in place. A very simple solution to fix things.
Got the last (I think) coat of sealer on the deck its self. Now to just get the motors in so I can know just were it needs to be mounted to.
Also got the last trim pump in for the tabs. There is still some work to do. I have a leak where the lines goes through the transom and some minor work on the rocker tabs themselves. I still have to find some different bushings that wont crush so easy and want to pop out from under the washers but at least they work.
____________________________________________________________________
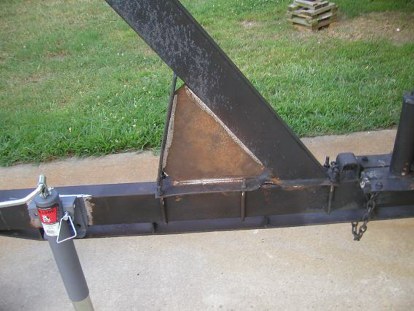
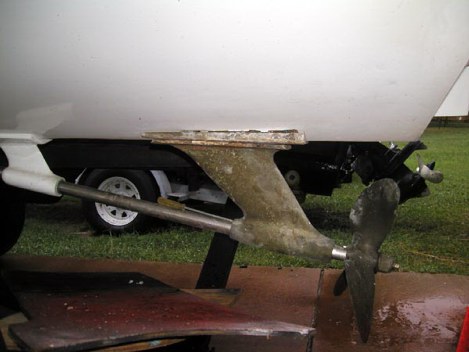
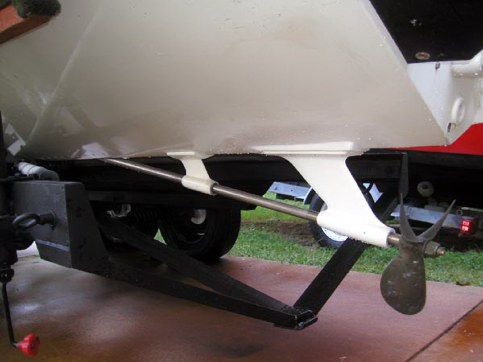
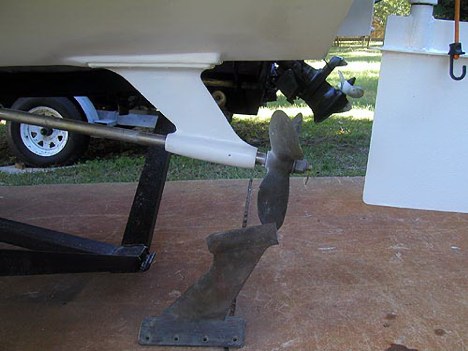
A New Strut
9/9/2010
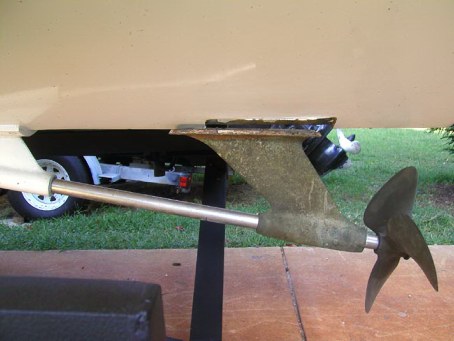
Thanks to Poodle I now have a strut to work with for the race boat. This one is about as close as it gets off the (very old) shelf. But as you can see from the pictures its not a perfect fit. That leads me to a question or two on how to go about making it work.
1, How close to the prop should this strut sit? The old strut used to ride about an inch off the prop. I ask this because
2, Can I move the strut forward, up the prop shaft? Like 2 or 3 inches? If thats the case I can fix the existing cut out and move the strut forward on the shaft so I can counter sink it into the hull. It will still need some sort of spacer built due to the angle not being standard. You can tell by the smaller strut in the picture below. See how the side closer to the prop hangs down lower. I guess that is a racer trick.
3, Last but not least if nothing else will work and I have to have the strut as close as possible to the prop can I build something that will fill in the gap between the strut and hull? I used to have a boat that had a old depth finder sender on a little wedge (shaped like a little boat) so the sender would point straight down. The boat did 50mph and it held on for decades.
Building a new one was one option until I found out how much it cost. I cant do it myself as most here know. What was needed to be done to get someone to do it also was an issue. Of course it is not a standard strut angle. Its been kicked down someby a couple degrees. Even the last foot of the ass end of the boat is up at an angle by a degree or two. The new base would have been a different size so the hull had to be fixed first. They also wanted the boat. About a 30 mile tow and so far I have towed it about 10 miles with it on the trailer. No motors = the trailer is un balanced. Have to cross the Key Bridge. That tall one in a couple the vids you see in the background. Straight up and straight down. No thanks.
So as I was weighing options and then Poodle shot me an email. He said it came from a boat with the same center prop set up and the strut sat on a flat base. Ding! Out comes the fiberglass.
Probably would have been easier to let them do it but whats the fun in that?
Im on day 4.
The first thing I did was build a fiberglass box. It was thin enough to cut easy so I could get the general shape easy enough.
After some monkey fitting of everything in place I had my general shape. I knew things were going to be a bit different on final fit but I had what I need so I could build the wedges right side up for the most part.
Now was time on the hull and it was all upside down. Lucky enough that it already had a solid backing so it was grind it out and fill it in. There is at least 40 layers of glass in there. It took days and again, all upside down.
Then again I monkey fitted it all together and got my made up wedge in place with a ton of 2 part gel epoxy on it to hold it to the hull. I also started to blend in the front to the hull.
I also had to fix the inside. I had to extend the base plate area by 3 inches. It was so nice to work right side up for the short time it took to do this. A couple (5) layers of glass over the whole thing just to clean it up. And yes I ground it all down to clean glass before I started. The picture is an in progress shot and the glass started to get wider then I originally thought it would.
Another day of glass work to finish it (99.9% of the whole thing is glass and mat / no bondo of any kind) it didnt turn out to bad. Im trying to color match it now.
Fit it all together today and got it all bolted up. A little tinkering here and there and it didn't turn out to bad. The prop shaft spins freely with no hang ups so I think I may have it right.
____________________________________________________________________
After The Strut
After getting past the strut install ...
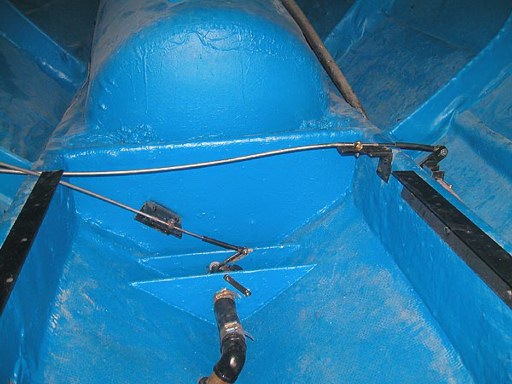
The next thing is the steering. I finally got to get this 40lb chunk of steel out of the garage. All new seals, bolts, grease zerks drilled and installed and a few of the old parts cleaned up and I can point the boat in the right direction. Now just to get it going.
____________________________________________________________________
September 25, 2010
All the loose ends I can come up with have been done. Its time!
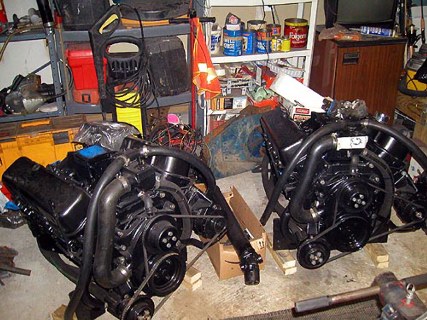
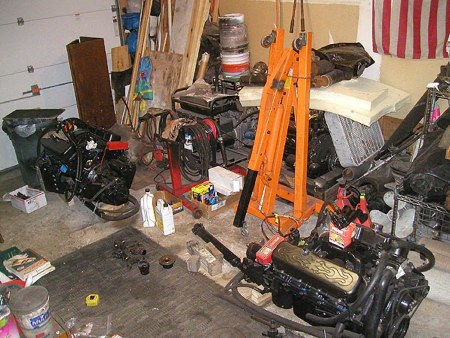
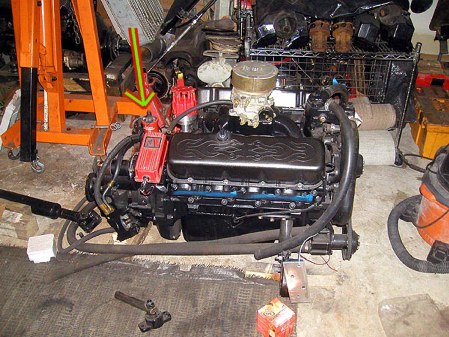
Time to blow the dust off the motors. The last couple days I have been trying to get them ready for install. I thought I was done but there was some more left to do. Nothing that would have stopped the install but would be a lot easier to do in the garage.
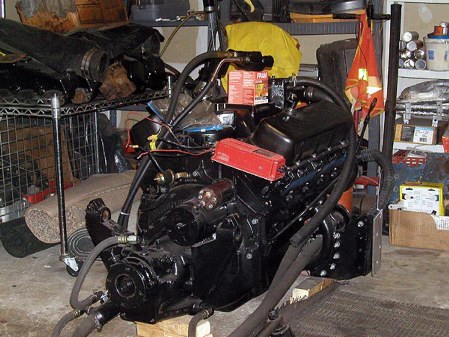
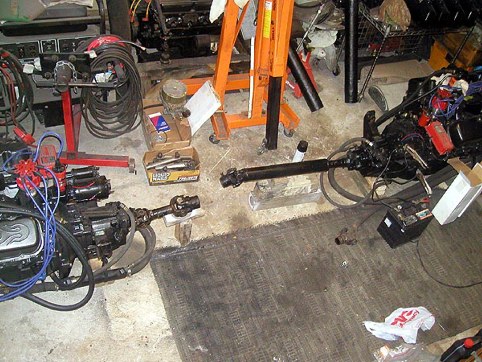
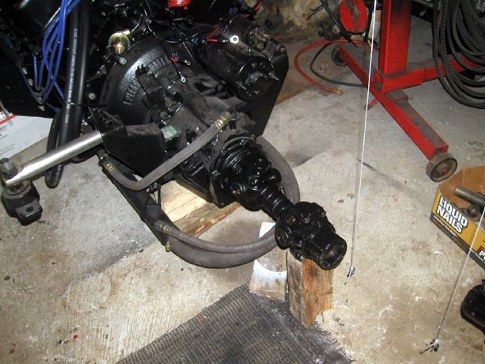
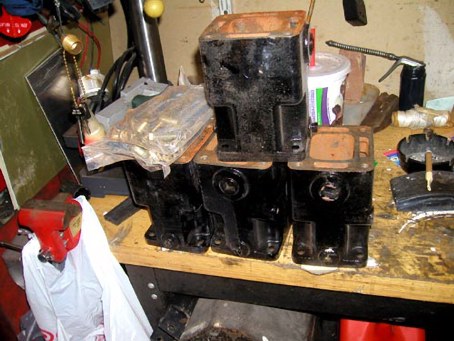
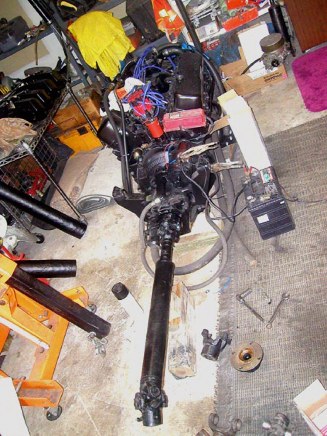
The first thing I did after blowing an inch of dust off of them was get the motors in the right position as they would sit in the boat. Got the driveshafts or what was left of them and a couple pieces I bought over the winter and started working a plan. I have to have one section cut in the small shaft (front motor) and Im not sure about the longer shaft until the parts come in that will let me bolt it all up and find out just how long it all is from front to tail. Then some hardcore measurements inside the boat to how it all will sit. Im not sure how the Ford 427s sat and how long they were compared to the 454s and the transmissions screw everything up. So Im going to make sure it fits before I have it hanging over the boat.
Ive also started some other stuff like getting the senders for the gauges in the motors. Changed some oil cooling lines around. A second look and everything was to tight so I had to make some extensions and add in a longer line so it would make it to the manifold mounting position without kinking.
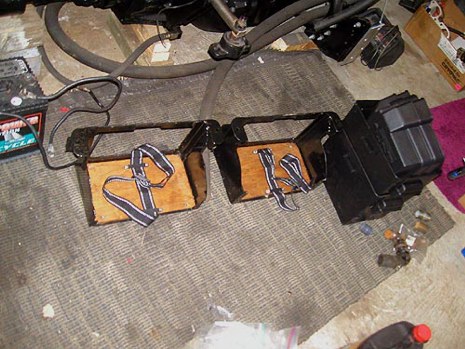
I also made these little platforms for the MSD boxes to sit on. I never though about having this much room to move things around like I can on the R/B.
While I am waiting on the V drive I can get some other things done so I am. The next thing I need to do is figure just where the V drive sits and all I have is some pictures. Its going to be fun.
____________________________________________________________________
September 26, 2010
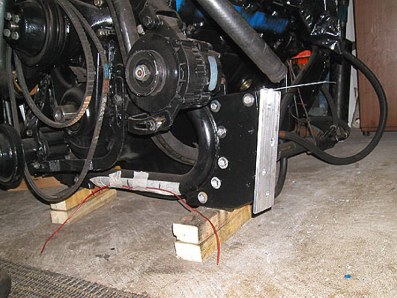
Im starting to know what writers block is in so many words. There is things to do but I have been preoccupied with a couple stupid brackets. Like I said before I have never had so much room to move things around so I taking advantage of it but 2 days on this is crazy.
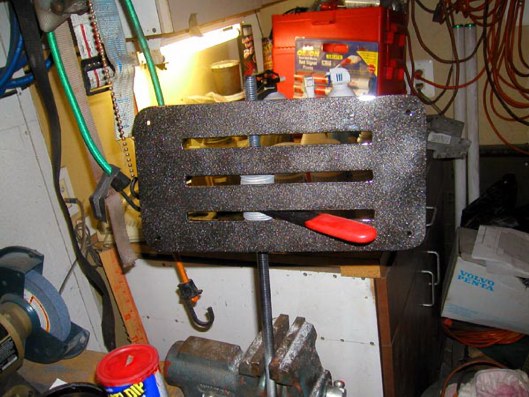
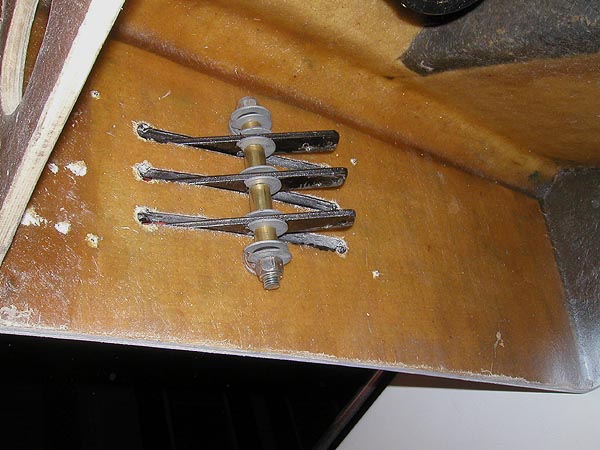
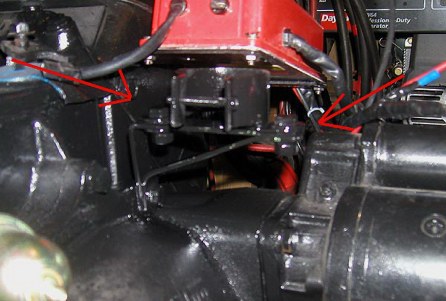
After getting the MSD boxes on the right way this morning and figuring out the wiring I had to figure out where the coils were going so I knew how long the wires had to be. Well that opened another can of works. Anywhere on the intake where it should have went meant it was crammed up against the distributor on in the way of the oil cooling lines, throttle cable coming up and the transmission cable going down or both or all the above. So between chores I had to do today and what materials I had in stock the big accomplishment today was the coil mount I made in the picture. I almost have the second one done but of course I ran out of aluminum stock to late to get any. Just another 3 inches would have finished it. I may not seem like much but for being the third location I tried to make work and the second modification to this bracket Im O.K. with it.
____________________________________________________________________
September 28, 2010
Im running out of things to do. Its not so bad but at the same time as winter gets closer it is a bad thing.
Some of the pieces for the driveshafts came in yesterday. Just one more piece that should come in tomorrow. Funny thing about that tomorrows part. I got the hard copy of the bill on Sat. Strange how it can show up 5 days before the part does.
Everything I can get done is almost done. I have even wired up the distributors even though they have to come back out before the big lift. Dont want any broken caps and such.
One thing I was glad I did was bolt up the exhaust. For some reason, even though I have used these valve covers on another motor of the same size these sat to close to the risers. So I had to do some modifications to them with a hammer. I took my time and besides where you see them sink in (with the exhaust manifolds off) the look fine. A couple more sandings and layers of paint and you would never notice it. Put the exhaust manifolds on and you cant see it anyway.
After tomorrow with the last part here I should be able to get real measurements on everything real tight and then I will know if the driveshafts need to be shortened or the hull modified or both. Then I am set.
____________________________________________________________________
September 30, 2010
Doing what I can.
The last couple days have been doing more of the stuff that
..well
need to be done but could have waited.
One thing was these exhaust tubes. They were set up for the cabin cruiser they came out of. No reason to waste them being exhaust tube is a small fortune per foot. I also needed to make another elbow so to turn the exhaust to the outside sides of the boat for the front motor. So I spent the day re-cutting the tube and fiber glassing in the gaps. Funny how many hours you can waste on something like this. After a couple coats of black paint they are ready to be cut up anyway I need them. I almost positive I have enough now to finish all the exhaust.
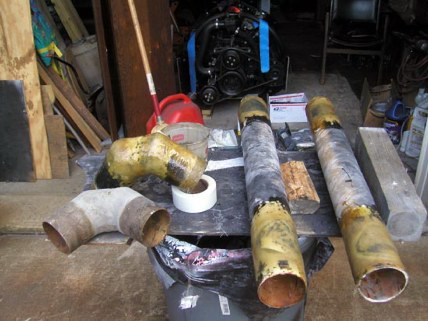
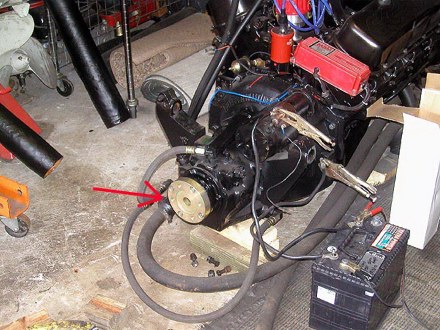
Now this is an expensive chunk of metal. 75 bucks and all it does is make one piece bolt up to the other piece. It just has the right holes drilled into it and this is one place that everything has to be perfect. I have to say after spending 75 bucks on something its kind of a letdown that it only took two minutes to install. Another weird thing is the other (front) motor doesnt need one. Its flange is already predrilled. Good thing to. I will need every millimeter I can get.
With that chunk of metal this motor is done.
Even though it was a major pain in the ass to do Im glad I dry fitted everything together. A lot of little mods that would have been a major pain in the boat. Just for the stupid coil brackets I would have had to get in and out of the boat a hundred times. Every time means climbing a 6 tall step latter. Then in the boat and then down under. It gets old.
Back to the front motor. A couple more issues. The driveshaft parts I was going to use wont work. I was having a had time finding the right flange that would work with the transmission and the driveshaft. So I built one that would work but makes the drive train to long. Yes its down to inches. I have a feeling I will need to cut the bulkhead in the front of the boat to make it fit but first I want all the original on it first to get the best measurement on it all. So the planned driveshaft has been scrapped and the old one is coming back together. A missing flange and U joint should be here in a couple days and it should be done also.
I did a quick string measurement of the motors last night and its tight. The rear motor has about 8s to play with. The front motor is over by at least 3 inches. I still dont have the V drive to know the stopping point and like I said Im using the original driveshaft. That gives me 2 inches but its tight.
____________________________________________________________________
October 05, 2010
With this piece I do the finish. 
Besides a couple little things (famous last words).
The driveshaft parts came in early. I was shocked. And a better one yet is they were all the right parts. Everything fit together like it was always that way. With that I got all the measurements I needed to figure out a few things. Nothing I have is perfect being the V drive is not there but to the best of my ability I pretty much know how things are going to go. The motors will sit at a bit of a weird angle thought. Not sure if I want to go with keeping the motor and driveshaft a straight drop as possible and make all the angle at the v drive or split the difference at where the driveshaft meets the transmission and the v drive or
. I have string going in every direction all over the garage but Im coming up with a plan tomorrow.
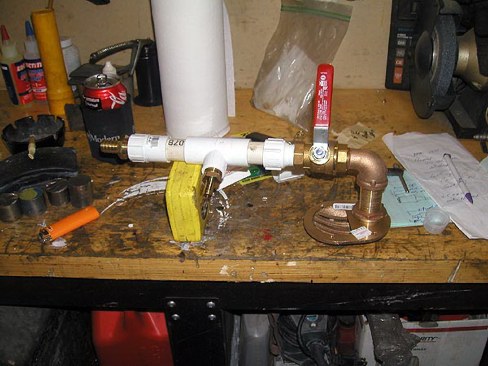
Then there is this. I didnt want to do it but it was a must. Im still not sure how Brownie had it set up unless there was splitters on splitters on every hose coming from the transom. So I made up this and installed it. Raw water pick up to 1 pipe to a 3/8 and 5/8 nipple . Should keep things cooler then before.
With having a general length of the motors I found the front one was to long even with the old driveshaft. Just by a couple inches but it was not going to fit. So the front bulkhead had to be trimmed some. Lucky I still have the right paint. Anyway it had to be done so out came the saw-zaw and it was done. I don't think anything structural was hurt. I'm still debating putting some metal on the backside.
I also found the mysterious black pipe that stuck through the stringer on the drivers side was right where a transmission mount was. As I was taking it out it dawned on me what it was for when it got flipped 180*. It was cross over through the stringer for the hose coming from the sea strainer to the front motor. It still had to go and the hole had to be fixed but now it has to go back somewhere else. Believe it or not but things are already getting tight and nothing has been installed yet.
____________________________________________________________________
October 09, 2010
Ferd calls me the other day and says, you will never believe what I found. 13 months after bringing it home and I miss it by 2 weeks. Not sure what I'm going to do about it. It was a one time cast just for the boat. The other one on the boat is bigger with a longer base. This one has a thicker base. Major operation to put it back. Not sure
.
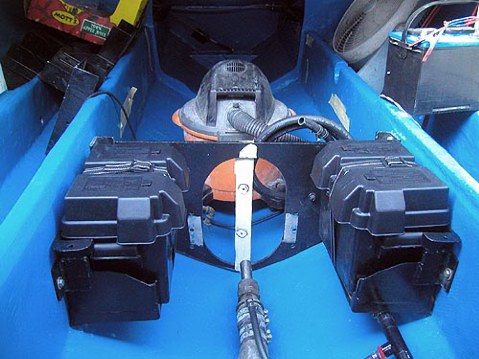
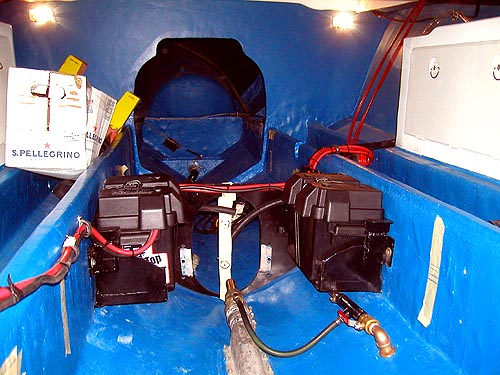
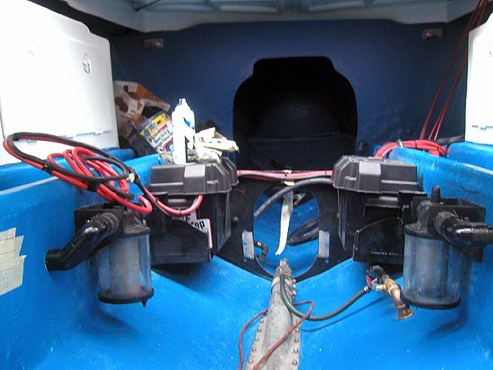
Its funny on how much time you can spend on silly things. The old battery trays were kind of home built and batteries must have been bigger back then or something because todays batteries didn't fit and wanted to fall through it. Not only that but the whole battery was exposed. Ahhhh
So I spent about 5 or 6 hours making the original trays work with battery boxes and still ended up cutting another chunk off of the trays today to make the whole thing low enough to fit under the deck. I don't think this is their original place but for the life of me I cant find anywhere where they bolted to something. So this is the best I can come up with for a location. A broken drive shaft will be caught in the cage before it got to wild and hit the batteries. Not that I'm thinking thats going to happen or anything.
Got the exhaust back from the welder neighbor. Flaps were installed and it took about 20 minutes to get the sides back in. The whole time it was out pissed me off because it was already in at one time. So this was a small victory for me.
Now the transom is another thing interiorly.
I never thought that the exhaust would be up this high. I even glassed over the holes when I painted the boat thinking there wasn't a chance. After adding 6 risers to my center rise Mercruiser exhaust thats where it goes or at least I can put it back to original without to many issues. With the boat level there will be a 2 drop from exhaust riser to the exhaust tips. Add in the boat sits lower in the ass when in the water adds to the down slope. Should be OK. Theres flappers in them also even though if water is hitting the transom that high its coming in the boat.
Now on a fun side, tell me this don't look like a old man's face?? 
____________________________________________________________________
October 11, 2010
Started off by winterizing the 19. I am so disappointed about that one. Next spring.
Went to the Monza next and got it started after sitting a month. It was to early to go out and the tide was low so I started a project.
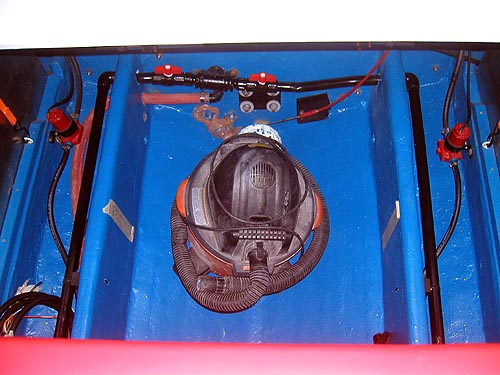
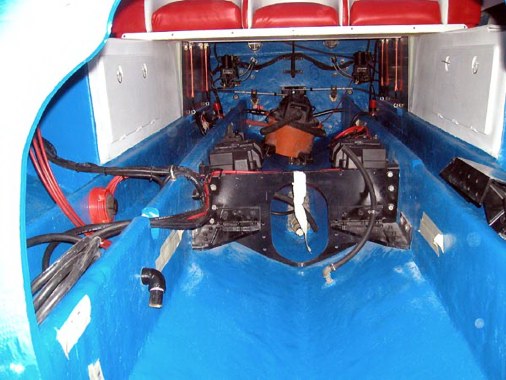
Never really intended to finish it but one thing lead to another. Got the majority of the wiring finished. Batteries in, selector switch is in, whole crap load of wiring. Each battery has a ground line that runs to each motor and then a jumper runs from battery to battery in case one ground fails. Both positive cables run to the selector switch. From the selector switch to a high amp cable connector. The connector holds dash, trim pumps power cables and both motors starter cables. Should work fine.
All thats left is hooking the wires to the motors.
Tomorrow I have an idea about finishing the water intake plumbing for the strainers and the motors.
____________________________________________________________________
Ahhhhh Cooling
____________________________________________________________________
October 12, 2010
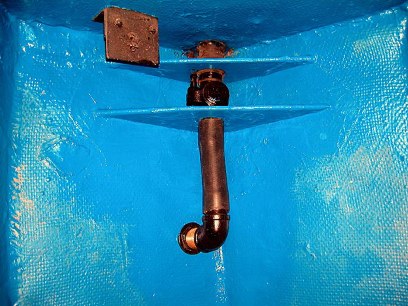
The majority of the raw water cooling lines. Went with 1 PVC painted black with plastic paint. Brownie had rubber lines running everywhere. This will be a lot cleaner without rubber lines bowing around motors and over stingers and such. They will all run inside the first stringer and have outlets of brass pipe and elbows where the motors sit.
____________________________________________________________________
October 14, 2010
Its betting busy in there.
I know some will bitch about its not the way it was but for me it works. And for that matter I like it better then it was. This is not longer a Florida boat and things have to functional for a Maryland environment. What am I talking about? Winter.
This thing has to be winterized every year and I am starting to see that it can be difficult or easy. Just depends on planning. It definitely will be wet. This boat holds a ton of water in the cooling system.
Everything runs inside the first stringer and is out of the way of the motor mounts.
Hose on these runs would have sagged, had to be bent over stuff and would've had to cross the bilge at least once and that would have been the place all the gooey stuff would build up and sit.
Still took a ton of money at Home Depot to get it done and I even had some stuff. But it was a lot cheaper then going with the hose and like I said, I like it better.
So it's official, I am out of stuff I can do. I can install things like the driveshaft cages but if I do and need to make a change on the fly it becomes a major pain if they are in. All the wiring is in, the cooling is in. I have a couple small bugs I'm still working out with tabs but thats outside and they do work fine. I have to wait on the deck (floor) install until after the motors are in. Its sitting in the garage ready to go along with the "L" brackets it will anchor to the stringers with. The motors should be plug in and play ready. I'm waiting on installing the exhaust on the motors if it kills me. I need the manifolds off to drill the holes in the stringers for the motor mounts and I'm not cutting one inch of the exhaust hose and tube until I know where it goes. I only have maybe just enough and that would just be stupid.
I figure a day to set the motors and get everything bolted up right. A day for exhaust. Man, I could be riding by Monday. 
____________________________________________________________________
V Drive and Other Stuff
October 22, 2010
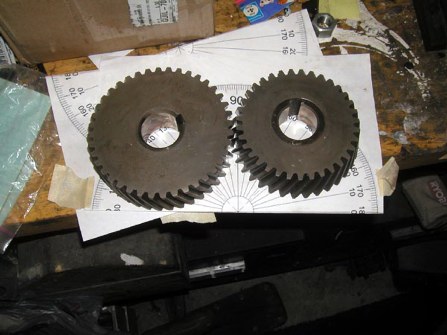
I found gears, I think. Holding breath until the show.
At the moment I have a guy sending me gears for 300.00
Andy Casale said he also has gears for the V drive for 500.00 so I have a plan and a back up plan.
____________________________________________________________________
October 24, 2010
Safety day.
Like I said I am out of things to do so I wonder eBay looking for this and that. I know I have the 19's rebuild coming up but it's still race mode right now.
One thing I noticed is the folks that ran the Bahamans 500 (you had to watch the whole 30 minute video) all the racers were required to have a few safety items onboard. Not that I will be 50 miles offshore anytime soon and not that it helped Brownie when he was broke down and stuck in the boat for two days but what the hell.
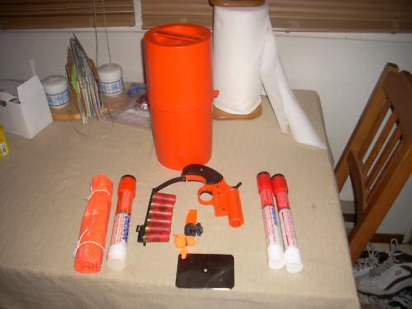
So I scan for deals constantly. I'm not paying full price for this stuff. I have plenty of time to shop. Picked up 2 fire extinguishers (one for each side) a couple weeks ago at Price Club and this Orion kit on eBay.
Then there is this.
I kind of figured that lanyards were a must. I didn't want them sticking out of the dash so I made a bracket so they would stick down just behind the dash. Everything was working perfect. The bracket was built everything was wired and ready to install. After lining everything up I found I need to extend the bolt hole in the bracket because the dash curves. So as I'm doing it I nick one of the switches. Well I'm not trusting that so out comes the voltmeter and something was not right. Not only with the one I nicked but both of them. You pull the lanyard off and power flows through them. Put the lanyard on and the power is cut off.
____________________________________________________________________
October 24, 2010
There here.
Fingers are still crossed.
____________________________________________________________________
October 27, 2010
I'll let you all in on a secret. The gears have to hold up to some bad stuff and to be honest I would have changed some stuff if I was going to drop in 800hp (each) motors in this boat's set up.
The last few days I have been on the hunt. Not for parts but for information. Its been awhile since I've done it so it was time for some updates on the boat if any.
One thing that I did find out was this boat was the experiment and not necessarily the right way of doing it.
Ran across an old post by Brownie the other day from 2005 on OSO. And that brought up a couple other things that Brownie mentioned on Donzi.org a couple weeks ago. One thing mentioned was, why I was using a reverse rotation and a standard rotation motors? Brownie said I would need two standard rotation motors. One to the top shaft in the V drive and one at a 12* angle to the bottom gear. It makes sense and if I would have though about it and in the beginning I may have done it that way but there was something wrong with that theory in this boat. Two standard rotation motor into a two gear V Drive would not spin a right hand prop the right way. To make it simple forget about the rear motor. Think about putting the front motor in to the bottom gear. Looking at it from the front the motor spins clockwise. Putting the output of the tranny end to the bottom gear or basically to the prop shaft that is attached to the other side you would have to use a Left hand prop. The prop that is on it is dated 8/1969 on its side and its a right hand prop. Add in if the rear motor was standard rotation but being backwards going to the top gear (that spins the bottom gear the opposite way) things are not working out for a right hand prop at all.
So I think Brownie had the fix in mind when he mentioned the motor set up. Why do I say fix? Apparently there was an issue about putting all the HP and torque of two motors into just the top gear and that would burn them up. So later they decided to split the two motors by making one go to the top gear and one to the bottom gear. Sounds like a great idea but again I know this boat was not like that originally.
Also for the split to work you would need both gears exactly the same in the V drive. Same size diameter and teeth. If not one of the motors RPMs would be different from the others. The V Drive did not have the same gear in the top and bottom of the case and I don't think anyone changed them and the prop just to make it the old, not so desired way.
Lucky enough also I will be using transmissions on both motors and that should lighten the load on the gears.
I know part of the problem had to be running a direct drive and a crash box to the ends of each motor basically tying them together. I'm sure that put a lot of stress on that shaft and gear until you got the motors evened out and in big seas thats not gonna happen. Now if one motor gets ahead of the other the one motor will feel like its rolling down hill instead of being forced to spin by the motor thats running fast. Forcing another motor to run faster then you are feeding gas to it by a second motor has to be bad. Just the chance of running it lean and burning a piston alone is to great to do it without transmissions.
The gears went out to Mad Poodle this morning. Scott should have them by Friday and then the waiting game begins, again.
____________________________________________________________________
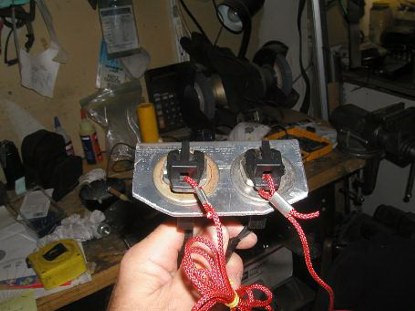
October 28, 2010
Yesterday the proper kill switches and lanyards came in and with a little work they we set up and ready for install. Today came and I wish I would had installed them before I put the steering in. Everything was in the way to get to the wires I needed to get to. I hate doing something after I have already done everything else around it.
The ends come out just below the bottom of the dash so you can see them and they are not obstructed but at the same time they are not to obvious.
I'm glad it's done and I should have thought of it earlier. The last thing I want to see is this boat sailing along without me so this will let me sleep better at night.
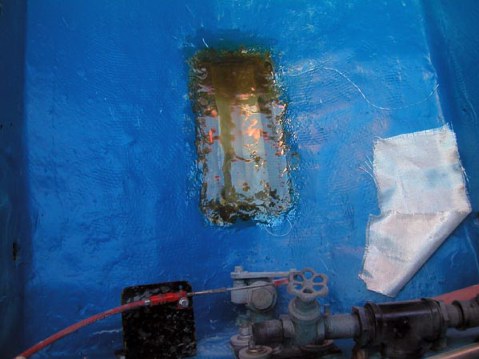
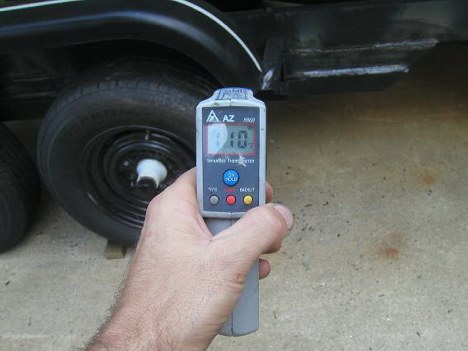
Here is something that I totally forgot about that may interest some. When I cut the hole for the water pickup for the Vdrive and the stuffing box I ended up with a kind of core sample of the boat. So my hole saw wouldn't get jammed up with fiberglass I didn't take it all out in one cut so thats why I had to use the vice to hold it all together but I cranked it down about a hard as it will go and this is what it measures at. Never had a boat with a inch thick hull. Didn't even know they made such a thing.
____________________________________________________________________
eBay Ass
November 07, 2010
Risers------- Well I thought I had this taken care off 6 or 8 weeks ago. Then it turned into a fiasco.
Hunted for weeks, sat on a auction for 7 days, rearranged my schedule and made sure I was in front of a PC and eBay at just the right time. Waited to the last second and made my one and only bid. Worked perfect like normal and I made the score. Four, six inch riser extensions deliver to the house for $200.00
Don't sound like a deal but after pricing them it was at least 35% off list price or anyone else that had them for sale. Hell some people wanted twice or three times that.
So its done and I move on to the V drive. In most cases I wont even think of an eBay item showing up for a least two weeks. Not that they all do but after two weeks is about the time I will send the seller an email asking if I should still be waiting on it. This time I wait and then send my email. Couple days go by and no reply. I send another just in case you didn't get the last one email and wait. No reply. Here we go. I go to pay pal and get a little info on the guy (email address) and start web hunting him. Got home address and phone number (there is so much info out there on the web, be careful folks). Filed a complaint with eBay and PayPal and start burning up their phone. Never did get an answer and after a waiting period eBay ended up giving me my money back.
Now I'm pissed. I'm back to square one on this one last thing that I have needed from the start. So I start the hunt again. Couple weeks go by and I find another 4 of them (2 auctions from the same seller). This time I email the guy with a question or two and even make him a offer of a $150.00 + shipping for all 4. He comes back with the info but wont take my offer. He thinks they are going for big bucks because he has had a couple hits on his page. I didn't want to burst his bubble but he made a mistake or two. First, he thought the over priced comparisons on eBay that don't sell was the going rate, no reserve and he had them listed buy the wrong name or as exhaust spacers. Another three days and at 5pm Friday (another timing mistake) I snipe both auctions. The first set was for $37.00 and the second set was $42.00 Add in shipping and it was less then hundred bucks for all four.
I had them in three days and they also comes with gaskets, bolts, everything for a much better deal then the first.
____________________________________________________________________
Stringers In a Can
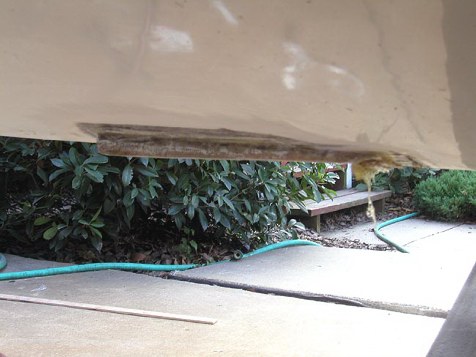
November 10, 2010
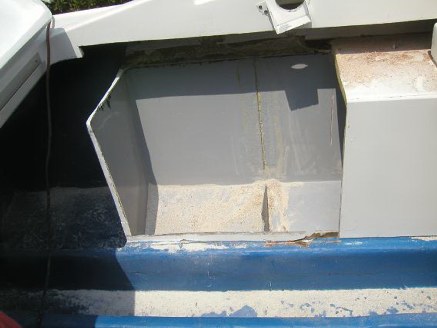
Been going through a bit of a dilemma the last few weeks. The stringer cores in the boat are rotten. Half way up to the bow on the passenger side and all the way to the bow on the drivers side.
I kind of knew there was something up this whole time but .... the stringers are so thick (fiberglass) along with the hull being so thick I never gave it a second thought. Figured they were just something for the deck to sit on anyway but the last few weeks it has been getting on my nerves.
Originally I first thought they must have been hollow core or foam or something like that from the factory. It seemed like when I would drill into them for something (not like it happened often) there was nothing there. I mean nothing. Just hollow glass. Then I installed the cooling. Even though when you felt around the rear drain holes there was no rot and was solid, when I cut the holes for the cooling I found wood. Just enough for a hollow box for the mold or something. Then I started digging around (finally had a hole big enough to) and found a wood knot as wide as the stringer.

It must have been a super soft wood because it's gone. The volume wood in there for the size of the space doesn't seem to be the same at all. Maybe termites ate them up? Anyway around it though, it leaves me options (making lemonade out of a lemons here). The last set of stringers I did 15 years ago (I'm so happy there is none in the Monza or 19 Nova) meant basically cutting the boat up to get them out and rebuilding the stringer from scratch. This time I have a plan that will be a mess but will be a lot less work, money and will be as strong as it ever was if not better.
So again the first thing I do is some research and ask a lot of questions of the right people and come to some conclusions. First, taking the tops off the stringers would be a very bad idea. The original Fur wood inside was never meant to be structural just a core for the glass lay up. I guess that's why they didn't care if they used a sponge for wood. All the strength of the stringers is in the half inch thick fiberglass box around the wood. Taking the fiberglass top off of them would weaken the over all stringer by half. Even if I did get the tops back on, to rebuild a half inch thick layer of glass would never happen unless it looked like Frankenstein's baby when done.
So now I'm pulling my hair out on what to do. To leave them would be OK (even though I would hate it) but there is one thing I'm afraid of the bolts that hold the mounts for the motors and trannys are going to squeeze the somewhat hollow stringer and over time from all the torque and heat cycles will elongate the bolt holes through the stringers.
So there is taken the tops off that when fixed and finished will be weaker then they are now or taking a (as small as it is) risk that something will happen in the future. So what to do, what to do?
After weeks of thinking on it an old project idea hits me. I had a situation before that needed pour in liquid wood. Two Part closed cell foam. The good stuff. The kind they make street signs out of and the same stuff I used on the 19. I still have some from 3 years ago mixed up and expanded in a cup in the garage. You can still hit it with a hammer and not leave a dent. So filling part was figured out.
Now how to get the old stuff out without destroying the stringers strength.
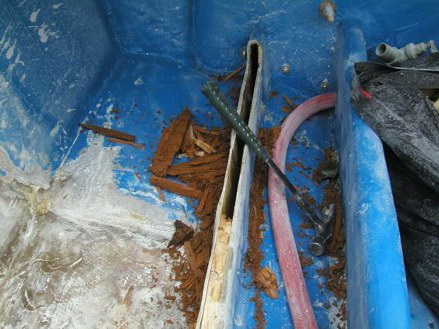
Today I started that part. Its going to take a couple days. Lots of simple tools. Lots of crazy ways but it seems to be working.
This is a little of what it took to get everything out of there but the most important tool is not there. My trusty Shop Vac. I would start with the hole over top of the bottom outlet hole. Grind up the stuff inside, fish it through the hole and then move out from there.
After 3 days of this I now have stringers in a can.
I was lucky. For the most part what was left of the wood came out pretty easy with my assortment of tools. Drill, drill, push out with a chunk of all thread. Repeat with some chopping and breaking up chunks with needle nose pliers. Suck it all up with the shop vac. I think I got it all where it was bad. There is one spot I want to go over again tomorrow that will require pulling the bolts out of the V drive plate but this is a one time thing and will be done before it's time to pour. 
Stringers in a can.
I love this stuff. Searched for something like it for a long time when I had to fix the 19s strikes. I forget who mentioned it but I do owe that man a beer.
____________________________________________________________________
November 11, 2010
Started the pour. Made it all the way to the last 3 feet of the last stringer to fill. And it's even half full. Then I ran out of foam. Oh well, even on a cold day (the reason I'm doing it now is the weather is still warm enough out and I have nothing better to do) I can heat the stringer up enough for the foam to work. At least for the time being I can get the fiberglass plugs in and painted back up so no one will notice it been done.
Last, I have to admit the one of the main reason I am doing this is a post I read on OSO. Some guy was looking for an old raceboat. One of the first post were, "I have never inspected an old raceboat that didn't have wet or rotten stringers, stay clear". Now I don't have that worry about that anymore if I ever sell it (not that I plan on it but stuff happens). It's real hard to explain to someone that has never seen a stringer set up like this before that the stringer cores had little use after the glass was cast. Now I wont have to.
____________________________________________________________________
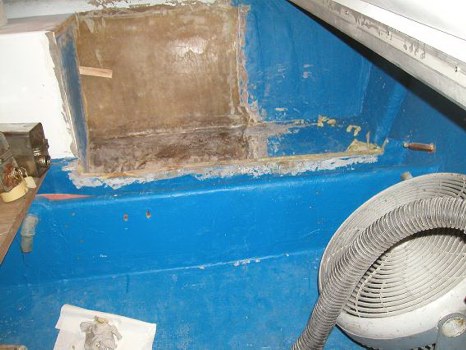
November 12, 2010
Man, ever since I started this project I have been afraid of this happening and now its has.
What a mess!
I got all the access holes I cut ground down and glassed over. Then sanded and painted. Only got one coat of paint on. It was taking forever to dry so at 7pm I gave up. I still have four holes in the top of the last stringer to fill so I can put another coat on then. The last 4 holes will be hand sanded this time to keep the dust down. I thought about doing it for about a second when doing the other holes but gave up on that idea real quick because there is so many. I thought it would have been easier just to clean the boat after then hand sanding everything. Hummmmmmm
It's getting better.
____________________________________________________________________
November 17, 2010
Got the 2 part foam in today to finish what I started. Another 3 or 4 hours just because I had to pull everything back out again to do it. I was waiting for the UPS guy to show at the door all day and figures he comes late in the afternoon. I needed to get it done today. This may be the last day (here it is November) that I would be able to get the foam to work proper without having to heat the boat for a bunch of hours. I used a space heater to warm the stringer I was working on at the time but overall the boat was warm enough. Tomorrow doesn't look like it's going to be so the rush was on.
Again this foam stuff is awesome. Just mix and pour. Its hard to tell because of I used blue tape to cover the holes but thats basically what you do and being this was an end of a run I had to leave a hole in the top open as a pressure relief valve. Thanks to this stuff the stringer is packed now with minimal damage to make it better.
Having plenty of foam this time and not needing a missing chunk now that the water pipe goes through the stringer, I fixed the sawzawed out horseshoe in the stringer that has been there since the first motor install 40 years ago.
It was as easy as making a mold out of tape and filled it with foam. When cured I ground it down flat and put a few layers of glass on it. The paint is still wet in the picture and it still needs to be painted again but the big hack out is gone. 
____________________________________________________________________
Winter Sucks
December 29, 2010
Thanks to a little deal the other day I picked up an exhaust system accustom to the 496 thats in the 19. That means that the aluminum GLM manifolds that are in it now don't have a home
..well
ya they do. Honestly I had it in the back of my head before I ever even thought about buying the set for the 496. I knew if I found a system I wanted I could pass the exhaust on to something else. I wanted it in the race boat but I have been looking for about a year for another set of GLMs and everyone says they have them but then they don't. So no match set is not worth the hassle. But then the 496 exhaust came up real cheap and I get an email from Dennis of Dennis Moore Performance saying (now this is after about 11 months of back and forth) he has one set in his shop and knew I wanted them. Sold!
Now I have a match set for both motors. Just by using these I am dropping between 100 to 120 pounds out of the boat and thats even weight across the hull so no balance issues either.
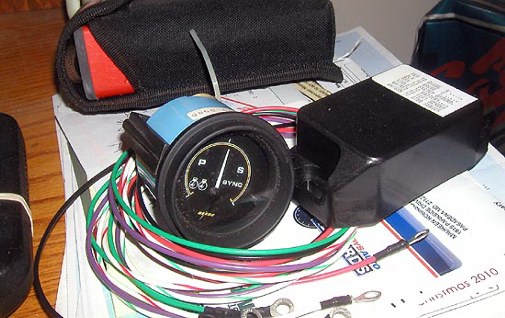
I also picked up an engine sync gauge system. It doesn't match the gauges thats in the boat but I contacted the folks at Beede and they are mailing me a Euro style, black bezel free of charge. How cool is that!
I want to mount it over the throttle. Never considered it. I hope there's room.
Mad Poodle called and said the gear box should be ready mid January. Its a little cold out so he has time.
____________________________________________________________________
Looks like it's getting to be to much for just one page.
____________________________________________________________________
More to come!
____________________________________________________________________
The SuperNova19 Network