THE SUPERNOVA 24 RACE BOAT
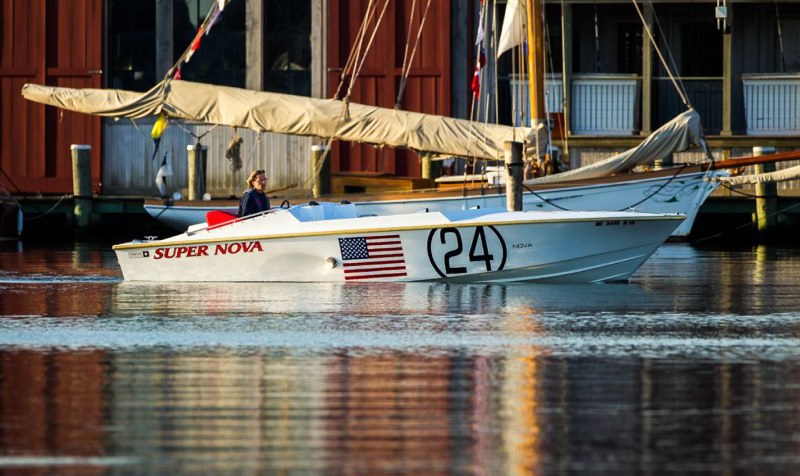
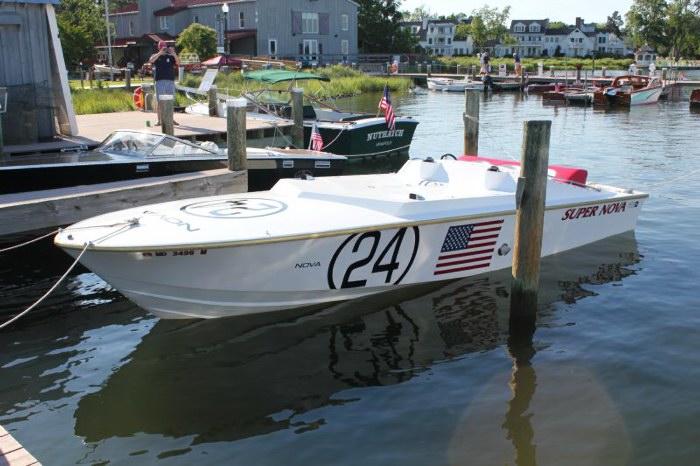
Scott Bruce took this picture at the St Michaels Boat Show June 2016.
We call it "Early Morning Noise"
____________________________________________________________________
____________________________________________________________________
____________________________________________________________________
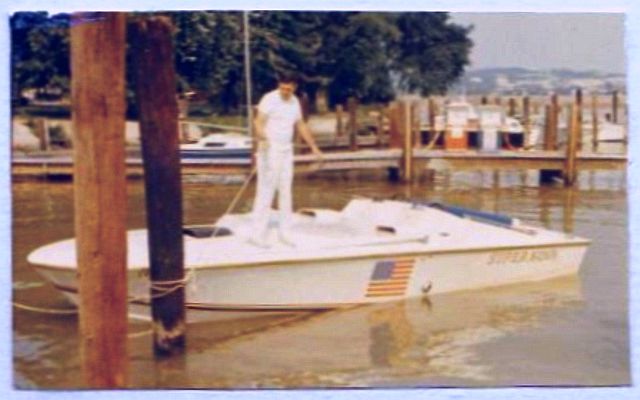
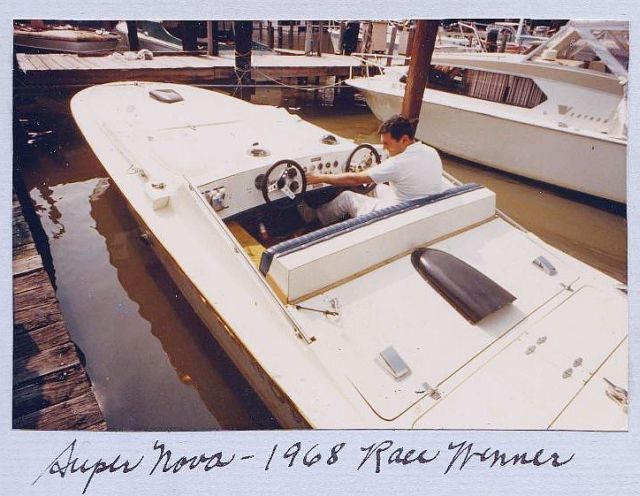
Blast From The Past
A couple pictures right out of a family photo album of one of the past owners. Notice the caption written under the second picture. Still trying to figure out what race it was.
Every picture we see from it's past there is a hundred differences in the boat from picture to picture.
____________________________________________________________________
Getting Started
January 8, 2016
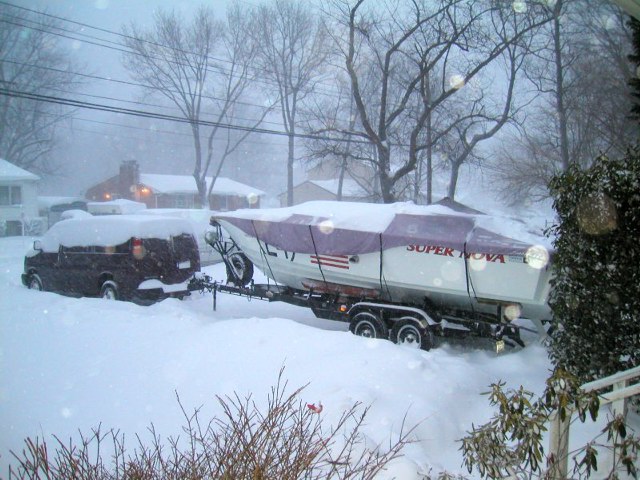
Florida boats don't like no snow and neither does it's ex-Maine resident owner.
Its been a great winter so far with temps in the 60s and 70s going into the new year but now winter has showed up in force. Kind of sucks but at the same time there is only so many more days it can last and then spring will be here. Our main finish line of winter is when you no longer have to worry about a hard freeze breaking things. From there we can deal with it but for now we are chomping at the bit.
Have new vents and vent hoses for the bow. New dipstick / transmission plugs, some labels for the cockpit along with other things. Not to mention the ideas we have about changing the seats and the rear motor cover hood scoop. Still haven't found a new base line prop to start with this spring. Then there is the boat show coming up
We soooo want to get started.
____________________________________________________________________
January 2016
We're not sure what day it was or is for that matter with the weather / blizzard and other little, intense projects going on. One of those projects meant it was time we really built an outdrive for the 19 and like normal it got way out of hand. Ended up building two and almost a third but that's for the other page.
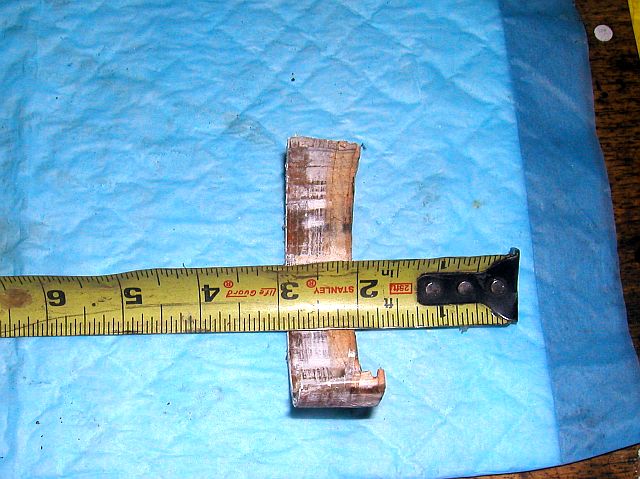
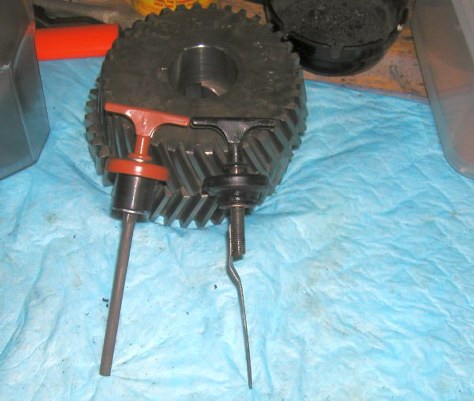
One of the little things we did while we were trapped from the snow was build this prop puller. Always look on eBay and such to see if one went up for sale cheap but there must be a prop puller cartel or something because we have never seen one cheaper than $80 bucks. And that was for one size and we have two boats with inboard props that are two different sizes so we were looking at a $160 bucks for prop pullers. That wasn't going to work so we got out our hardest steel we had in stock (we also made the tranmission mounts for the 24 with the same steel) and got out our welder and spent a few hours turning scrap into money. To some it wouldn't be worth the time spent doing it but we look at it as a learning experience (welding practice) and saving money while sitting around watching TV or listening to the stereo in our living room-garage.
We use a couple 5/8 nuts, a chunk of all-thread and a left over steel point from an old stripped out harmonic balancer puller to finish it off. We also made a steel insert so we can use it on the smaller boats prop to.
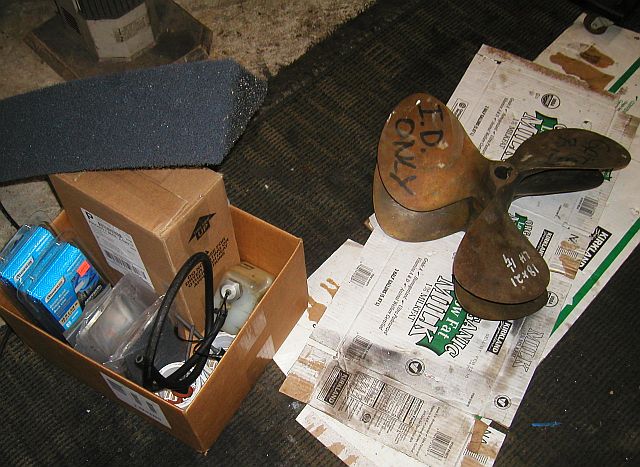
So we are filling up our box of stuff for spring projects and yet this is for three boats and it's not even full. This is not a normal year thats for sure. Not like we don't have much going on. It just seem like we have most of it done already. One thing that we have played with and not sure if we are good enough without the proper tools is props for the race boat. We spent a lot of money and time last year rebuilding driveshaft connections, prop shaft connections, cutlass bearings, prop shaft, etc, etc so we really thought we needed a real factory base line to work off of when it came to props. We had props with numbers on them but without the blade blocks on the right table it was all a guessing game for the precision we wanted after it all that was done so we took two prop to Millers Island Props. Really wanted to go with just one but by the time we get to test it they will be backlogged and it will take weeks if not months to get work done. So we took two with our best guess from the test drives last summer. One thing we do know is its going to hurt when we get the bill.
____________________________________________________________________
February 11, 2016
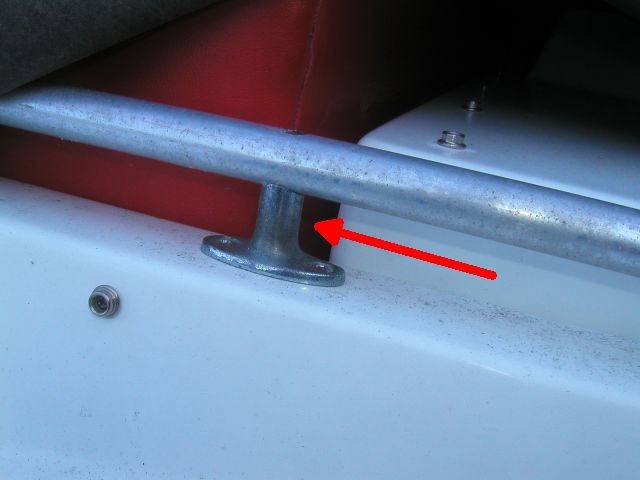
So we get this break in the weather (40 degrees) and we have been looking at parts of a project sitting on a shelf for a few years now that keeps getting pushed back due to other things and whats involved for a non-mechanical small gain. In other words, its just for looks. Lol. Its these little handrails on the sides of the cockpit. The boat is pretty dirty in the picture above (top ripped
blizzard
winter
) but the handrails were never the right ones or had the right luster being aluminum. They were also bent and parts of it are 50 years old and the chrome is missing and on and on. Time for a change.
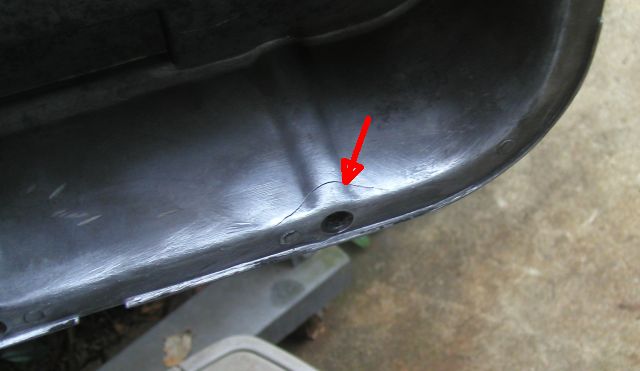
So we braved the cold and spent an hour or so removing the old railings off the boat. We really wanted the little posts off (the arrow) because we couldn't find them anywhere. Since they already have holes in the boat for them our only option was to remove them and after making them a bit shorter so they would fit better we sent them off to be re-chromed. Probably going to be the most expensive part of the whole project and our guys at Als Polishing Shop are very reasonable.
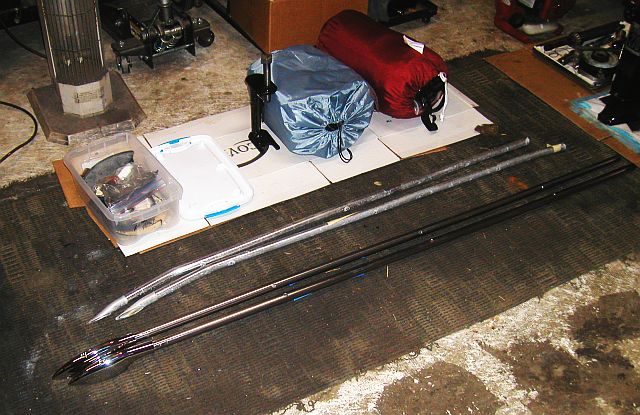
We also found a couple nice rail ends that will cover the old screw holes from the old railing ends. Brand new for $12 bucks each. Thats what we were hoping for with the little posts but at least we found the ends cheap. What started the project is we had a couple 7/8s stainless steel handrails from a burned out bass boat that we salvaged years ago for the 24. They also came with posts so we didn't think we would even need the original posts but we then found the new posts didn't cover the old posts screw holes and were also too tall so we couldn't use them. Now the issue was they left a ring around the railing where they used to sit when installed on the other boat. Real nasty looking rings and the rails were like $50 bucks each. Funny how these supposedly free projects turn into real money if not careful. Lucky enough we had the fix. First we only used the best part of the railing tube making sure the worst was in the most hidden places if not cut off all together. Then we went to work with fine sandpaper, steelwool and our polishing tools. Started to make the repairs look better than the rest of the rail they came out so nice. Went back at it with the steelwool to dull it down some. We want it to look like the rest of the stainless steel and not a mirror even though it wouldn't take much to get it there now but we achieved what we set out to do so it was time to move on and make some holes.
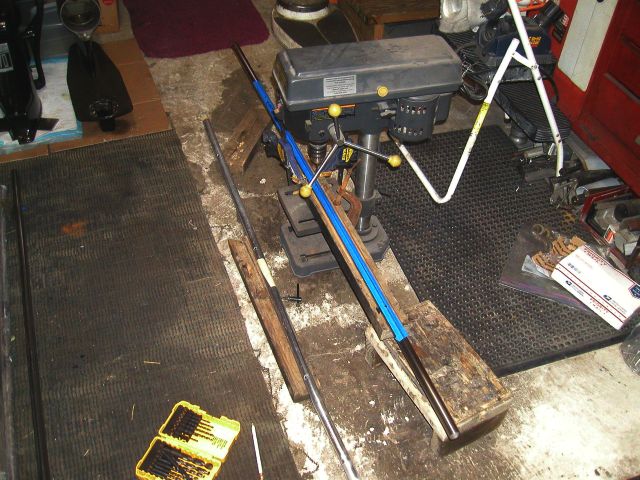
We flipped the old railings over and used painters tape to mark the railings so they stayed in order and the right direction and then transferred everything over to the new railings including the screw holes for the posts by taping over the holes on the old rail, cutting them out and then pealing the tape off and putting it on the new rail making sure we kept about the same tension on the tape when sticking it to it. We then put it in our piece of wood with a channel cut out of it (looks like for pallet strapping) and ran a pencil line down it to make sure the holes would be in line in case the tape pulled off from side to side. We then used the same wood and clamped it in place on our drill press so it would hold the rail from spinning and drilled out our holes. We then flipped it over and chamfered out the top holes so the heads of the screws that go in from the top will be counter sunk into the railing. May require a little fine tuning for each screw but the major part is done and done square being it was still in the block in our drill press. Left the rail a little long on both ends for later alterations. Now we just need the pieces back from the chrome shop and for it to warm up a bit.
What a difference already.
____________________________________________________________________
February 21, 2016
Als Polishing Shop never keeps you waiting thats for sure. Seems like every time we send something to them it comes back faster than it did the last time. This time was no exception and like normal the work is exceptional and very reasonable priced.
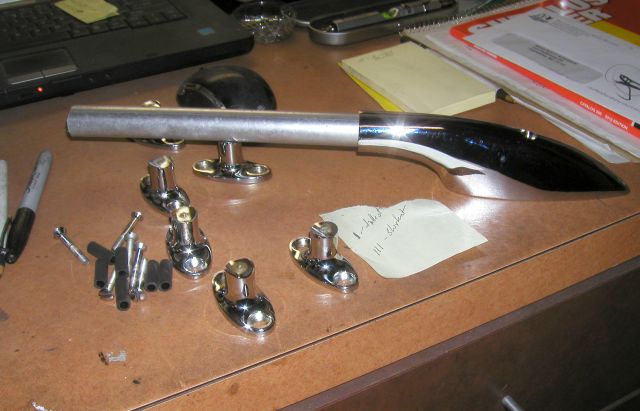
Like we said before we trimmed down each post's top with a drum sander so they would fit better with the new shorter end piece. So after they were chromed we had to figure out what post went where without any markings on them. Next time we will put better marks on something that has to stay in order before going to the chromer. The reason they had to be shortened is because the original railings just stuck straight out with no end piece. Nothing like having a one inch chrome pipe sticking out into space on a boat. That wasnt going to work so we came up with the last set up and just bent the railing over the post and used an end that just nosedived it into the deck. The main issue with that was it didnt leave much to hold on to, a railings main purpose.
Today a warm day showed up getting into the high 50s which is pretty warm compared to the last few weeks. We got it all the pieces figured out and numbered along with new screws for the posts and 4 inch thru screws for the ends so they will be super secure.
We pull the boat cover back and find a super mess because of the nasty winter and the piece of crap cover not doing its job but thats not what we were there for. Just wipe off the area in question and move along. First we get all the center posts in and then measure from the rear post to the rear socket the railing sits in and cut that end off of the new railing to fit. Then get the front end piece where we wanted and measure from the front post to the front end piece and cut the extra off of the new railing tube. From there it was just screwing it all down and then repeating it on the other side.
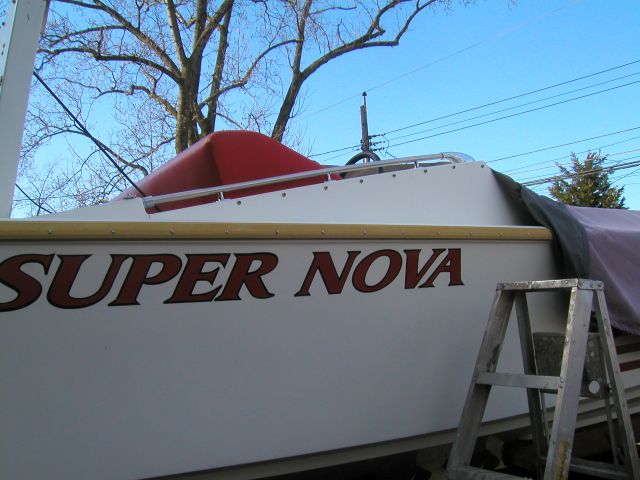
The two ends pulled the railing down real tight on top of the center posts which is good being we didnt want the little screws that hold the railing to the posts to have to do too much work. Like it is they shouldnt have to do anything but fill the holes. Overall the new railings are a great improvement. Pictures dont do them justice. Straight, super solid, clean, no dents, no sharp edges or anything to get caught on and best of all they match the rest of the boats railings perfect. One project off the 2016 master list.
____________________________________________________________________
February 24, 2016
With the new railings installed we had to remake some of the cockpit cover we just custom made for it last fall. Never have actually used it yet and we have to take it apart and try to extend it where the ends of the railings are now taller. Lucky enough we left extra on it with the project in mind but it took some serious alterations and a lot of sewing machine work to make it happen. Then had to install it again, mark where the new snaps would go and then install them just to roll it up and stick it in it's storage bag. Have no use for it now but if we tow the boat anywhere we will and it should be ready to go.
____________________________________________________________________
Gears And Go
February 29, 2016
Happy Leap Day!
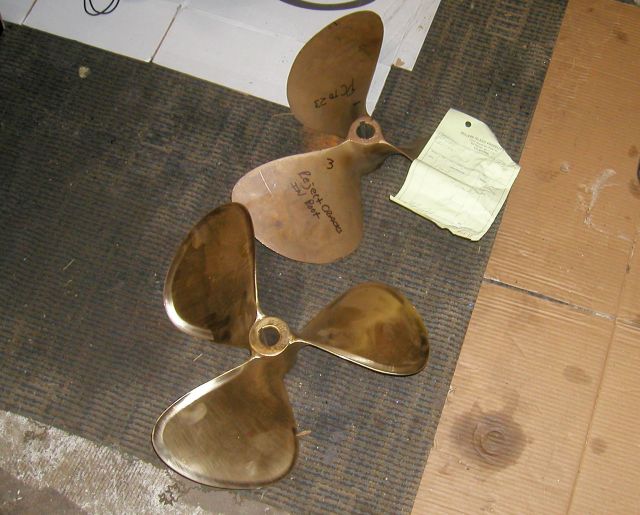
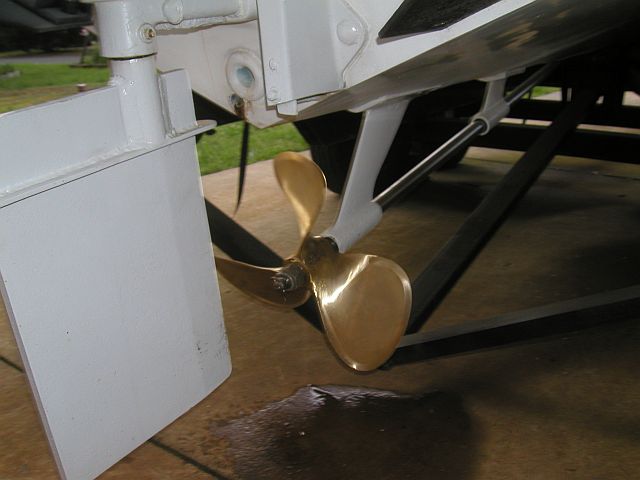
Got the props back. They found micro fractures in the blade roots of the prop we just bought. Not super bad but they wouldnt re-pitch it because of them. Also the prop we took off the boat was now the same size as it was so we decided to have it checked for pitch and left it alone. It will make a good back up prop. The one we did have reworked is beautiful of course. Millers Island does great work. Its now a 17X21 left cupped and balanced and ready to go.
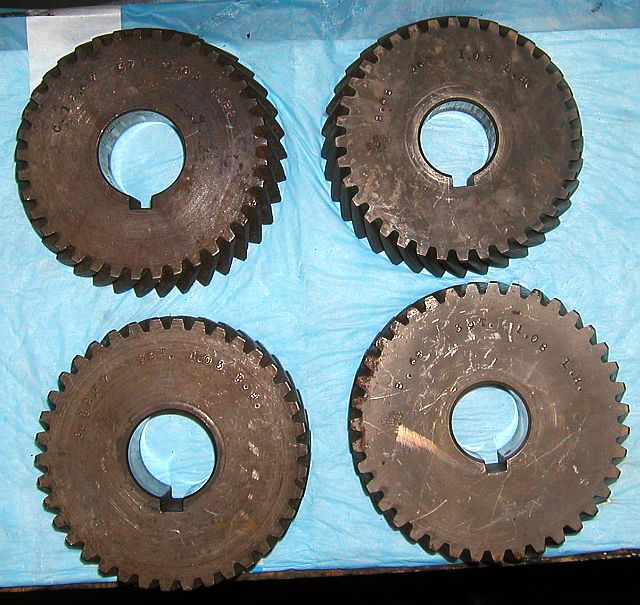
We would install it but look what we found
.
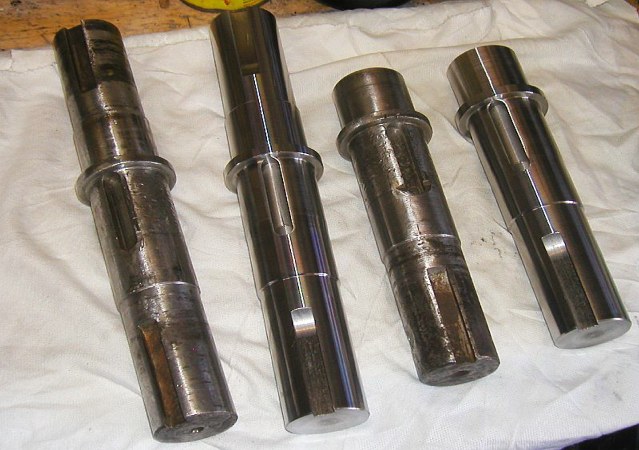
Cruising eBay and ran across these (on the right). They are the same gears for the Casale V-drive except a little smaller. When we say smaller, the old gears are a ¼ inch thicker and the holes in the center are about a ¼ inch to small but beside that they were Casales and over all measure to the same size as the old gears so we risked the $200 on a chance they would work. Never considered the hole in the center was going to be an issue but when they came in we knew right away the shaft holes were to small. The seller gave some pretty vague sizes when we asked them about it but we still had to have them. So we hit our local machine shop and they were like "no we cant do that" but they did give us a couple places to go. One said they could do it. It's pretty scary having to take your 50 year old V drive gears to a place that built NASA space shuttle parts just to be drilled out 1/4 inch and a key way installed. They also want a month to do it. Again, scary.
____________________________________________________________________
March 14, 2016
Hell of a time to be cutting holes in the boat.
While the new gears are hanging out with some folks with NASA connections we figure its time to get something done. But once again we are at the mercy of the weather in March so its spotty when it happens.
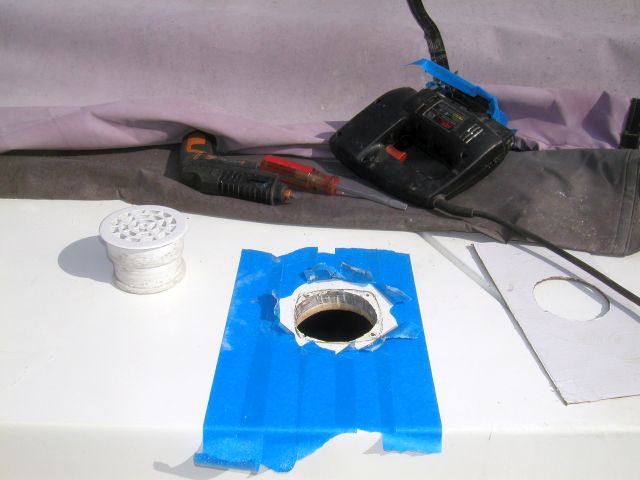
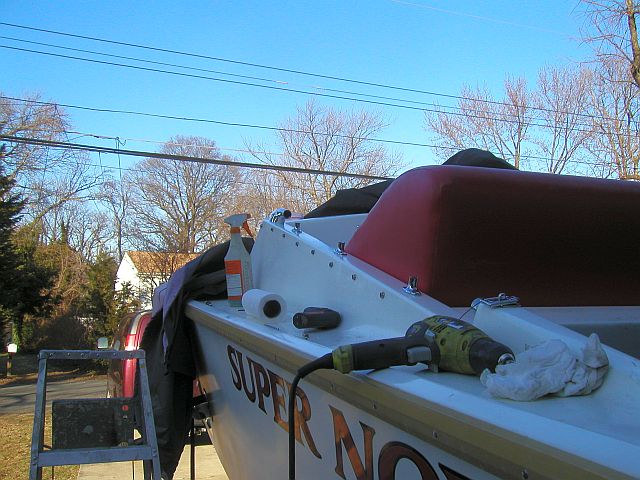
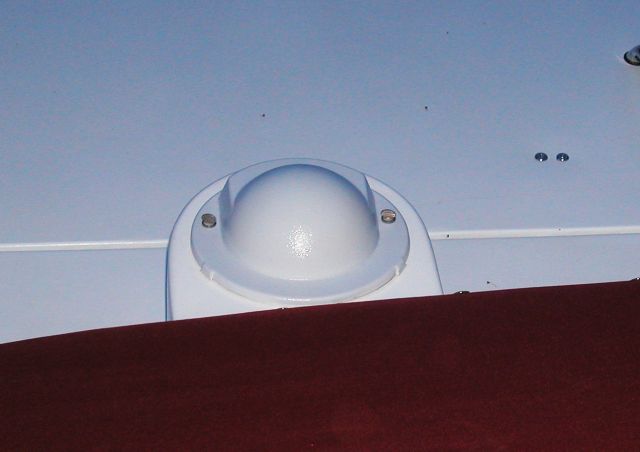
Something on the master to do list is front cowl vents. Funny, we are installing these on the 24 but on most boats we are removing them. This case is special. There is a BBC up there that needs fresh air. We had some low profile vents there before but being low profile they were not pushing much air through the vent. So they had to be replaced with something a little bigger.
Removed the old low profile vent and vent hose. Taped everything up so we wouldnt cause more damage than we intended to. Used a templet we made up of the plastic drain we plan on inserting into the hole so we could mark up the hole of what we needed to cut out. It wasnt much. Just a trim around the outside of one side and it was short work with our jigsaw. We use the PVC three inch pipe drain so no water will reach the core wood even though it is sealed. Its probably super overkill but it also gives a solid place for the flex hose to attach to under the deck being the vents we use dont come with bases for that.
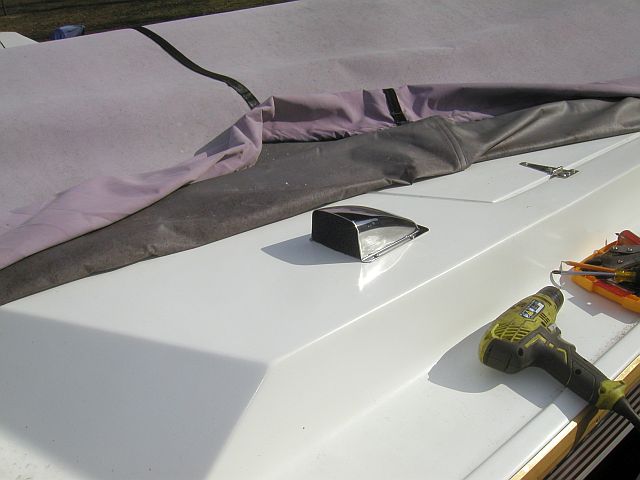
We get our PVC drain cover sealed up and pushed in tight. Then used a T square to make sure the vent cowls were straight. Marked and drilled out the screw holes and screwed them down with new stainless steel screws. Just to finish them off we filled the inside with some roof ridge vent foam. You can get the stuff at Home Depot, not very expensive, about as weather proof as it gets, loose enough to not restrict air flow but should keep out most water and bugs. Just a couple feet away from them and the inside almost disappears and looks like a shadow. Perfect!
And again, this thing is a tank. The new vents went in around where the windshield is in a production Nova 24. They dont build them like they used to.
____________________________________________________________________
April 26, 2016
A couple weeks after our month estimate we got to go visit our Nasa contractor friends once again. The seemed genuinely interested in the gears and what they were for. Made sense being I got their names from a Speed Shop that they were customers of. Our normal shop didnt have the equipment to cut the gear hole or make space shuttle parts and the shop that did didnt have a machine to bore a motor cylinder. They both probably could have managed to do it but by the time you factor in set up time and such its better to just let someone else do it. This time we made out because they do great work and were pretty cheap. They do it as side work so it may take a while but now we know it can be done and who can do it. So nice to have a phone number to call if we need to do it again.
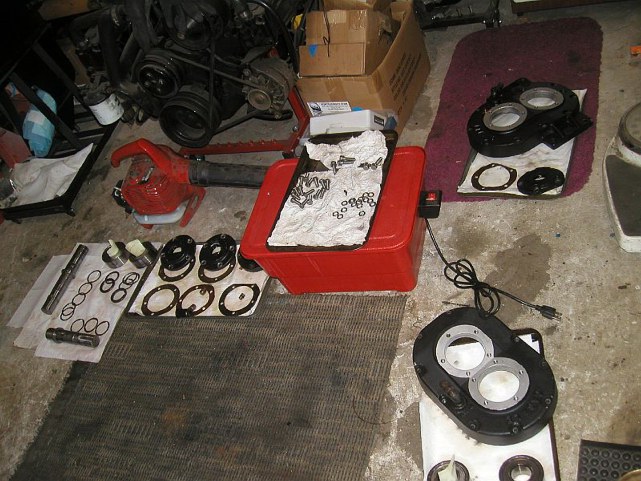
So we take time from getting the Nova19 going from it's motor and outdrive rebuild this winter to get the V drive out of the 24 during what is one of a few sunny and warm days yet. Things are not as intimidating as they once were with this boat. It was like a warm day with no plan, lets go. Not like it was a surprise or anything. Maybe a surprise start but we figured if we are trapped in the garage for a couple days like they are calling for it would be nice to have something that needs to be done with us.
Being there is motors and transmissions on both sides and a prop shaft you first have to free the V drive from everything connected to it one at a time but they all disconnect differently. One you have to remove the driveshaft from the motor and then take it apart again at one of the U joints. Another just un-bolt the U straps around the U joint. The prop shaft just having a bunch of work done to it was as simple as spreading the couple and pulling it back toward the rudder. Even though it was simple it still took a while but before it was over the V drive was in the garage.
Trying to get the most of the day outside we finished off what was left to do for connections under the front deck for the front vents. Cleaned up some of the mess and to finish it off we replaced our transmissions fluid dipsticks. Little expensive but we had enough trying to keep the old dipsticks in. The right bounce and they were just sitting there until the next bounce. Not anymore with these sweet factory replacements.
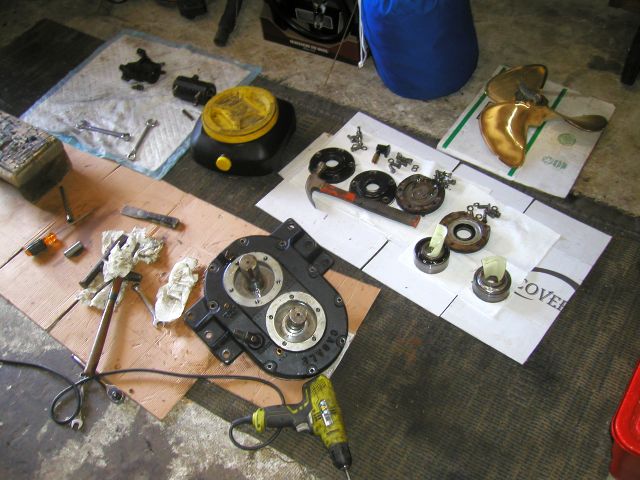
We have a HallCraft V-Drive in another boat. People in the V drive world consider it a pain to change gears in. We have found that its a lot of work but if you can install a wheel bearing you can rebuild a HullCraft V-dive. As simple as this Casale is its light years ahead of it but unlike other Casales this C-1000 dont come apart to easy and makes the H/C look so simple its sick. Its really not that bad its just a long process of pulling this bearing then that one in order on and on. Its not delicate work either not to mention everything is coated in gear oil. We hate gear oil. Then you get to clean everything up until it all sparkles before you can do anything else.
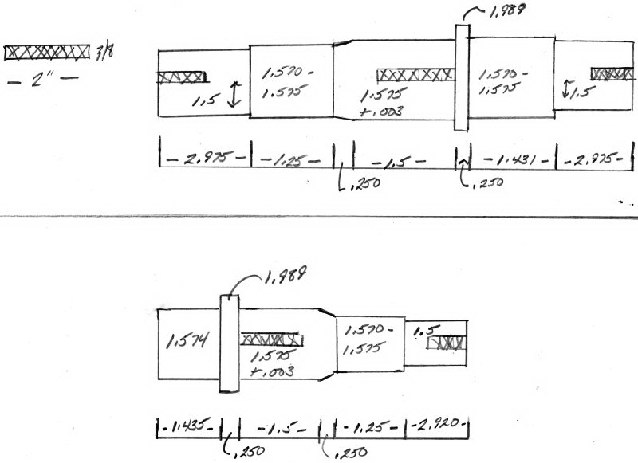
Next we had to spend some time final honing the gears for the shafts. Wish we would have been able to take the shafts to them when we had the gears re-drilled but they were in the boat buried under snow so we did the next best thing and took the original gear set and let them figure the closest match without going over. Then we have our own tricks to get those last couple thousandths.
We have also done a few measurements and even though the center holes were the wrong size everything else so far looks to be almost perfect. We'll see when we start putting it back together. Fingers are crossed.
____________________________________________________________________
May 4, 2016
May the forth be with you. 
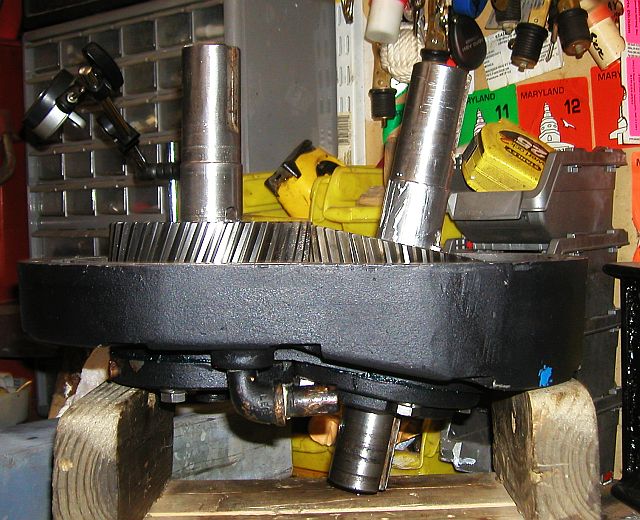
We had days of rain so we took days trying to get the drive just right. Put it together, measure this, take it apart again, readjust and put it back together again. Repeat over and over. The gears being a different size we had to shim them from the front and back side. We then had to figure out how much gear lash we had and then readjust figuring out how each adjustment affected everything else. And after all that we had to make sure the gear faces matched up to where they had full contact end to end of the pattern.
We then put it all together and go through the same thing getting the front bearings to match up with the caps. There is always some tweaking but it didnt help us having the cap depth wrote down wrong and worked off it three times before figuring it out.
Made some serious upgrades this time and really think we put it back together much better than it was before just for the fact we understood a little better what we were supposed to do and how to do it. Having some of the right tools dont hurt either.
My V-drive is heavier than yours. All 64lbs of it.
____________________________________________________________________
May 30, 2016
Finally we got to put our newly rebuilt prop put back on the boat after its been kicking around the garage waiting for the V-drive to be reinstalled so the prop shaft could go back before it could go back on. With all that done its done.
Like normal everyone thought we were crazy seizing any day we were not rained out and even then having something in the shop to work on. This spring has been the worst on record. It was still below 50 for a day time high just a couple days ago. The last 3 or 4 days has been 90+ degrees. Spring? What spring? Again thank God we didnt wait until the weather cleared up or we may not have even uncovered this boat this year.
At some point about two weeks ago we just had enough. The boat had to be washed anyway. Lol. The reality was we had so much to do and we were running out of time. The boat this year had obligations.
We knew the boat was dirty under our failing boat cover. At one point we lost 3 boat tops to a single winter storm last winter. The old one was ripped and all screwed up but we left it on because of the nasty spring and why put a new top on a dirty boat. So we pull the cover off and man we were in for a shock.
We have never seen so much mold. It was on everything. We are now on day 10 of the battle. The whole boat has been scrubbed inside and out. Every nook and cranny and then it was done again. From there the whole boat has been rubbing compounded out with the real expensive rubbing compound and then thats followed up with another super expensive high tech polymer wax.
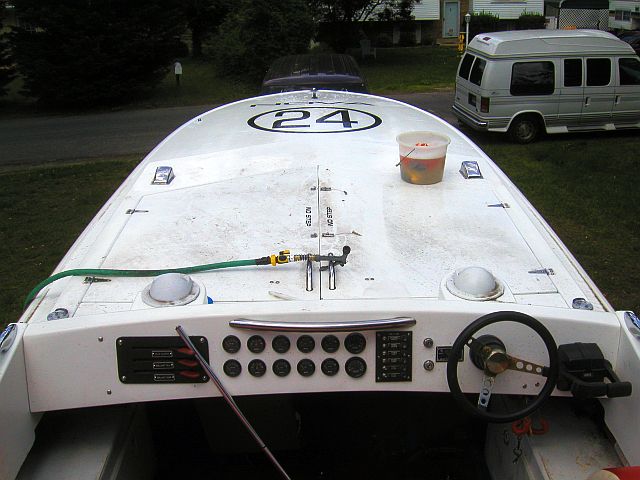
Along with that we re-stained the deck, changed the steering wheel out for a new one, fixed the drag on the throttles and installed the ID tags we had made up and also drained the gas tanks. Gots lots of lawn mower gas now. Might as well start off new.
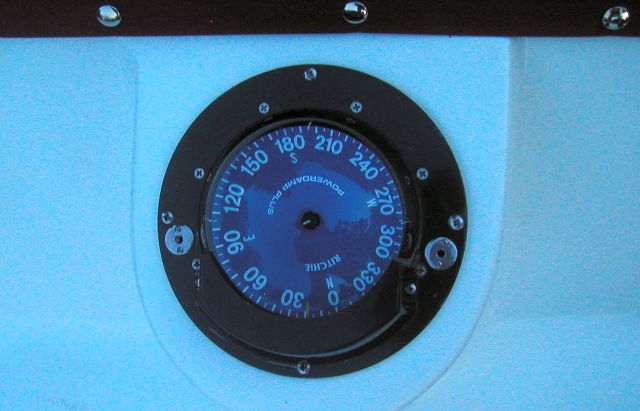
Last, since we are no longer going to tow the boat with the full cover on it we made the new hurricane top for it but we couldnt figure out what to do about the compasses. Just didnt seem right to leave them exposed like they were when not in use and extending the cover out to cover them really wouldnt look right to us. A while back we bought these form plastic fitting covers so the boat top wouldnt just sit on the compasses but it kind of just sat there and your options were limited on what you could use to hold it down. So over the winter we totally over engineered the whole thing. The covers now have stainless steel wing bolt hold downs. You just slip the cover on and turn the screws in the ss fittings with threaded holes in the compass.
Took the rig for a test spin on the road today going up to the gas station for some new gas. Just the hurricane top and the compass covers. Was also testing out the new trailer coupler from last fall. All went well.
____________________________________________________________________
Bad Timing
June 12, 2016
Where to start?
Last update was about a month ago. Its been asses and elbows ever since in between every rain drop that has fell over the last few weeks but no matter how hard we've tried we just could never get the boat to the ramp for a test drive.
We scrubbed and polished and painted and tuned and fixed until we just couldnt do any more. And all for a single day. Ya, we are taking the 24 to another ACBS St Michaels boat show.
Its time for a couple things to happen. One, the boat has to get out and let people have a look. We originally had every intention to take the boat all over the place. For some reason it has always found a way for that not to happen. Two, we want to use the boat even if it means breaking it and having to fix it. We will never know what needs fixing if we dont shake it out and shaking it out usually means breaking things. We are just going to have to use to it.
The saddest thing is the weather has not cooperated in any way. And then this
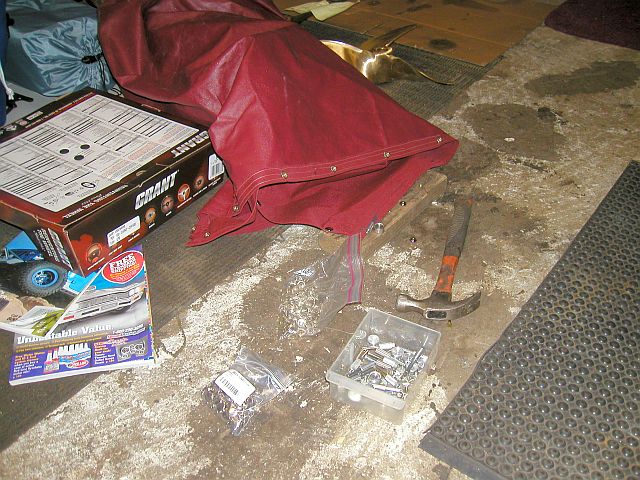
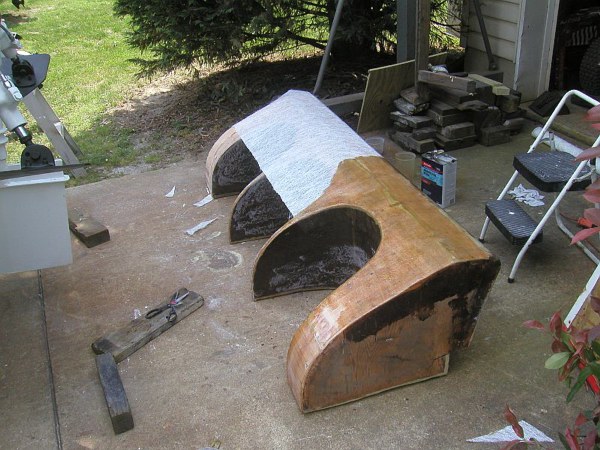
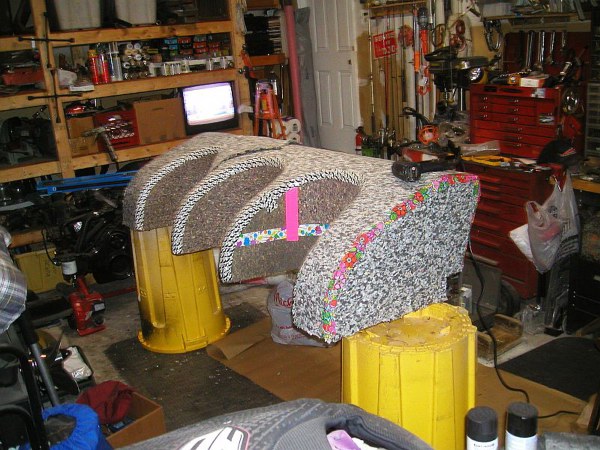
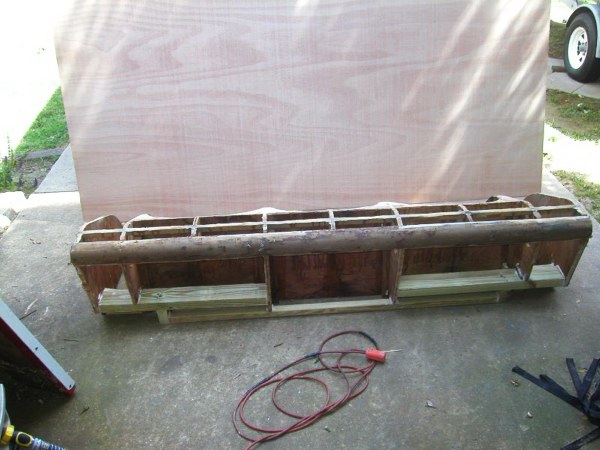
Jump in the boat like I normally do. Up the transom and walk up the motor cover and over the seat. Done it thousands of times. Thursday afternoon I proceed to put my heal through the seat back right at the top. Im mad thinking it will take a day to recover the seat and I dont have the vinyl. So off to the vinyl store to see if they have something in stock. Lucky enough they still have the same vinyl I did the seat with the last time.
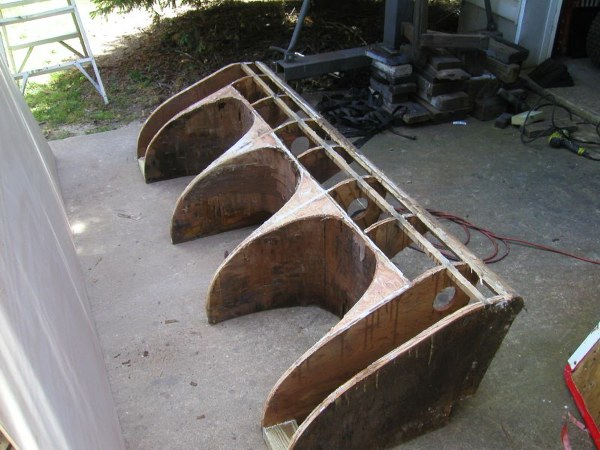
I get home with the vinyl, pull the heavy ass seat from the boat and start to take it apart. Even though when I put it together I thought I made it so it would come apart easy, it was not. Before you know it we at it with two pry bars and a big hammer breaking stuff up. Basically the whole seat disintegrated. Supports were just sitting inside not attached and all the plywood delaminated. By the time we were done we were sweeping most of it up into a trash bag. Now we're a bit worried cause this bolster is looking very rough and we have never built one before.
Friday started with a trip to the Home Depot for 170 bucks of lumber (pressure treated plywood, 2X4 and 2X2s / sheet of lauan / sheet of 1/8 Masonite / assortment of screws and liquid nails, etc). Then a whole lot of creative engineering trying to salvage what was left of the seat with what I just bought. All new pressure traeted bracing inside then the whole thing got reskinned. Had to use the Masonite to make the seat bends. Misted down the back side with a little water and then stuck it into the bend in the hot sun. Wasnt long and they were ready to be installed. Liquid nail everything that still remained of the bolster, stepped on the Masonite pushing it in place with my foot and then nailing in the sides with a staple gun. After they were installed and set up some to replace any missing supports behind the seat back we fill in the voids with closed cell 2 part expanding foam.
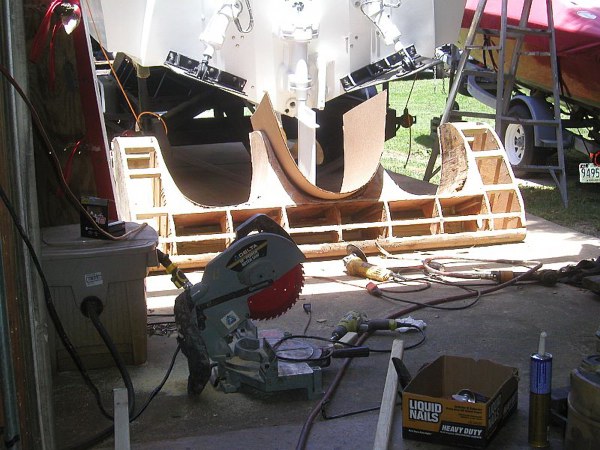
After another trip to the Depot for more screws, liquid nails, padding and fiberglass and after a special trip to the local home and craft store for some batten it was a long day of fiber glassing. Everything and if it was a corner it got done twice. This side, let it set up, that side, let it set up. Lucky it was a hot sunny day. I was using like half the activator and it was still setting up too quick. As fast as I could mix it up and spread it there was somewhere else to do for like 7 hours stright and I already did the seat back the night before.
After we cleaned up that mess we moved inside and to finish off the night (12:22am) we glued all the pad on and taped all the seams. Still more to go but it's a good start.
____________________________________________________________________
June 14, 2016
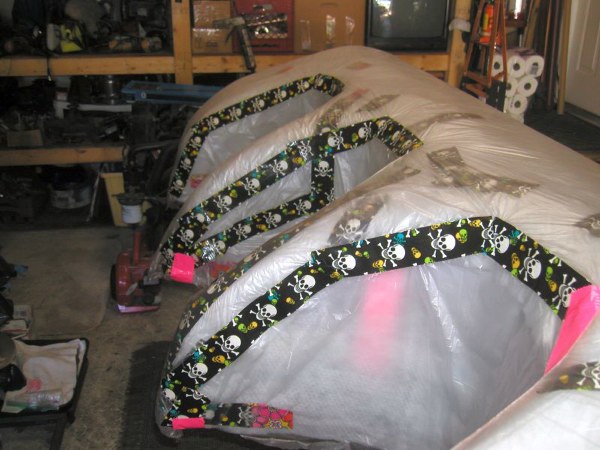
After some comments on the tape we were using we changed and hope its more appropriate for Brownies old race boat?
An insane amount of time cutting patterns and in front of a sewing machine to the point that I stitched my finger to a piece of vinyl, we made some serious headway in the project. After the pad was installed we did a thick layer of batten doubling up along the seat backs. Then we cover everything in painters plastic. Thick enough to keep out water but thin enough that you dont know its under the vinyl (learned that from other boat seats Ive taken apart). Like shingles on a roof the plastic is layered over top of one another and then the seams are duct taped.
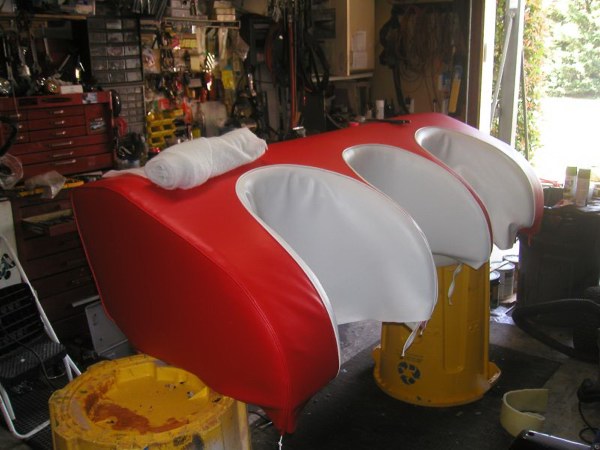
From there it was time to put my creation on the monster and to start pulling. A little this way, a little that way then rip it off and start over again. The trick was to get the center seat back in the best it would go and then pulling both ways off of it. As you would get other parts installed you would have to go back and readjust what was already done over and over. After a couple hours of that upside down it was on good enough that we could flip the seat upside down and then it was on. Everything became a lot easier, still a lot of time but at least we were right side up. Being a carpet installer for 25 years didnt hurt either.
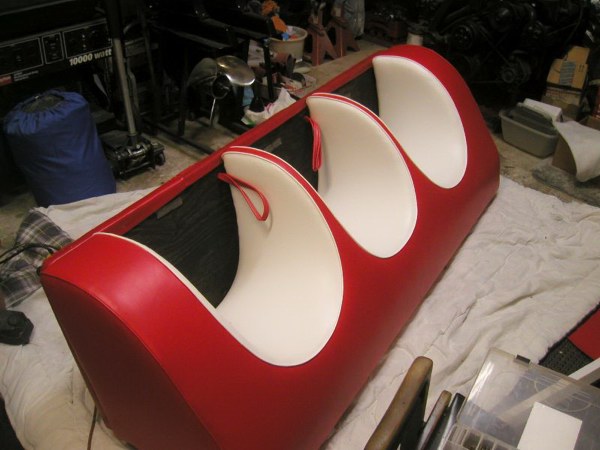
Also spent some time on the base. It was pressure treated, nothing was wrong with it and it fit right in the boat so we kept it. It needed new matching vinyl edging (same color but after 6 years its not if you know what I mean). It also needed to be cleaned up, sanded and then we stained it with black stain. There is also 2 L bars that go along the bottom edges but they were still out for paint.
And here the show is less than a week away. Taking a boat that due to weather and 100 projects has not been on the water since last summer and since last summer we have rebuilt a motor and had (new to us) v-drive gears drilled and then made them fit inside the V Drive even though they were not made for that v drive. Still have to do the seats bases themselves but I ran out of vinyl after I did the first one. Hoping this will be over tomorrow.
____________________________________________________________________
June 16, 2016
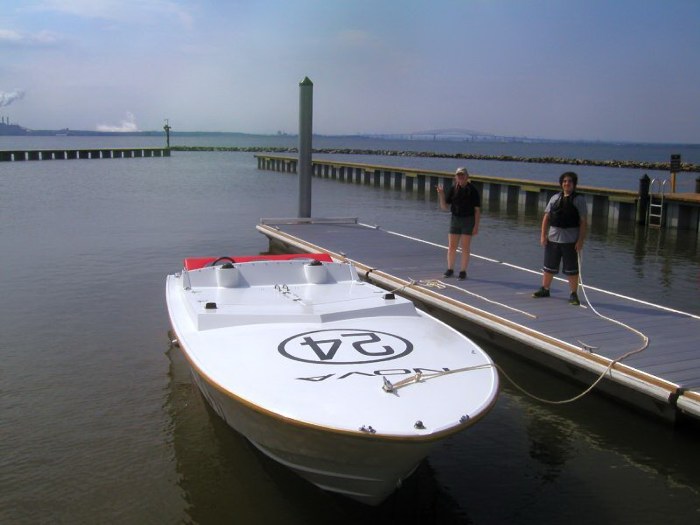
I wonder if it ever crossed Brownie's mind that one day his race boat's engineer and navigator would be 14 boy and a 16 year old girl? At least they put down their phones for a few minutes. All went well. Fingers are crossed being it goes to the show tomorrow.
____________________________________________________________________
Another Show
June 19, 2016
Yes we are officially crazy. After a spring that had us thinking about building an ark instead of a boat we were thinking maybe it wasnt our best decision. Then when the seat issue came up it really had us thinking we made a big mistake and then add in that we havent had it on the water yet this year until yesterday this could turn into a real disaster. But the boat was already entered and hotel reservations were made so we were going even if the boat just sat in the parking lot.
When Friday morning came it was kind of feeling like what a race weekend must have felt like back in the day or something like it. All the prep work was done and it was time to run what you brung until it was done.
Burned about 45 gallons of gas (most ever of any year since we owned it and it was in a weekend), everyone got a taste of the throttles firewalled (even if it was with the wrong prop), I fell in the boat and did something to my ankle that it now has a large bump on it, it didnt before, something sounds a bit of a miss with the rear motor, looks like the Exxon Valdese crashed in my bilge, seems like the drivetrain got louder (had to do too much slow stuff), on way home a guy at a stop light runs up to the truck to tell me I have a trailer brake that is smoking, pull over on the side of RT-50 to adjust the adjuster all the way off, no brakes on that side and the trailer now wants to pull the truck sideways every time I have to stop, total ass in front of me for 20 miles in stop and go traffic (stopping short by 50 yards, weaving, etc, etc), get home and all the grease seeps out of the second brake drum axel and onto my driveway (whole brake set up is like brand new) and as Im getting 3 days of St Michaels off the boat I notice this. Think I found out where some of the water is coming from.
Tomorrow Ill go inside and asses the damages but you know what? It was all worth it. Ferd got his only second ride after 30 years (the first one was with a single sick motor). He is now saying the 427 Fords need to go back in the boat and seemed eager for it to happen. Hummmm
. Chris (seabuddy) got a ride. Wasnt keeping him out of it. Duck Hunter from Donzi.org got a ride and we got to watch him rescue a little bird from drowning and return it to its nest (ya a guy with a screen name of DuckHunter did that). I got to act stupid with the boat with the idea that at one point I would have to be towed back to the dock that never happened. And last but not least they shot the boat for our chapters calendar. Glass never made the cover, fingers are crossed.
Now that its 11 at night, the garage is shut down, everything is put away and Im sitting in my own basement I cant wait for next year. This dont hurt either and no that's not my Natty Bo. 
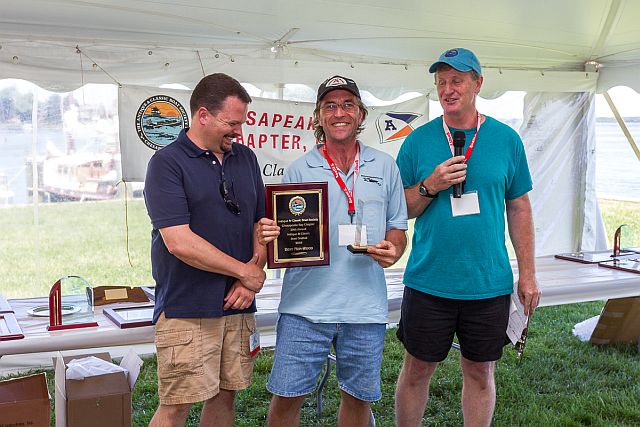
ACBS Chesapeake Chapter Best Non-Wood
ACBS National Award Best Non-Wood
ACBS Chesapeake Chapter - Peoples Choice Award
Not a bad haul for one weekend.
Our Chapters Best Non-Wood was very unexpected. Its not best of show but we figure it around 3rd or a close second and with the class of boats at the show we were pretty happy with that.
The ACBS National Non Wood, a real honor. It was from the ACBS head office itself. What else do we have to say? WOW!!! But now we have to read the rule book because some things change because of it.
The Peoples Choice is beyond awesome and our personal favorite. That means from all that paid to attend the show and voted the 24 got the most votes and a lot of people (couple thousand) attend this show. We hear it was real close between us and a competitors wood boat. For glass to win at an ACBS show against a very nice wood boat says volumes.
____________________________________________________________________
June 22, 2016
Long story short, it was an expensive weekend.
After the show we had some commitments that had us out of town for about 14 days. Before we left we did have a day or two to assess the damages and there was plenty to assess.
The first thing was to chase down the massive oil leak and clean up the mess it left behind. Had a good idea where it was coming from but couldnt figure out why. Then we decided to take a couple things apart and it became real apparent where but why was still a mystery.
A valve cover after being on the motor for a year all of a sudden has a crack in it around one of the mounting holes. Small enough to not see it from the outside but big enough to let all kinds of oil drip out on our freshly painted bilge. Add in a little water sloshing around and it was everywhere and took forever to clean up from what was boat show ready just a couple days before. Since we dont mig/tig weld we dropped it off at our local shop before we left. Hope they can fix it. Just a pain to buy two valve covers just for one that will have to be sanded, painted, decal, sand again then clear coat for a tiny crack. That was really nothing and to be honest we are happy to get away with such a small repair.
Front motor assessed and repairs are underway. Moving on working our way back the next stop was the V-Drive. Wasnt sure what to expect with this one. Since we didnt find any gear oil slung everywhere we almost though it must be empty. We first checked all the drive/prop shafts to make sure they were still as tight as they were supposed to be. One rattling around a while back cased a major gear oil leak so its the first place we look now. Everything was good so we checked the oil next and it was where it should be also so we have our fingers crossed and moved on to the next one.
Last but no least was the rear motor. Now this one was giving us real issues. Almost sounded like it had a valve issue when we were at the show. After having the same thing happen with the 19 last year I knew it when hit happened and if not it sure sounded like it. We could barely keep the motor running when flushing it after the show. So we did all the things you do to a sick motor. We checked the timing, made sure the carb was working right and then did a compression test. Everything seemed fine but it was not. Popped off a valve cover to check rockers and found milky oil sprayed on the top of the valve cover. At that point we were pretty much done and were out of time and had to go. It will all be sitting here when we get back along with a couple other things.
____________________________________________________________________
July 9, 2016
Been back for a few days now and its been asses and elbows even since even though its near 100 degrees every day.
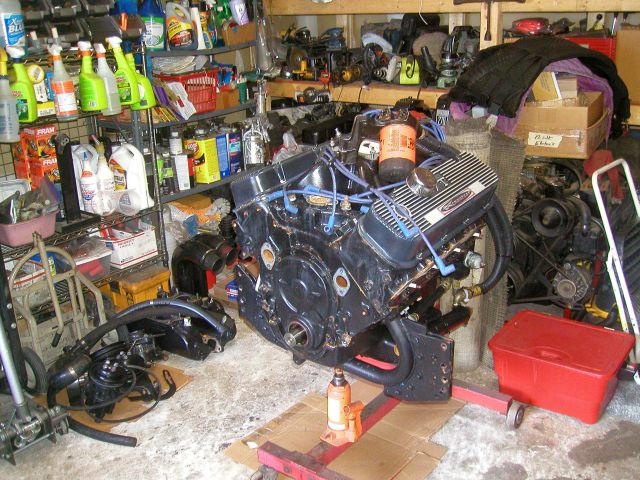
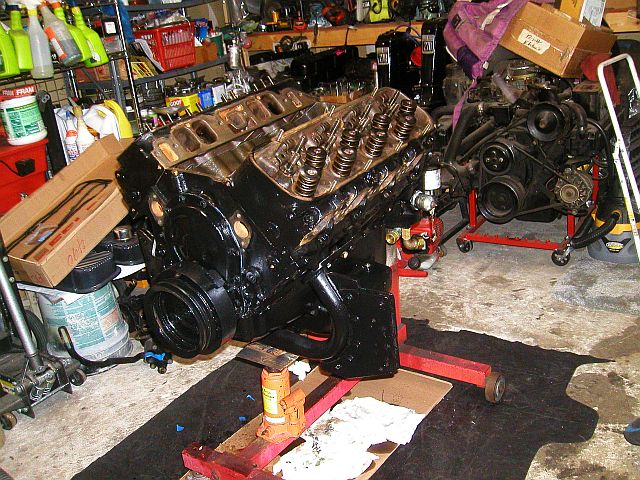
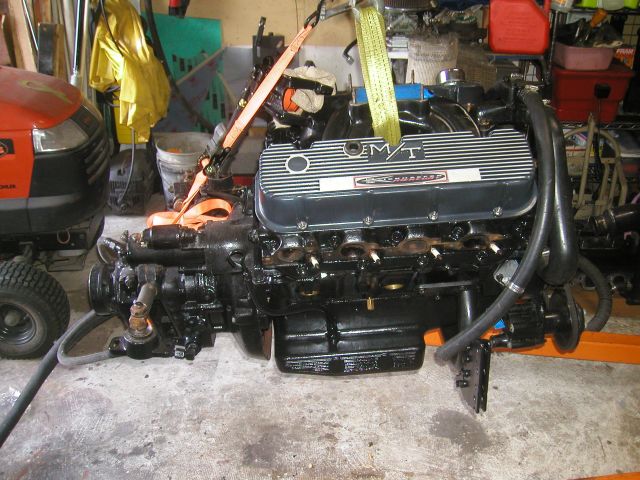
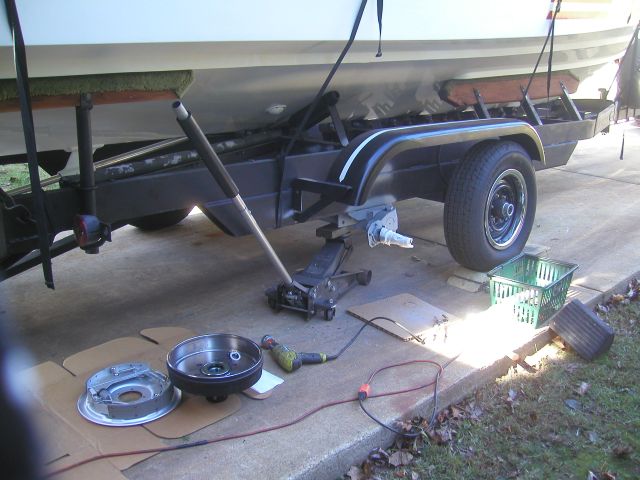
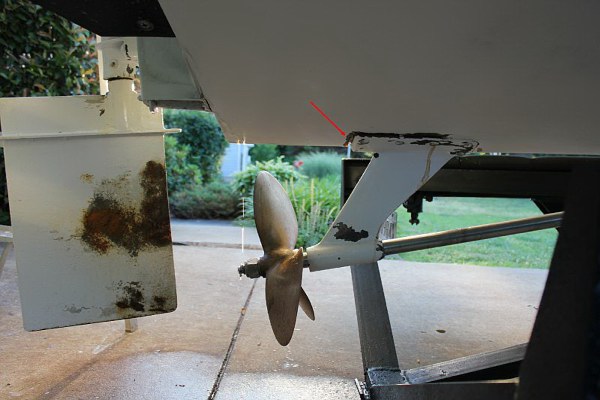
Tuesday (Monday was the 4th of July and rained all day) started with stripping the motor of what stays in the boat because the motor is coming out. Weve tried motor clean outs and such before and never had any luck with them. Even did one motor 3 times in a row and then took it apart just too still find milky oil all over the place. Another reason we wanted it out is because the prop shaft strut that needed repairs was under it also. Two bird with one stone so to speak. We then followed that up with setting up the gantry crane, balancing it to our slanted driveway and extending it up 12 feet. Once that was done it was as simple as lifting the motor and moving the boat back and forth until it was out then dropping it on the ground for our cherry picker to pick back up and drag it in the garage.
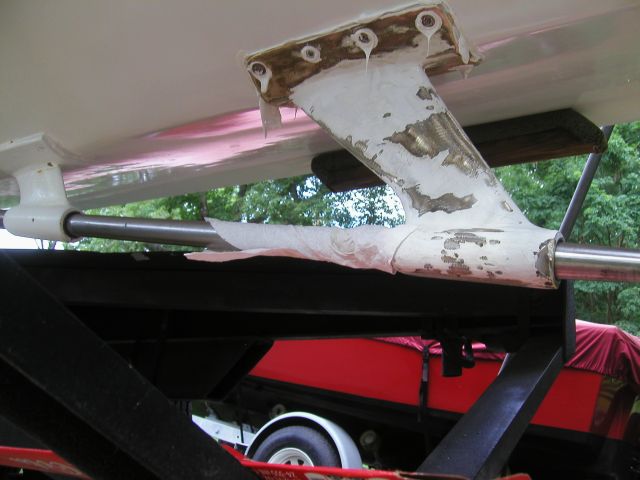
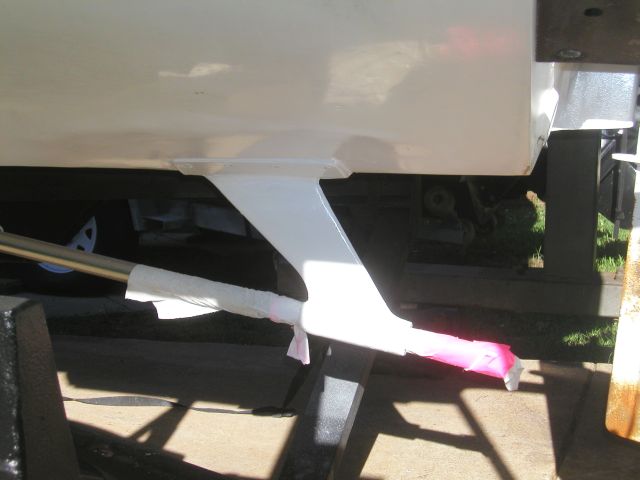
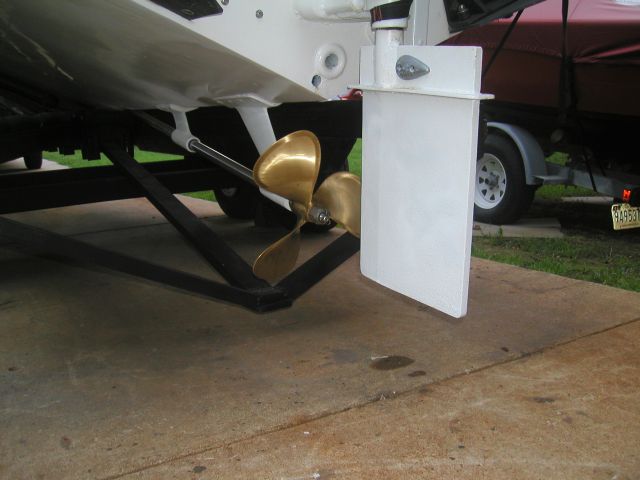
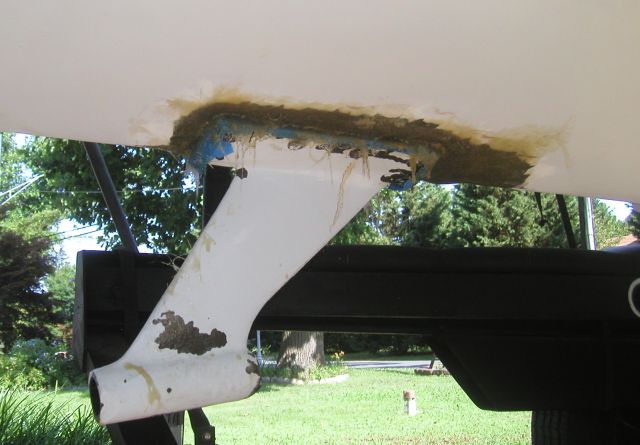
As long as the weather was going to cooperate, beside the things we were doing here and there we decided to skip the motor for now and go for the prop strut repair. That meant pulling the prop, rudder and prop shaft for like a 3rd time now (getting pretty good at it). We then removed the strut and went at it with a grinder getting rid of anything was not solid fiberglass making sure to leave enough of the base so when reinstalling it, it would go back where it belongs. From there like a surgeon we took out small sections of filler and 5200 caulk out of the base it sat on and replacing it with built up solid fiberglass. If it would have been right side up it would have took an hour. Upside down
lots of hours. Once we got the base the way we wanted and the edges feathered for future repairs we then wrapped the edges of the strut in blue painters tape and then bolted it back up in place.
Then it was many hours of glassing up tiny areas, letting it set up and then doing it again and again. After doing that for a while we got to grind most of it off so not to build up a hump outside the area we were trying to fill in. Then more glassing over what we just ground off. This went on for what seemed like forever in 100 degree weather. At least the glass was setting up fast. Sometimes a little too fast. We kept on rolling right on through and into the night and as the night came it got cooler and the glass was easier to work with. Around 11pm we quit after donating too much blood to the mosquitos.
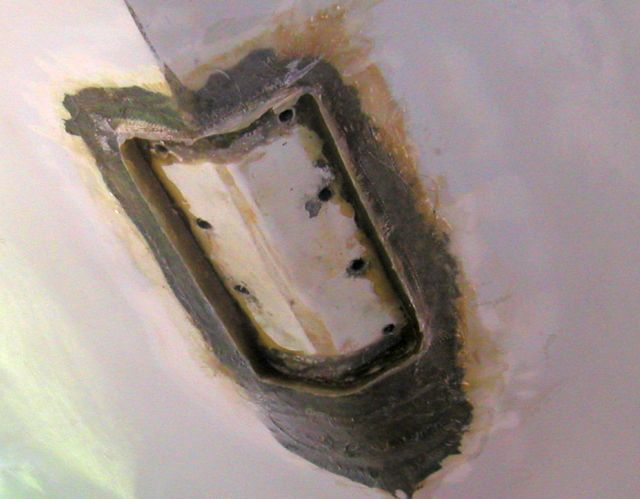
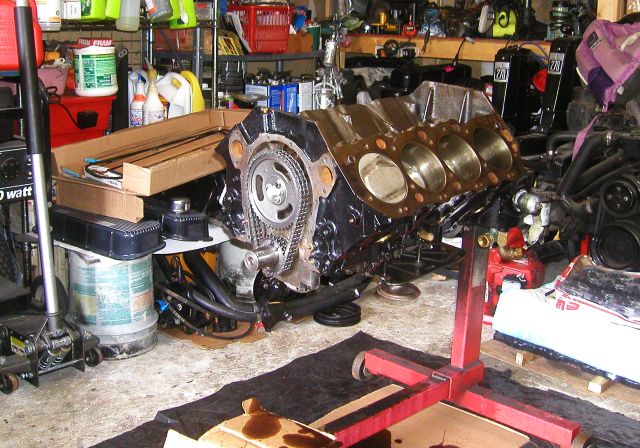
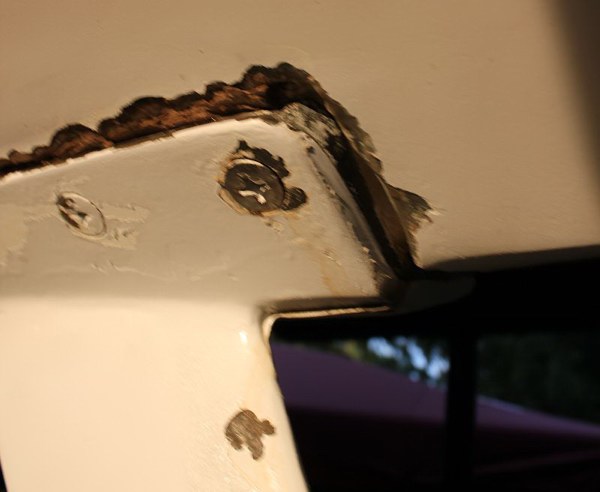
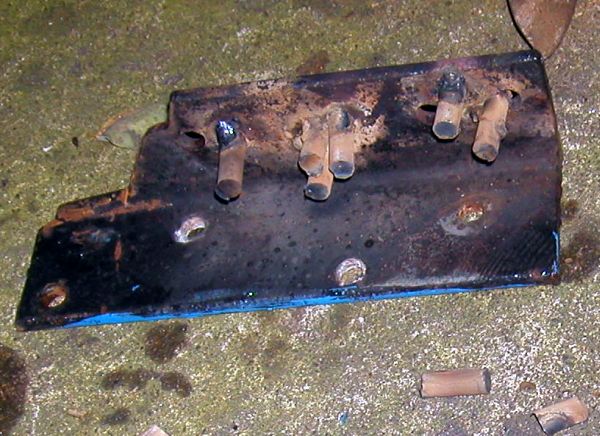
Started the next day with the picture above.
After unbolting the strut it still took a half hour of strategic cutting and grinding to get it out without damaging anything. But it worked though. The layers of tape separated and when enough glass was removed it came out
perfectly and the thickness of the extra tape layers left the perfect size pocket for the strut to sit in. When the strut was out we then could knock down the built up edge to where it was all level with the rest of the surrounding hull and finish glassing everything in from there.
____________________________________________________________________
July 10, 2016
A couple days have gone by and we are making progress.
After we got our slip in pocket made for the strut and while it was not installed we did all the cosmetic work around the base. We built up fiberglass in place of any filler and then sanded it down to where it was smooth. We did end up using a tiny bit of filler but for the most part it was just to sand off again.
After we covered the back side with 5200 caulk we got our strut back up in place and loosely bolted up. Just to make sure there was nothing off from all the construction we then slid the prop shaft in place and sent it all the way home in the V drive. We then tighten down the eight bolts in an order so not to pull it off in any direction and also letting the caulk escape as needed. Let it sit a couple minutes and then tighten it down again until it bottomed out solid.
Lots more work getting the V drive and shaft hooked up, the rudder back on and the bilge pump reinstalled. As good as we are getting with this prop shaft thing we are hoping this will be the last time for a while. Just too many other things that need to be removed and reinstalled to get to it.
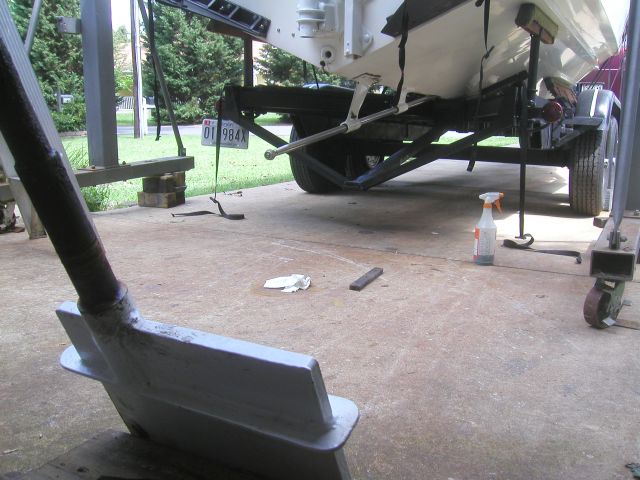
A little paint makes everything look better.
____________________________________________________________________
July 13, 2016
Heres something that worked out alright. Dropped off the broken valve cover, went on vacation, come back and pick it back up and its ready for some paint and reinstall. Really wanted to get this cover installed. The front motor didnt have any issues except for a bad oil leak and this should fix it.
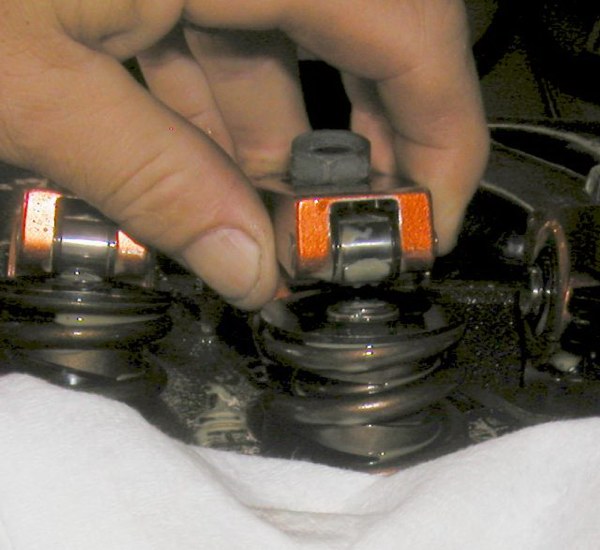
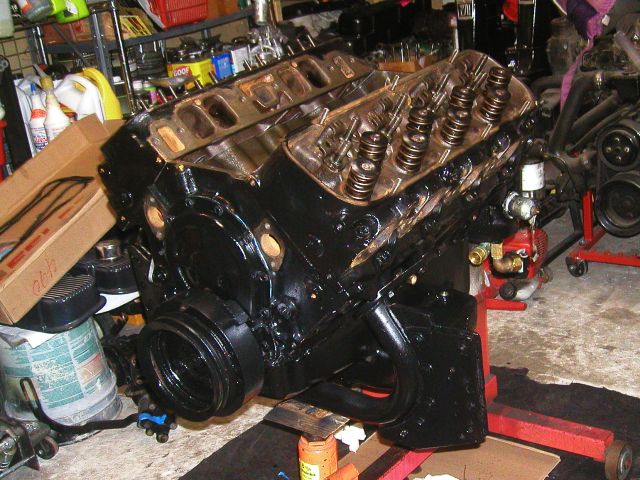
As for the rear motor...
Well that's not supposed to be that big of a gap and the poly-loc didn't back off. 
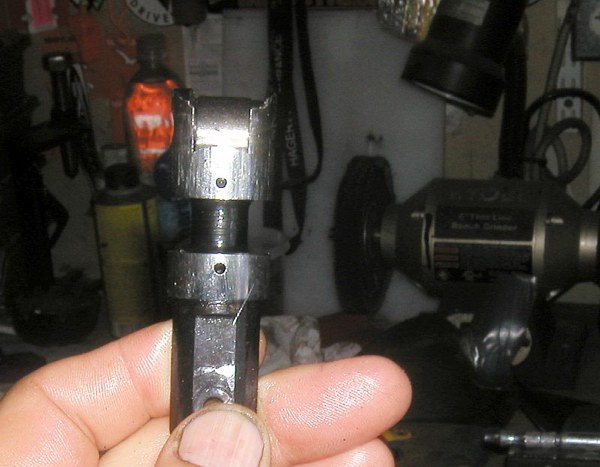
Water in oil but just a very little in the top end of the motor. Also a crushed solid roller lifter (roller pin's hole is now oblong) and a semi wiped out lobe on a pretty rare cam. Lucky enough I found another original Crane grind cam recently and made a deal with the guy today. Pretty sure it will be the last one on the market for some time being its the first one I've seen in 2 years.
As for the lifter. F_in breaks my heart. I don't think I have ever lost a cam in 30 years and the majority of them were flat tappet. And I've seriously f_ed up some motors over the years. I hope I'm not jinxing myself but the 19's 496 is cast crank and Comp parts roller motor. Never had any of the "cast crank failures" or "cheap Comp roller parts flying apart". This motor is top of the line everything and its spent more time in the garage then it has in the boat. Worked fine in the Biesemeyer for a year but for some reason in this boat it wants to melt down and then suck up water every hour or so.
Not sure where the lifters came from and they may even be original. Figure the failure resulted from the heads rebuild we did last fall. New springs, shimmed right ect, ect. We heat cycled the motor last fall and put it away for winter. Sat all winter and then was a short ride the day before the boat show. I knew something happened on the second day of the show on a ride but we and it had to live up to obligations no matter what and we kept running it (and it was worth it). Went to flush it at home after the show and think it's when it hydro-locked and then would barley start and run so out the motor came. Or at least thats what we are going with for now.
____________________________________________________________________
July 29, 2016
This is not turning out to be too be fun at all.
All the way down to the last bolt. Everything had to come apart. Exhaust lifter on #5 crushed wiping out the lobe on the cam sending metal into the oil pan. Nice big chunks that destroyed a $130 oil pump and then going on to destroy another $200 in bearings. One of the reasons they cost so much is they are supposed to catch metal and imbed it so not to hurt the crank. They did their job
yeah
.I guess. Another set of rings, timing chain, solid roller lifters
you can see where are going with this. Piles of money.
Had to take the heads apart to fix the seals that got blown out. Also got out a piece of glass to check for any bends that was not supposed to be there. After lot of looking we did come up with one intake valve that was not seating right. When you lapped the valve to the head the heads seat looked right but the valves was kind of oblong on one side. Anyway we have a box full of them so it was a quick fix being the guide was nice and tight and when we lapped in the new valve its seat was a perfect circle on the head and valve.
The cam is another issue. The cam we bought was damaged. Not as bad as the one we have but it was not right. The seller seems like a standup guy and has had this issue before with his race team (performance shop). He said he would get the cam fixed so I sent it back to him and while I was at it I sent our damaged cam too. Its the same fix (exhaust lobe) on both so maybe it will be cheaper??
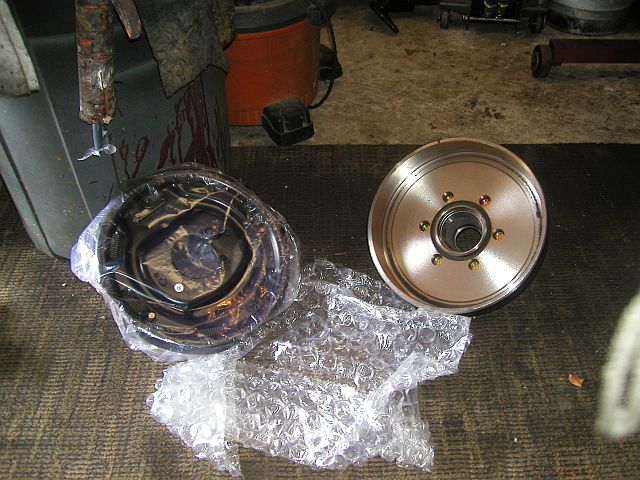
Brake parts are also coming in. We know almost everything was new but there is an issue somewhere between the old that was left and new that we cant have ever happen again. This time we are going with new factory hubs with drums and all new everything (every bearing, seal, nut, bolt and washer comes in the kit). We have a theory that the old drums were out of round or something. There has to be a reason but when not sure we replace everything.
____________________________________________________________________
August 5, 2016
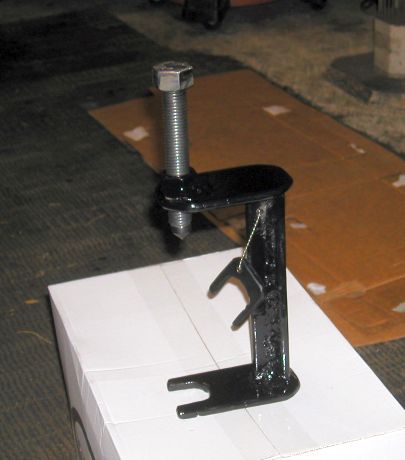
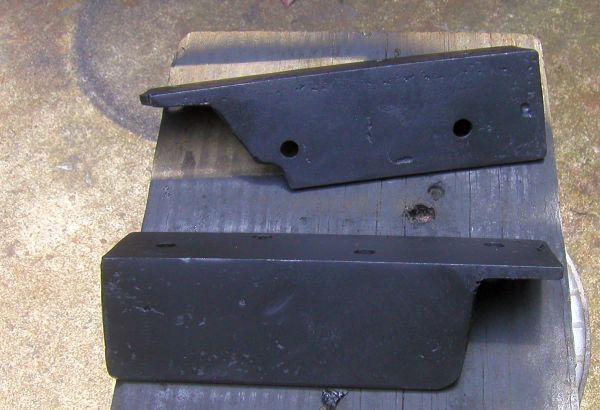
Just a quick update. We are coming up on our 7th year anniversary owning the boat in the next couple days and while we are waiting on our cam to return we are moving along with anything we can come up with while the motor is still out. One thing is these motor mounts.
Dont look like motor mounts. Looks like L bars drilled out like Swiss Cheese. The rear motor has been shifted around so many times that we had holes on top of holes drilled out in these pieces that hold the offshore mounts to the stringers. It was time while the motor was out. Chopped up 21 pieces (for both L bars) of 3/8th steel rod and got out the welder. Pound the pieces into the holes and tack them in place. Cut them off level and then burn them in on both sides. After they cooled we ground them off smooth and of course painted them black. We left a couple holes (that were right) to get the mount lined back up so we could drill fresh new holes where they should be. Thats also why we just didnt replace them outright. It took a long time to get the motor just where it was so we were not taking the chance that new metal could be off by a quarter inch here or there when installed.
All the brake parts come in for the trailer and we got it all installed. We are not really happy with what we saw when we had everything apart. The new drums came with new bearing and such. Didnt think we were going to need them being there was only a couple hundred miles on the axels. The front axle hubs were in the good shape but had to come off for the new. While we were at it we gave the rear axle a once over and found one hub had chewed up a rear seal and the other had rust on the bearings and made a grinding sound when spinning the tire (off the ground). So we cleaned everything up and installed the good front hubs on the rear axle. We also put in an order for two wheel hub rebuild kits (seals, bearings, nuts, bolts, lug nuts, etc). Well clean up the hubs we didnt reinstall and together we will always have a couple new hubs ready to go in an emergency.
____________________________________________________________________
August 15, 2016
I guess you can say I was a bit happy in this picture. We are still getting pictures and such from folks that attended the show. Its been a slow process due to many reasons and some pictures will not be released until after they pick what they want to use for the calendar.
We also found out the paid attendance of the show to see how big the pool was for winning the Peoples Choice award. We are not allowed to state the number being it has not been released yet but it was well into the few thousands and thats not counting the folks that get in for free (museum members, youth groups, invited guests, etc, etc). From what we hear through the grapevine the 24 pulled a lot of votes. Again, not bad at an ACBS event. Theyre not just for wood boats anymore.
Now back to the cost of the show.
We did what we could with the motor out. Painted the bilge, drilled out the offshore mounts to the newley repaired L brackets, updated and repaired some wiring but even with the motor out there is nothing easy in this boat. Just standing in it with the steep angles of the hull hurts every mussel the next day.
After the motor sat for what seemed like forever both cams came back in, in one afternoon from the big brown truck. Tracking totally screwed up during shipping and we were a bit worried because we had no clue where they were until it showed up 6 days after it left their shop. For a little less than 200 bucks we ended up with our original cam repaired and a second one also fresh from the shop. Hope we never need it but we have it if so. We could always build another one of these tall block beasts
.
With the cam we finished building the motor and got it ready for install the next day. When installing it, it took a little while and a couple drift pins to get it lined up right. It had to be perfect this time due to all the new holes in the mounts being real tight. It went in and didnt require any holes to be re-drilled. We consider that a win.
While we had all this down time we took another prop to the prop shop once again. We spent some time looking for one to try but after not wanting to drop stupid money on another shot in the dark prop selection we took what we called our marina prop (it was small enough pitch the boat would act normal around a marina or other slow areas) and had it bent to a 16X19. Fingers are crossed again for a good middle of the road prop.
____________________________________________________________________
August 27 , 2016
Not how we wanted things to go. Long story short we got the boat put back together and fired up in the driveway. Everything was normal and sounded so good. Took it to the ramp and went for a spin. Everything seemed to work great and with each build we seem to be making progress on understanding this whole concept of this boat.
Should have known our luck was about to change when the electric winch died 6 inches from the bow stop and the hand crank on the winch wouldnt work either.
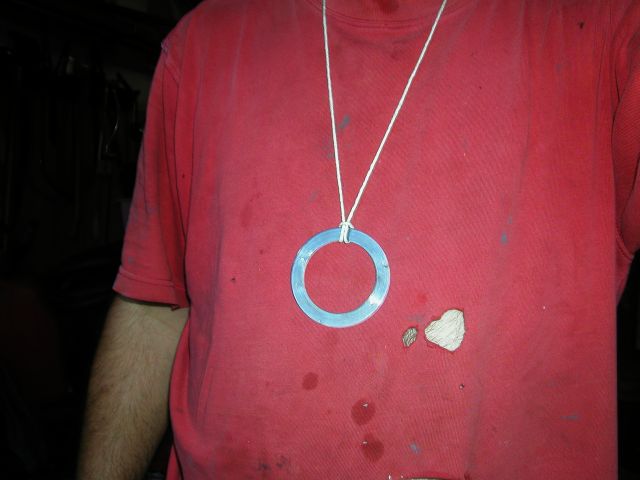
Like my new neckless? It cost somewhere around $1800.
Got back and started running over the hundred point check list that we do every time we take it out. This boat is always in test drive mode so we have to look things over just to make sure everything is doing what its supposed to be doing.
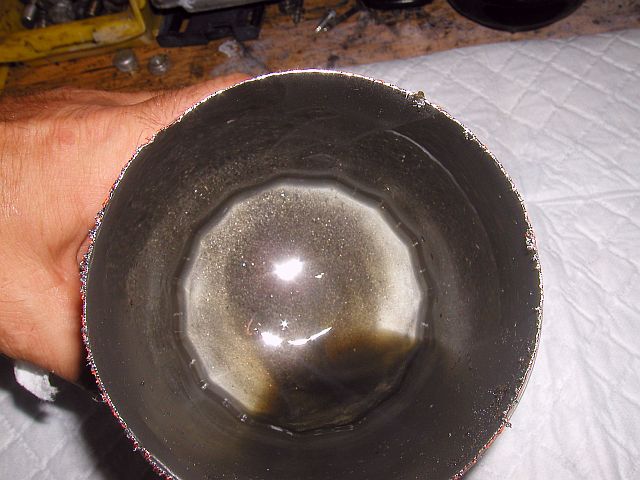
During our inspection we found that we had to do something about the V-drive. Gear lash had got way to large and now there also was movement between the gears and the shafts. Figured the keys in the shafts have worked loose or something but something had to be done. We just needed to change the oil filter in the motor we just rebuilt (to see what is inside) and then we could get on to tightening up the V-drive. And look what we found.
What we thought was going to be a conformation that we had a good to go motor quickly turned into a nightmare. What we found in the bottom of the oil filter would have been great if we were mixing paint but not in oil. And that was nothing. There was a hundred times more in the paper of the filter and this was just after an hour of use. Something else was wrong because what broke the last time wouldnt have anything to do with this.
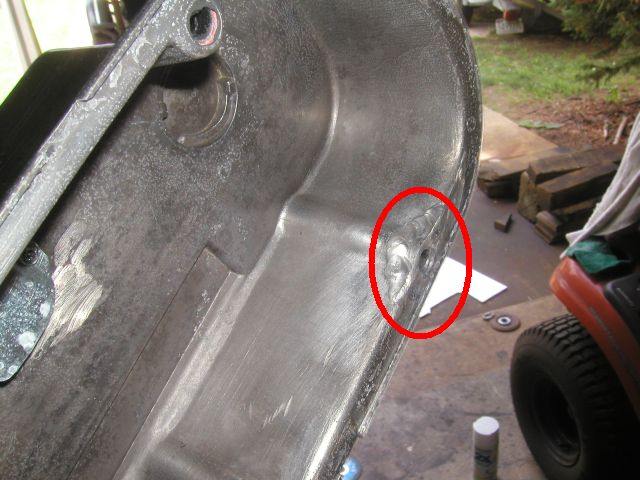
After another motor removal and teardown it took a while to find out just what happened. First we found the back of the big cam gear had been eaten away and the face of the block had scratches in it. Now that shouldnt be. This motor has extra oiling ports and a hardened spacer between the gear and block. We check the spacer and it looked normal except for some scratches and for the next day or so we just kept looking as we took the motor all the way down to the last bolt. Had to it anyway being there was metal flake throughout. After not finding anything else we go back to the timing chain parts and the spacer. Now we were thinking it got a bur in it somehow and snowballed from there. Maybe we could change the oiling system or something. Hate not knowing exactly what happened.
We had lots of other work to do and time waiting on parts so the spacer sat on the bench for a couple days. Then one day I look at it in just the right light and notice what looks like a scratch but it doesnt. I give the spacer a bend and one side pops up like a tiny knife edge. Been looking at it, measuring, etc, etc a couple times over the days and it was such a perfect crack I never noticed it was actually broke. When in the motor it must have acted like a hardened steel wood plane filing iron off with every pass of the cam.
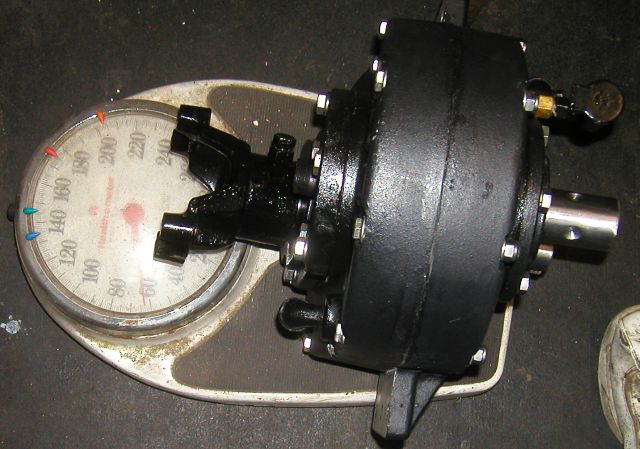
And while we were at it we pulled the C-1000 also. Here comes trouble.
____________________________________________________________________
September 1, 2016
This is so sad. If water had been the issue you can dry most everything out and start over again. When its metal flake and everything is roller it pretty much means everything is junk and in this case its only an hour old junk. Breaks my heart taking out almost new $400 roller lifters just to throw them into the recycle bin.
We were throwing away so much we were happy just to save something at one point. Timing chain and sprockets, bearings, rings, roller lifters, roller rockers, oil pump and pick up, oil cooler, oil remote and cooler lines all went right in the bin. Thank god the rods and pistons floating pins were fine and the cam gear seemed to take the most damage saving the block.
All the oil galley block plugs had to be pulled and the block was scrubbed, flushed and blown out 3 or 4 times. We figure if there is still a metal flake in there it will turn to rust which wont be too bad. Then the process of cleaning everything else that was staying and replacing everything that went in the trash began. A lot of stuff was easy to find and we knew just what it cost so we started with what would get the most of the motor put back together the quickest.
What we need to get the short block together came in a couple days later and it was nice to get some of the parts back in the block. There is over a hundred separate pieces in an installed piston set alone and things like a crank or cam that cant get a scratch on them are not safe in our garage. After every waking hour working on the motor we were back to having a short block, yeah! But we were also short a lot of expensive parts, booooo. It was time to let this project cool down for a bit and regroup at this point.
____________________________________________________________________
September 2, 2016
And then there was this. Our infamous Casale C-1000. It is having some serious issues. One of its biggest issues is its an extreme pain in the ass to do any adjustments to. It requires metal shims on both sides of both gears. Then sandwiched between roller bearings on both sides and all that is sandwiched between two case bearing caps and it all has to be perfect so its not squeezed at all and at the same time there is absolutely zero end play. To make changes in most cases requires taking the whole case apart and starting over again.
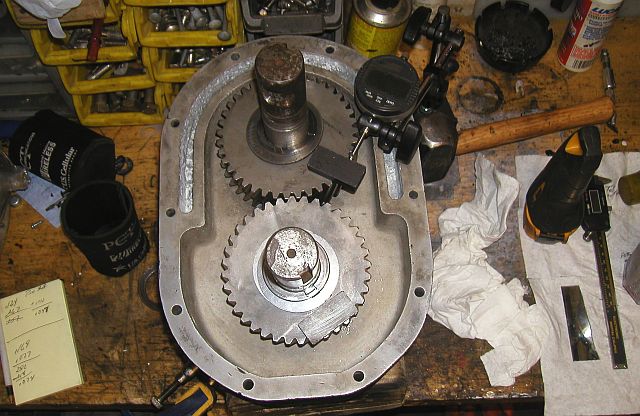
One thing we did find out was we were instructed to assemble the V-drive wrong. A major mix up on how to set gear lash that made our gear lash setting around .040 when it should have been around .008, not good and could explain some of the gear lash rattle. So we took the V-drive apart and took some time to get it back in spec. We also got some oversize key stock to tighten up the keys with and we already had new bearings in stock. Then the real issues began. Just setting lash was insane being there was some sort of wobble in one of the shafts. Thought it was a new bearing at first but after swapping them around we knew there was something more going on.
____________________________________________________________________
Huge Update
November 30, 2016
Been awhile. So much was going on there was no way to blog about it also. Lets see if we can pick up where we left off at. The rear motor was apart and the V-drive was apart.
The reason we had both apart at the same time is due to lack of motor parts and having the V-drive parts. There is always a couple parts for these race boat motors that is always either super hard to find or stupid expensive if you can. They take time to acquire if its because of money alone. So we planned on making some simple adjustments to the V-drive, had new bearings in stock and any shims we would need so it made sense to move over to it while we let our wallet cool off for a little while.
So we get the V-drive apart and cleaned up like we said before and started putting it together with the idea of tightening up the lash and calling it a day. We then noticed when trying to set the lash as the gear would go around the lash would get bigger and then smaller. We did everything we could, swapping bearings to measuring the shafts when on the bench and we couldnt figure it out. We did figure out that it was out in the same place no matter what changes we made. It had to be the shafts or maybe the gear's holes or both. We finally went online with our drawing and asked if someone had any idea what it would cost and if they could be made at all. We already knew what Casale would say after dealing with them a few years back. This could set this project back months if not years.
So now we are bouncing from little project to little project figuring out what we are going to do and then we get a online post for a local guy saying to give this other guy a call. We do and set up a meeting and before its over I am handing a box of gears and shafts over to him with my fingers crossed. Two days later I get a call to come pick our stuff up. Got to say we were a little nervous going out there being it had been such a short time. Maybe he was just going to give our stuff back saying he couldnt do anything with it. My mind was put at ease when I walked into his shop and saw two bright new shafts sitting next to my old ones on the counter. He then explained that he also cleaned up the gear holes and made the shafts in spec so the V-drive can be assembled using the frozen bearing method. The total cost was even below an already insanely cheap estimate and our timing couldnt have been any more perfect being they had a large job coming up in a couple days and wanted my stuff out of the way before it showed up. Works for us. Now it was time to build something.
Thanks To;
Verb Precision, LLC
Severn, MD 21144
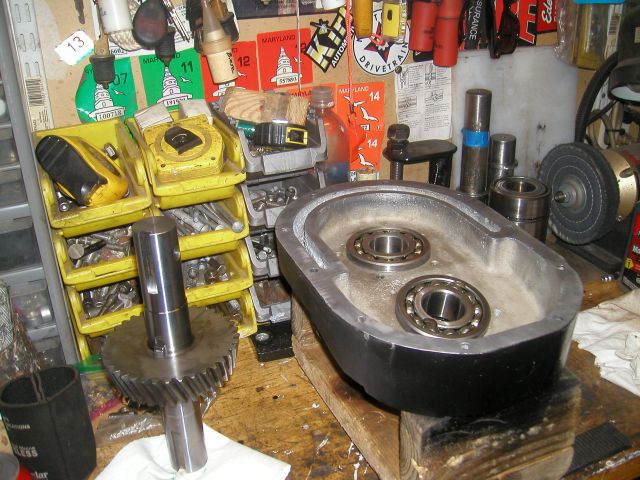
So after a period of not knowing if the V-drive would ever go together the first time to being on our 3rd set of gears and now having new shafts and new bearings which we studied all of this size bearing and found the old stock part numbers for the heaviest duty, high rpm bearings in their class. New seals and gaskets. All that's origianl now is the case and the bearing caps.
With all of our new parts and clean case we started to put it together dry. Mounting gears on shafts using the old measurements as a start to how much shimming to start with. Getting the first set of bearing in the case and the caps on the front of the case. It then took taking the gears on and off the shafts and re-shimming them a couple times so they had a perfect gear mesh with just the right lash.
When we went from there is when the trouble started. We put the second half of the case on the first and got it bolted up and then put in the last two bearings. The straight one went in with no issue. The one on the angle would go in but when you put the cap on finger tight the gears would not make a full revolution without jamming together. After pulling our hair out trying to figure out what could be wrong this time we took it all apart again in the process ripping it's case gasket. So to do some testing after we cleaned everything back up again we put it back together but this time dry and without a case gasket being I hadnt made one yet. It went back together the same way we did it before trying to make the same issue happen but it wouldnt do it no matter what we did. So thinking it may be solved we made a new case gasket and started putting it together again. Got to the same point we did the last time and the same issue happened, again.
After a very emotional hour that involved a broken shop light and a couple other things (the V-drive was slowly set on the floor and scolded profusely but not touched) something dawned on me. Why did it work without the gasket but not with? After another insane amount of research we found the case gasket we were using was too thick making the bearings in both sides of the case to far away from each other making them out of line slightly cocking the bearings in the case until the caps were put on each end and forced the two bearings to align then cocking on the shaft. Thats why it only did it on the bottom angled shaft. The straight top shaft didnt matter how far it was away from the other bearing. Got some thinner gasket material and made a new case gasket and after putting the whole thing back together it worked like it should. Or at least we think it works like it should.
____________________________________________________________________
So while this mess was going on with the v-drive for a couple weeks our main concern still was the motor. We did not want it sitting in the garage all winter and for that matter we didnt want all the other parts that went with it sitting in the garage all winter either. So we never stopped looking for what it would take to complete the motor and we may have even spent a couple extra bucks making sure we could get it done before the cold set in.
So by the end of September and $1800 in parts the motor was complete again along with the v-drive. But typical of late September the weather got rainy and cold for a couple weeks and held up everything.
Dodging rain storms it never felt like we could open everything up long enough to do a motor install (requiring the setup of the gantry crane) without getting everything soaked so we moved on to another thing sitting around in the garage. A second set of brakes for the trailer.
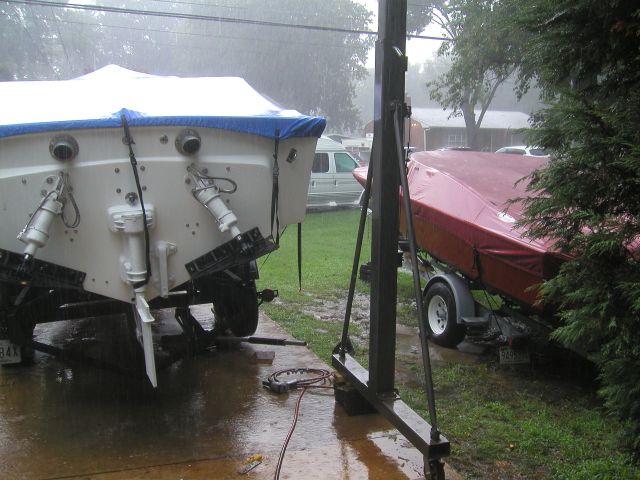
We figure we could break the install up into smaller mini projects if need be. The only conclusion we can come to about this trailer and its brake issues is the one set of brakes on the torsion axels are being overloaded when they work or basically have to be backed off so far they dont work at all. So we are going with a second set so all 4 wheels will have them now. We know our new surge coupler is ready for them. It just means putting them on where they have never been installed before. When there were brakes in the rain long enough to do something we did it and like the picture above we didnt always finish in time and it was like that for weeks. Not the Fall we were hoping for.
____________________________________________________________________
Many days have past and we finished up the brakes on the trailer. New plumbing to the almost new plumbing already there and then blead out. Wont have much chance to check it out besides around the neighborhood. We are just hoping for the chance to go a far as the park next door for one last ride but there is still is a lot of work to do.
We still had to get a motor and V drive installed. No matter what the goal is to get them out of the garage before winter makes them stuck there for months. So during the couple weeks of hell weather we were working through it by getting the breaks on the trailer and some other things done. One other was rebuilding the carb for the motor that was out. With all the back fires and flooding and such it was time. We also wanted to drill the throttle plates. These motors chugging around at boat ramps there is just too much uncontrolled fuel going on. A big cam will do that. Then we got the bright idea to move the remote oil filter on the front motor because it was way to long for no reason, going to the front of the motor when it should be on the back side. Just added clutter. With the relocation we were forced to buy all new easy couple fitting and hoses. Now both motors can replace all the oil hoses by just replacing the rubber hose its self without the fittings which cost all the money. Or about $10 a motor. Lets just hope we never need to now that we can.
Just to finish off the bad weather we put the other boats away for the season just as things got better for a few days and more like fall should be. This time with no real changes to the motor or drive locations it was simple installs, well as simple as drive system can be in a race boat. First was the V-drive along with everything attached to it and there's a lot. The best part is when the prop shaft slid in like a round in a chamber. That made us feel real good about its alignment. We also replaced all the original mounting bolts that for some reason were just a little short. Guess you used what you had back then. Then it was time for the motor and everything that had to bolted on it when it went back. This was the first reinstall since our last major changes and when it went back in with little trouble and made our prior work worth it. The mad rush was on though. The weather window is closing again in a couple days and then there will be no more test drive until next spring.
____________________________________________________________________
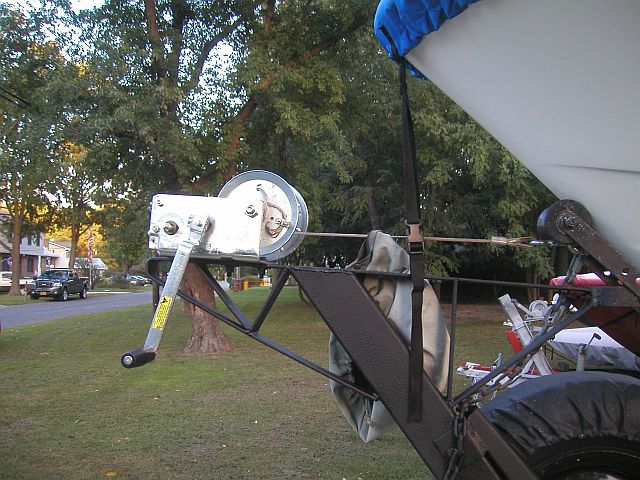
Believe it or not things moved right along and we were ready to go for a ride but one thing held us up. The last time out along with killing a motor we also had an electric winch take a crap on us just at the wrong time (when is the right time?). About 6 inches from the bow stop it was running but the cable was not moving with a low tide and it going out. So we had to wait until the new one showed up and being we got it for about half price on Ebay (it was brand new) we were at the mercy of their shipping practices. We chose a hand winch this time due to the issues we keep having with electric. Its more work but they work.
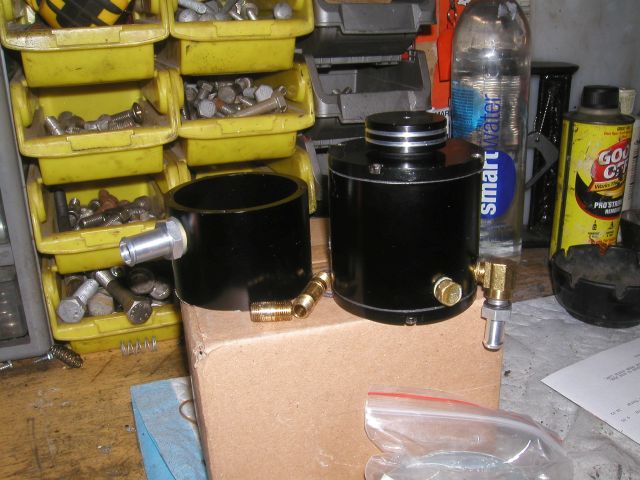
Took the boat out and man did it run great. All the gages were where they were supposed to be and the mod to the carb seemed to help out a lot. We still have an issue with the V-drive puking out fluid even after our small catch can build. Guess it was too small.
Even though the boat is now put away for the winter its not far from our thought. So far we got this oil puke tank which was way to big so we had to cut it about in half. Seemed simple enough until we realized that both ends needed to be cut being where they put the outlets for whatever this thing was made for. It was a project but it got done and dont look half bad. Should look like it fits in with everything else that is there. We also pull the front motors carb and rebuilt it just because we wanted to drill the throttle plates like we did the rear motors carb. We were going to have it apart anyway and know a gasket or something was going to rip. Lucky we did being there was an accelerator pump with a rip in it. How that happens after a couple years of light use gets me. The pump arm is set right to. Oh well at least its fixed and waiting on spring to arrive.
____________________________________________________________________
____________________________________________________________________
____________________________________________________________________
____________________________________________________________________
The SuperNova19 Network