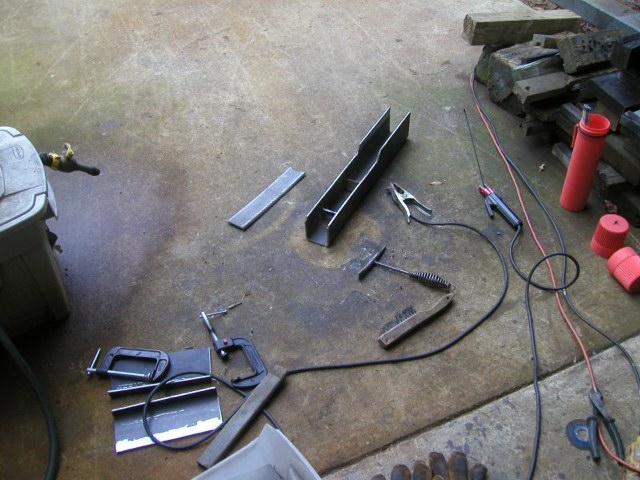
Didn't have any real goal with the race boat this season. It's mostly show and pretty average go up to now. Gas at $4.00+ a gallon and pretty average speed for a bigger boat really didn't make for much admiration to take it out. Also the issues with the 19 this spring, the new Donzi classic restore and the new motor for the Biesemeyer it was a pretty busy season anyway. All that's about to change though.
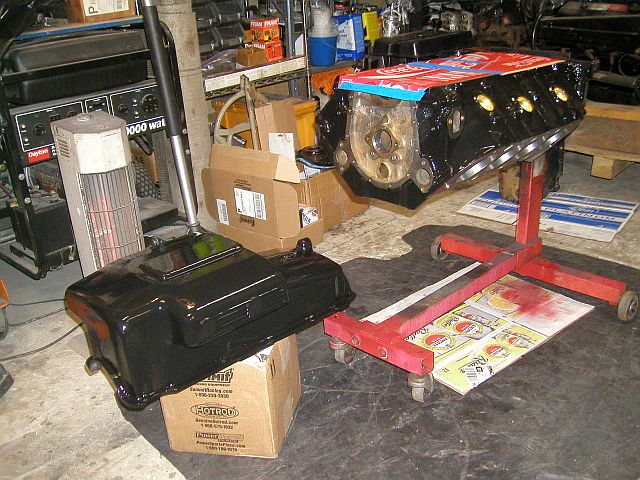
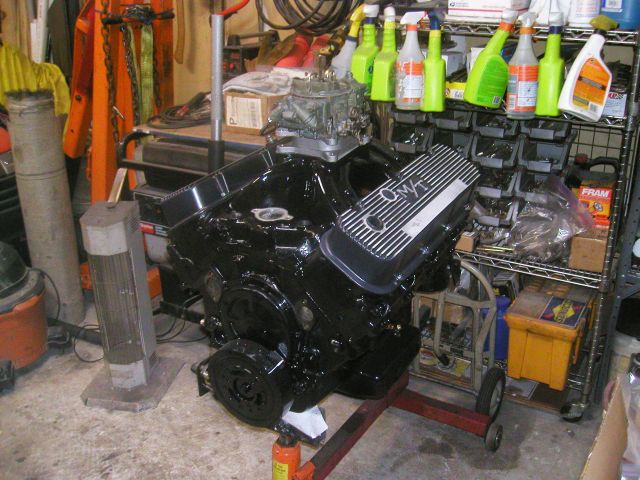
The Donzi is about done after a deck off restore and using the Gen V 454 out of the Biesemeyer. The Biesemeyer got a Kiekhaefer 482ci Chevy Big Block offshore race motor that was made even bigger to a 496ci.
Also did the ACBS boat show this spring again. Things just moved along until it was either time to drop everything and start with the Nova 24 or just forget about it for the year. After thinking about all the above and that the last time the boat was put away it was put away for long term storage, we just left the cover on and the dryers plugged in and finished other things before it got cold out.
After much thought we have come to the conclusion that are not going to restore any new boats for a while and concentrate on what we have. The 19 is fine as long as the motor holds together (fingers are crossed on that wild thing. lol). Some minor work but that's always. The Donzi is going to be sold. The 19 being a Donzi on steroids really leaves no use for it as pretty as it is. The Biesemeyer ... I'm still having issues trying to figure this boat out. I think the 482 install this spring was not the best idea for the boat. The motor is mean enough to rip the 55 year old girl in half and I'm afraid the boat is going to end up at the bottom of the river. Think we may go back to something a little smaller and keep the boat around for a few more years.
All that got us thinking .... if we ..........why not .... swap that one for .....
This is the issue. The 1959 Biesemeyer needs a lesser motor. The motor that was in Biese is now in a Donzi that was just finished and is for sale. I cant even swap motors back because the 482 in the Biese now will not fit in the Donzi (to tall) and the 482 is worth more then the whole Donzi package put together as it sits. Not to mention we didn't go through the hell to resurrect a Kiekhaefer 482 just to sell it off as a everyday BBC in a Donzi. So where to find a mild BBC to swap for the motor in the Biesemeyer ....
Been trying to figure out what to do because the last thing we need is for another motor without a home to be sitting in the garage. Bad things happen when that happens and a motor like this 482 sitting, looking for a home, real bad things could happen.
I found these connecting rods when I was researching the original Kiekhaefer 482 build last year. Looking up part numbers this guy in the mid west was the only person that had a set of Kiekhaefer 482 rods. Best part, the rods are the only "must have part" to build a Kiekhaefer 482 and he had them. The bad part, the rods are the only "must have part" to build a Kiekhaefer 482 and he had them. If you have the part numbers and the money about everything else for the motor is still off the shelf but the rods make the whole thing happen and they are not off the shelf by a long shot. Took about a year to get him to sell them to us. We originally wanted them just to hold on to in case needed in the future. Then we got this idea. How about we build a clone Kiekhaefer 482 and put them both in the Nova 24 race boat and use one of what we call the "show motors" from the 24 in the Biese. That would solve two issues. The Biese gets the motor it needs and the race boat gets the motors it needs.
To be honest I've been kind of looking for a reason to do this. I'm getting a bit of the racing bug lately. Nothing like Offshore Racing today with their million dollar toys. More like burning lots of gas in the river with a big boat. lol. Like said before, the 24 has "show motors" in it. They have had a little bit of work done to them but their main goal in life was to make sure the set up all worked and second was to move the boat forward if possible. They have done all that and then some but they are not race boat motors in any since of the word.
The Kiekhaefer 482 is a true Offshore Race Motor. They were the best of the best in 1968 / 1969 / 1970... O'Dell Lewis beat this very Nova and went on to win the championship running Kiekhaefer 482's in his boat. Didn't hurt being sponsored by Kiekhaefer/Mercury either. Anyway, what better motors to have in a 1967 Off Shore Race Boat then the best Off Shore Race Motor of it's time?
So we have these rods.....
And looked what jumped in the back of the truck. All the biggest and baddest motors end up ridding in the back of the old Chevy van.
The plan to build a second motor was officially started. Didn't think we would get to deep into it right away. We could pretty much do it at will now that we had the rods locked down but after already building one of these motors before we had a parts list down to the simplest part number on file which meant no research was needed. We also know it works after running one last summer. All there was left was buying the parts and making it happen so let the hunt begin and it didn't take long before we already found our second major deal. A running 427 tall deck cheap enough and close enough to go get.
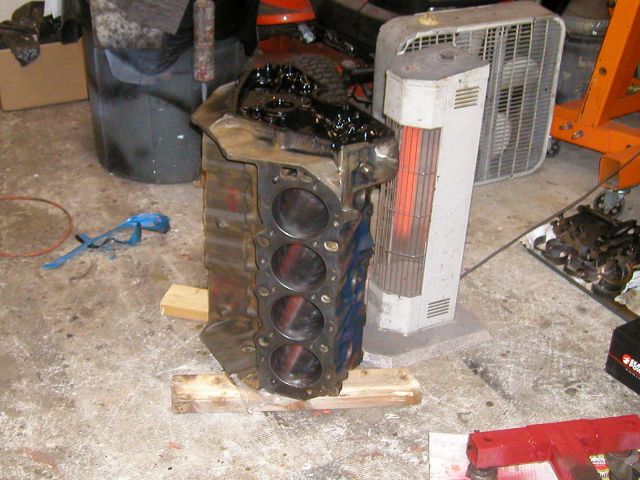
Came out of a late 70's Chevy dump truck from New Jersey. Looked like they oiled the motor from the outside it was so incrusted in grease and oil. Sadly all we want out it was the block and a couple small parts for the 482 build but we paid less then what a bare block with issues would have cost and we did get to keep a couple extra pieces even if they are not used on this project. One was this really cool alternator bracket that I've only seen in books and may be worth what we paid for the whole deal. lol.
Who would think under all that crap there is an offshore race motor.
After getting it home it took three days to strip and clean. Then nine cans of foaming engine clean, buckets of royal purple, scrapers, scrub brushes and a power washer just to get it clean enough to do the work to the block needed and wash it again before it went to the machine shop where it will be washed a couple more times. The motor was so dirty that even the parts we were keeping for later all had to be cleaned before we would even put them on our shelves. They were that bad.
The 427 all taken apart there is no surprises except for it having a 16" flywheel (useless in our world), the harmonic balancer is shot and spun off the hub and the cylinders were already been cut 30 over (someone has already been inside this one). So it's also official that this Kiekhaefer 482 like the other one will be a 496ci having to go 60 over in the cylinders. Not that it's an issue with these blocks. There's pistons north of a 100+ over for these tall blocks because of how thick the cylinder walls are.
Ya the block was blue under all that.
Out with the grinder and files to make all the necessary relief's for the stroker crank and rods. Having pictures from the last build and the 482 rods and the crank out of the original motor made for easy work finding the contact points. Then hit the rest of the block sanding off casting marks, sharp edges and cleaning up the lifter valley. At this point the build stops or we now need pistons and the block needs to get to the shop with those pistons. Again we can do this build as and when we want but being January there is no better off season time to have motor work done so we bought the pistons (another big step) and off to the shop it went. Now the next logical step is to gather the parts needed to finish the bottom end and get them to the balancer for the same reason its the right time to have motor work done as soon as the block and pistons come back. So we have been gathering. Got a forged 4.250 crank, bearings, rings, anything that has to go to the balancer so we can pick it up from one shop and drop it off at another. Doing all that did put a hurting on the bank account but later on this year when we would like to do it would take a lot longer and cost more. Those rings and bearing add up quick so saving where we can is a plus even if it take a while to pay off. Just like the cam. Found a new/old stock in box Crane cam by doing a parts number search every night on the list needed to build the motor. Never expected it and already had a custom one sorced for about $150 more then this one but up pops the cam on ebay still in a original vintage box. Not needing it now we had to buy it anyway just for the future savings.
The block at the shop and most of the parts here for the balancer things are kind of on hold except for anything I can think of no matter how much in the future it may be needed.
Take these valve covers, we don't even have heads to put them on yet.
Another eBay find. When they showed up they were red. Used a wire wheel on a drill to strip that off but the orange under it just wouldn't come off. It just smeared and got rubbery no matter how much pressure was or was not put on it. After dealing with it before many times we know it was some sort of powder coat but must have been put on way to heavy and maybe not baked on well enough.
Anyway it took about six spray cans of stripper and about three days to get all the orange off (there's that original cam box, lol). Soak it and let sit a few hours. Scrape, wire brush and pick out the corners of everything that would come off and then repeat until clean. Day after day. The last set I did like this took about four hours with nothing more then a couple wire wheels for the drill and a couple spray cans. This new set is the worst I've ever done by far.
Once they were down to metal then the real fun began, painting. Everything looks better with a coat of paint! I shot them at every angle with three or so coats of flat black paint (not primer) and let them dry overnight. Next day screw them down to a 2X10 board and just go over the fin tops with a belt sander until they all show evenly and the graining of the metal goes in one direction. After a good cleaning making sure to not even touch the flat paint with a bare hand they were give a couple coats of mat-clear so they have a gloss but not to much and become that perfect black color.
Paid $48 for them and have about $25 in stripper to clean them up. The rest we already had from other projects and such. A new set is about $170 to the door from Jegs. Don't think we did to bad. Now to get the heads that go under them.
And look what made it's return. That didn't take to long considering. All the things the shop was supposed to do and new cam bearings. Not sure why we don't do our own cam bearings and for that matter I'm not even sure why we replace them in most cases in the first case. We were asked a long time ago if we have ever saw a cam bearing fail? No and we still haven't to this day no matter what they have looked like. In this one's case they did look like they could use replacing because of a loose timing chain so we had them pop in our King bearings just because we like that brand for these strokers.
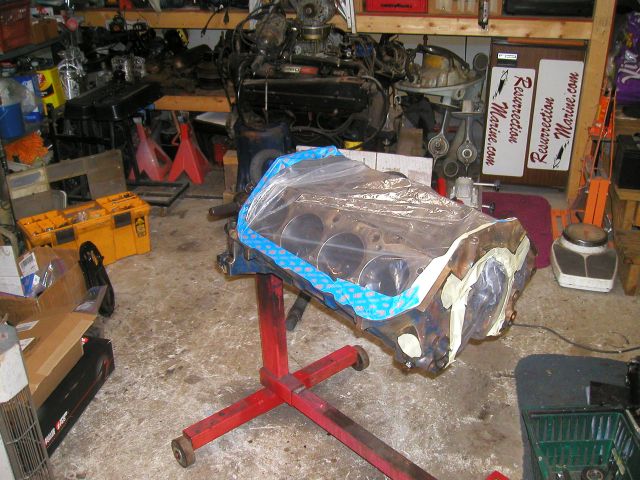
It's pretty cold out so what better way to make sure the block was dry then to stack it in front of a serious space heater for couple days while I was in the shop. While it sat there I got the back side painted and the brass block plugs in before we had to put it on the motor stand.
Now comes the real fun. It's not like this will be the final paint on the motor already knowing something will happen to it if not just for where stuff meets but its an important one in our opinion. This is like when all else fails there will still be this paint on it. It's also usually where a lot of folks get a lot of paint in the motor because you need to spray a lot to cover the raw metal and all its tiny spaces. Dont think it would hurt anything but why take the risk. So the motor was taped up, taken back and forth from the heated garage to outside in the snow to be sprayed down with two coats of flat black and then a couple coats of gloss black.
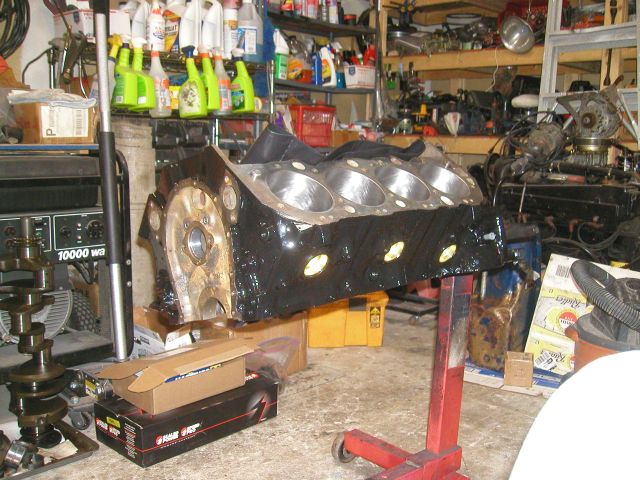
All the oil galley plugs are back in and everything is super clean and ready to go. Now we just had to wait on the crank to show up which was over due. It did today and tomorrow everything goes off to the balancer's so any building is on hold again. At least the Holley 850 from ebay is on the way with a rebuild kit from Holley to rebuild it so there's more to come.
Still waiting on the balancer to give us a call to come pick the stuff up.
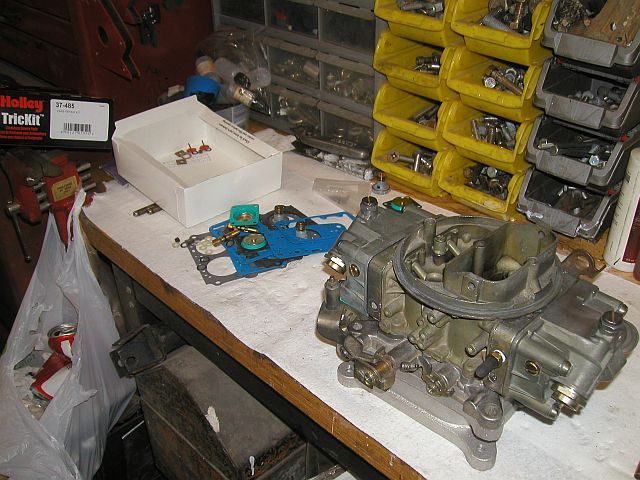
Got the new-old carburetor in from ebay the same day the carb rebuild kit came in and surprisingly they were both early. Got nothing else going on. lol. Time to do a rebuild.
The carb looked pretty good right out of the box so there was no major modifications or anything needed. We were surprised on how much dirt we did get out of it (left in the bottom of the soak pan) for as clean as it looked when it was all over. All new everything inside except for the jets which looked fine and were a good base line to start off with. Pulled the choke out of it and added a fuel line and J-tubes so if it floods it dumps down the throat of the carb and not all over the motor and bilge. Should match the original Kiekhaefer motor's carb perfect and that's all we are going for.
Now this was a bit of a score. There is one piece that is a must have to build this motor. The rods. Then there is three or four pieces that are a should have and the rest can be replaced with what ever is available as long as all the numbers add up so to speak. At the moment even though there is nothing here yet we are trying to get the long block buttoned up but it wasn't looking good when it came to the oil pan we wanted. We found two in six weeks of looking and the same guy had them both and we are pretty sure he thought they were made out of gold or something like it. There was just no way we were going to pay that much for a oil pan no matter how much we wanted the matching 10 quart pan. Then one night we had some extra time and started to search all the parts we were missing in any way we could think of. This one came up under "Mercruiser oil pan" but nothing else. The seller wanted stupid money for it but after not getting a bid we made them a lowball offer on it. After a phone call it was on the way here. More money then we wanted to pay but much less then what the seller started out at and a whole lot less then the other guy was asking. An oil pan is nothing you can change later without major pains so it was money well spent. Unlike the intake that is the same story as the oil pan except their is one on the market and the seller wants more then stupid money for it.
Let's just say the parts are still at the balancers. One thing after another with them. Kind of thinking we have been put on the back burner for a much larger job (balancing motors is just a tiny part of their business). There has been a couple small things that did hold up things but nothing to account for this long. We are pulling our hair out over it. Hate having all these expensive parts sitting around in the garage. Just an expensive accident waiting to happen. Not to mention all the money that has been laid out and all we have to show so far is an odd collection of parts and a rebuilt carburetor.
Just another reason we do this when we do. Here we are two plus months into this project in the middle of winter and nothing is moving fast. A couple months from now everything will cost more and take even longer. I was talking to a guy the other day from S.C. that said he has to make a four hour round trip to his machine shop and the waits are so long I wouldn't even bother so I guess it could be worse.
Picked these up to fill some time. Wasn't ready to buy them at all. Have a process to build this motor so there would be no expense that was not needed at the time. No reason to have parts sitting when other things are need to keep the project going unless their is no option like an insane deal that has to be jumped on.
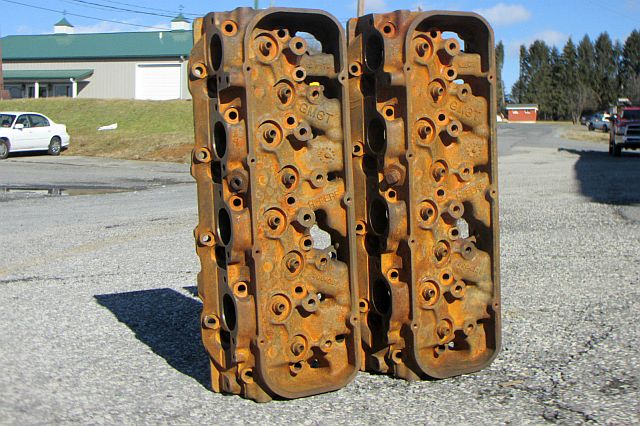
That's kind of what happened here. It wasn't an insane deal but it was OK. The insane part is what people wanted for these 109cc heads. Not sure who they think they are going to sell them to when it would be cheaper to put some dome pistons in a bigger cc, much cheaper head.
But to keep to the guidelines of a clone motor we got the 291 heads. The same 109cc, same 2.19/1.88 valves for the same dome pistons. We did have to keep our fingers crossed after looking at the seller's pictures but we figured the heads were washed and let to air dry bringing out all the red, driving potential customers off. Got them to the garage and besides a valve guide that got cracked in shipping they looked great. Then we went to work on them.
Lots of hours of wire brusher and wheels and then it was on to the porting and polishing stuff we just got. Most of the porting had already been done once before and we're happy to see it being we didnt want our first try porting and polishing to be with these heads.
Wow! Never thought in a million years it would be March and we would still be building the same motor. Close to three months now and that's not counting the planning and logistics before ever getting started. This whole thing really started last fall.
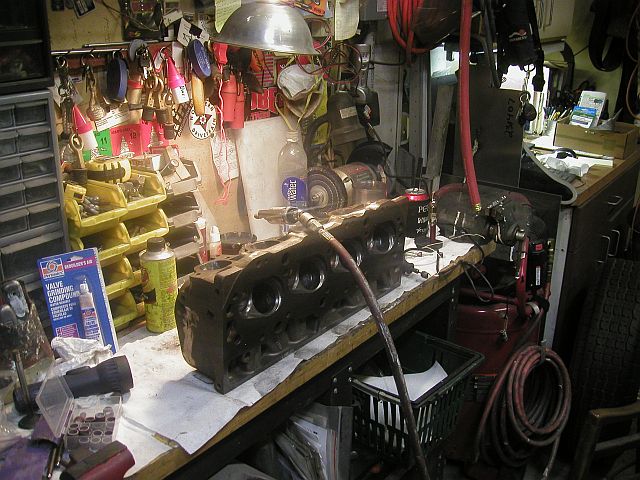
Waiting on the Balancer to get most of the motor back to us left us with only the heads to play with. We had the broken guide replaced and while there the rest of the guides checked and the surfaces for flatness to be on the safe side. Turn around time was like a business day and we had them back fixed and with a clean bill of health.
Once back that's when all the real work on them began. New valves lapped to the seats, cam matching springs, retainers, +.050 locks, shims, rocker studs and pushrod guides. Even new custom length valve cover studs for the thicker valve cover gaskets. We think at this point we have more money in these heads then we have in some boats we've owned. Just to step things up like this whole build has done to our skills this set of heads have been about as close to professorially built within every spec as we can in our little garage.
After a couple different orders for special parts the heads were done and they also joined the pile of parts waiting to be turned into a custom offshore race motor.
And bam.....it's just like Christmas. All the boxes of parts were back from the Balancer ready to be opened up and put together.
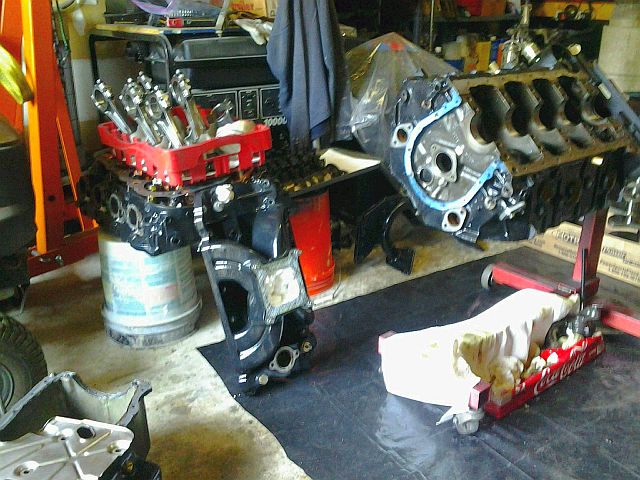
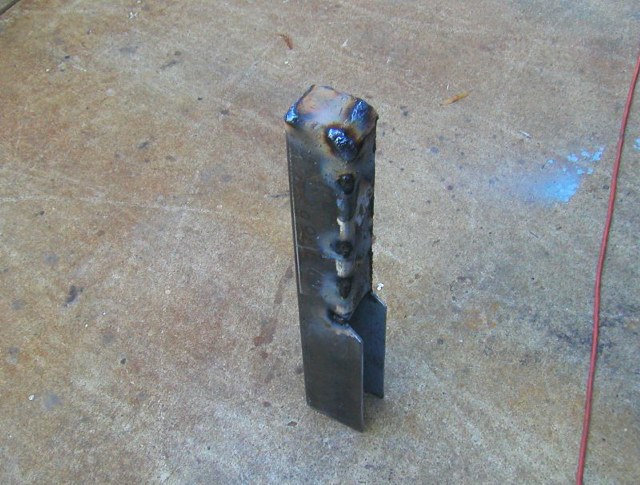
Nothing could be put in the block up to that point due to the crank that was going in the motor had never been in the motor. Lot's of grinding and such was done to the block clearing for the stroker crank with the old 427 crank as a stand in with a chunk a 1/4" aluminum stock used as a feeler gauge. So with the chance of future grinding being needed the first thing before anything else was to make sure the crank and rods were not going to hit anything. Being so far the grease ball that we brought home had been disassembled, degreased a bunch of times, power washed and scrubbed over and over and that was before it went to the machine shop to be worked on and then hot tanked it was a couple hours of assembly, rotating, checking and then moving on to the next cylinders hoping there would be no more metal dust flying around in the motor from a grinder.
It all passed and then it was a simple assembly. Well, up until we had to make a custom windage tray for the oil pan. That took a little figuring. Didn't turn out to bad and should do the trick.
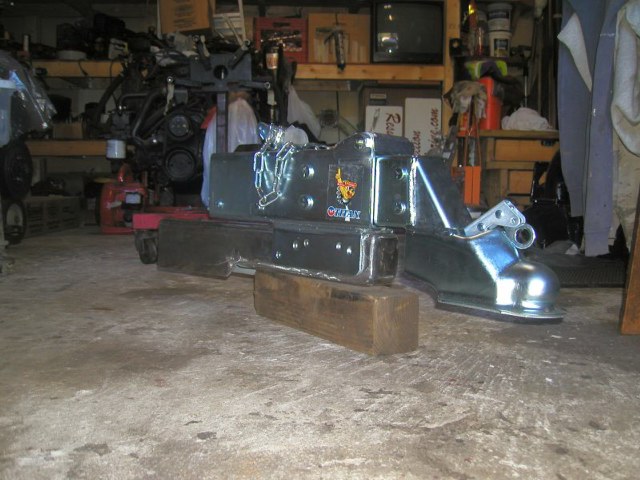
Couple days later we have this. An official Kiekhaefer 482 clone. Still missing a couple parts but nothing that cant be had for the right price and shouldn't hold up anything being there is still snow on the ground and they are calling for more later this week.
We need to swap a couple motors around this spring.
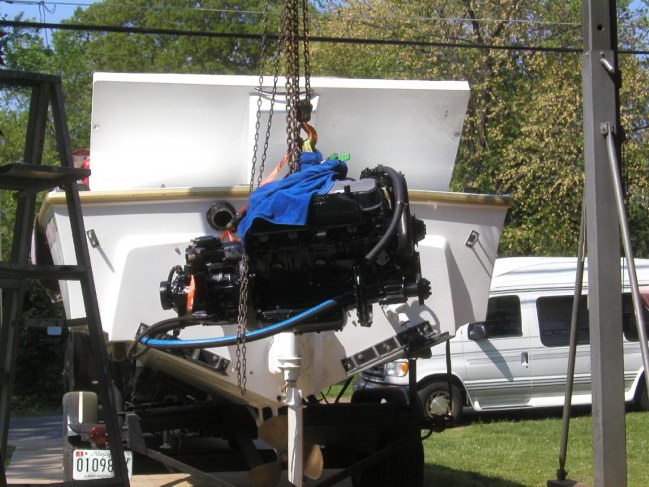
With the new 482/496 clone in the garage we have to remove Gen V 454 from the front of the race boat. Strip the external pieces and install them on 482/496 clone in garage. Install 482/496 clone in front of race boat. Remove 482/496 from Biesemeyer. Strip external pieces and install on Gen V 454 in garage. Install Gen V 454 in Biesemeyer. Remove Gen V 454 from rear of race boat. Strip external pieces and install on original 482/496 in garage. Install 482/496 in rear of race boat. Got all that?
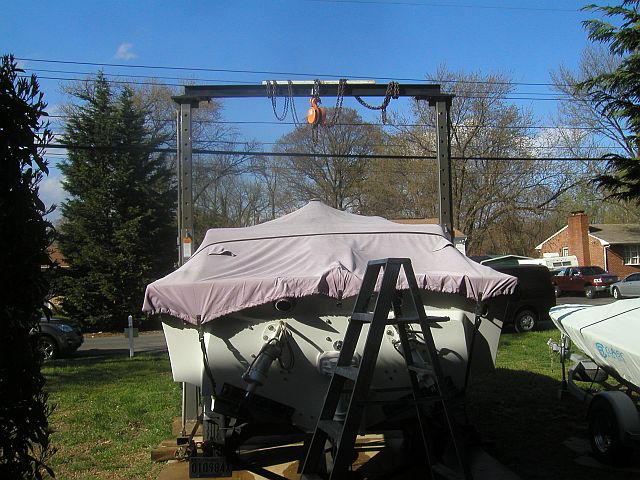
If it was only that easy. In the right situation pulling motors in this boat wouldnt be that hard. Even with the gantry and such that without would be impossible to do any of this its still a lot of work setting it up, balancing and pluming it, picking a motor, moving the boat, etc, etc.
It also never fails that as soon as we finish a project like a motor install we immediately come up with things we want to change or improve. This was no different. When we changed around the motors a couple years back so the front motor went to the bottom gear of the V-drive we also changed the motors angle. It was a lightly force into place thing. This time because we are using 427 tall blocks we wanted and needed to move the whole motor and its mounts. Not much but the 4 points needed to all change so the manifolds wont hit stringers etc, etc. Also needing to pull everything off the 454 and needing to reinstall it all back on the 482/496 there was a couple days before the motor went back in while we went to work.
Both front motor mounts and the transmission mounts were in their new places. Before the 454 came out we marked off where the solid L connectors needed to go on the stringers for the new motor. Then it was as easy as moving, clamping and drilling out the holes for them to be reinstalled. The way the offshore mounts we use attach to the L mounts on the stringers is they are sandwiched between two steel plates with a bunch of bolts. Leave the bolts slack and there is some fine adjustment in them before you tighten them back down to solid the thing up. Between that and the adjustability of the transmissions mounts the motor slipped into place and required very little re-drilling of any mounting holes. As things progressed it seemed like it was a much better install overall then we had before. Manifold to stinger clearances, angle of the driveshaft, height of the motor, it was all much better.
Really didnt expect to be taking this motor out of the Beisemeyer so soon. Its just too much for the 50+ year old girl. But thats a story for another day. Now, here is the second motor for the race boat. Lot easier than the clone motor thats for sure. But before it can go in the 24 the Biese has to be put back together with the 454 we took out of the front of the race boat. We need to get it out of the garage and all the parts had to come off of it so it was just a easy to put them back on the motor going back in. Plus installing a motor in the Biese is like installing one on an open sided trailer. Couple hours from garage to boat ramp and thats using a different motor. The same motor is even faster.
So now the Biese was done enough to no longer need the only piece of concrete we have it was on its way to the yard and the 24 was back again for another go around.
Again having to set up, plum and level the gantry and everything that goes with it, out the rear 454 came and again there were a lot of changes to be made before the new one went back in. All four mounting points had to be moved and the whole set up was going to be moved toward the bow two inches. This would require the driveshaft having to be cut down this time. It has never been fooled with and we are sure it could use being re-balanced anyway. Our original install closed up the driveshaft as far as it would go trying to get the motor mounts matched up to what we thought where the real original mounts were. Over time we have concluded that no matter what we do the mounts will never match because there is just too many differences between the 427 Fords and the 427 Chevys we are running now.
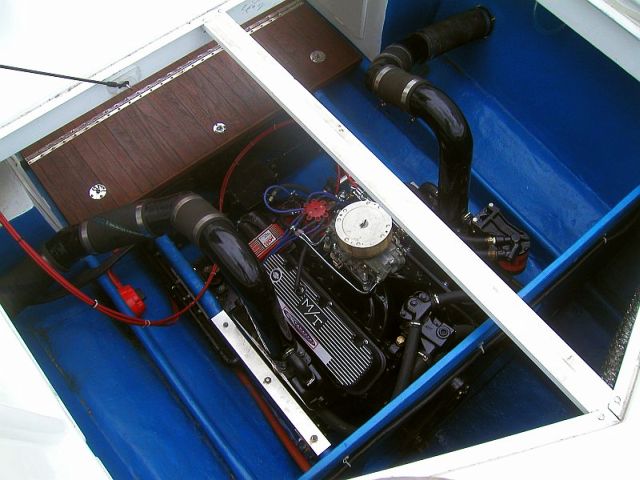
Another one of the main reasons for the big move is the exhaust. There has been many fights with the way it runs because of the angle of the motor and the way the risers are tilted and how close it all is to the rear deck. Impossible angles with 4" tube. So we are changing the height, angle, position, everything and for the most part, all this extra work, driveshaft sent out and shortened, is just to give us a little wiggle room. With the tall block in there with its tall intake with a spacer on top of that and then that big 850 double pumper it looks even more crowded then it was.
Work has been stopped for a few weeks due to the 19's issues and it going to the boat show (June 16th). It's not always about the race boat. Got to pay attention to the one that started all this now and then. Sadly it required a lot more attention then we could ever imagine. Even after giving ourselves a 5 week cushion we still came up short. Long story (all on the 19's pages) but here we are. We buttoned up everything we could think of. Tuned the motors the best we could in the driveway and it was time to get some gas and drop it in.
Don't look so big in the water. Just like an iceberg.
This is a real first test run for the new Kiekhaefer 482 / 496's.
First test drives with these old boats don't go well for us very often.
The punch list is long with some easy and some hard stuff.
Had to take one of the sea strainer completely out to fix the leak from the movie. Wasn't the strainer but the pipe feeding it. Then found both brass drain plugs in the bottom were leaking on both strainers. When I took them out they broke up and screwed up the threads so we redrilled and tapped the drain holes for half inch stainless steel bolts. Shouldn't be an issue with them in the future.
Had to redesign again one side of the rear motors exhaust system. But that was a good thing in a way being I needed one side taken off anyway so I could get to the raw water pump. I have always been a little guy. There is no way in hell Brownie ever bent himself in some of the places Ive had to on this boat. You would think its a big boat but there is just no room to work on things.
Apparently the raw water pump on the rear motor was an issue. The impeller exploded and for the most part the veins just jammed up inside of it. I found all but about half of 2 veins. Searched from the pump to the thermostat housing so if they are still in there they must be in the motor now because I didn't find them. Replaced the thermostat (because we had a new one and it was apart anyway) with a 140* stat. We will see if that fixes it.
Another issue that seemed to be with both motors but only showed itself on the front motor was an issue with the thermostat housing itself. Even though I took the cooling systems off factory MIE330 Mercs that were raw water cooled somehow they have the wrong gaskets in them. They used a restricted bypass gasket. Basically all the water that didn't go through the thermostat had a hole the size of a BB to get through. To add insult to injury, the front motor had a tiny flake of rust that lodge its self in the BB sized hole and blocked it completely. Now no water could bypass the motor and the full force of the raw water pump was trying to push it through. The last time something like this happened was on a motor I did as a teenage. The water pressure was so high with no by-pass it blew out the rear freeze plug under the bellhousing. Not as bad this time and just replaced the gaskets in both stats with the open style.
The raw water pump having all that extra drag on the motor may explain the motor dyeing when it would return to idle.
Even though it was a short ride it opened some eyes on some stuff and made a long list (too much to list here being we are working on a second notebook page) that we will be working on for a few days.
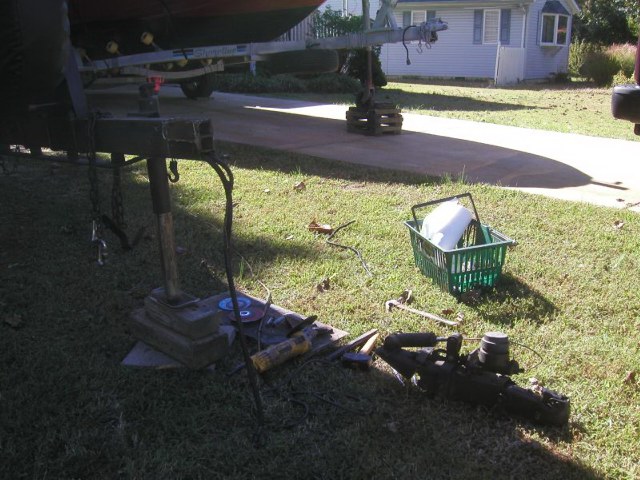
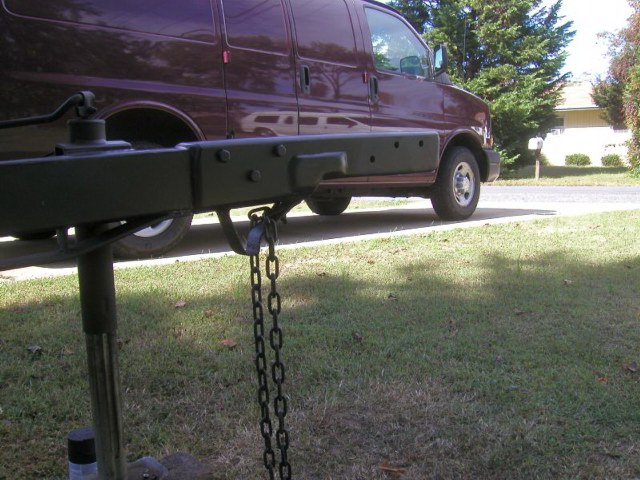
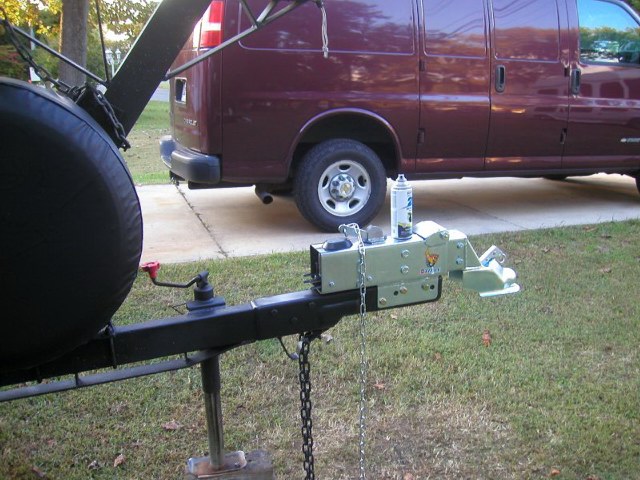
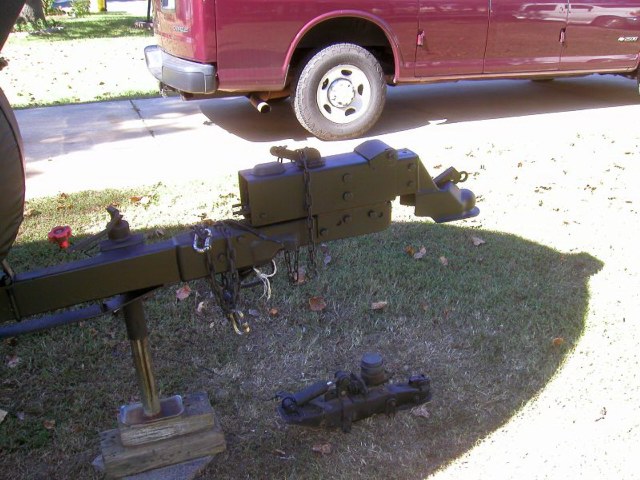
Sometimes its also not always about the boat. There is the 1969 Thunderbird trailer that sits under it most of the time. Still working on it here and there. This time after the new axles were installed is getting it to tow level. Due to the van's hitch being low we got a ball mount that had a three inch rise. Leveled things out real nice.
We set today as a new goal due to what we found a couple weeks ago. It was a long spring and first half of the summer and we did a lot of hard work just to be bitch slapped again and again. We were making good progress on the punch list but something kept nagging at us. We were ready to say screw it and go for another test drive but then the family vacation came up a couple weeks back and it gave us 10 days to drop it all and re-evaluate all the goings on. It seemed like we were spending a lot of time, money and moving a lot of iron but making no progress in both the 19 and the 24.
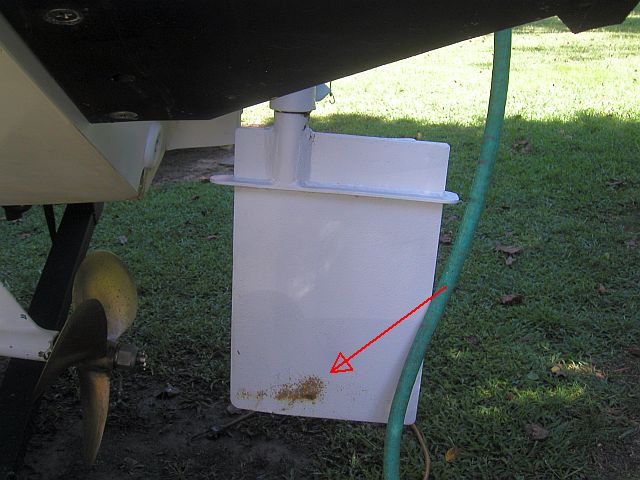
This is part of the re-evaluation and is the only picture we took (with an old cell phone yet) of this whole deal. Just didn't want to even think about it really. The test drive that killed the impeller on the rear motor that we spent half a day fixing apparently also contributed to a blown head gasket. Just kept finding little tiny bits of evidence of water. This motor spent a year in the Biese and never showed a drop of anything but super clean oil. We just tested the exhaust before we put it together and the manifolds were also dry when we took them off. So again out came the gantry and all that goes with it and a few hours later the motor was in the garage again.
It wasn't bad, well, as bad as having a motor now in the garage again that belongs in a boat but it could have been worse. When the oil was drained it looked like clean oil but as it was taken apart you knew there was water in it even if it was just a little. Another set of gaskets, rings, bearings, etc, etc and back in the boat it went.
It's a lot of work just getting this thing to the ramp. Not as easy as going down to the end of the street and using the neighborhood ramp. Got to take it about 10 miles away to a deeper water ramp. Also got to pay to use it, there's little parking and normally need a second person and it has to be high tide and .... We have a new ramp opening in the park that our neighborhood sits next to this coming spring which should make life a lot easier when it comes to using this boat. Been a long time coming being we have had a boat that don't work at out boat ramp for 6 years now.
There has been so much going on that we're sure we are forgetting a lot of stuff that's happened over the last couple weeks. Its been an off the chain season when it comes to projects that's for sure. But the stars have lined up and we are ready to go for another test drive.
Second test drive with the new Kiekhaefer 482 / 496's. Again, it's never easy. Here is the full uncut version.
Starting to figure some of this stuff out. Other things, not so much. Also have a few more new issues. Got fluid all over the place, dont know whats going on is that last thing I say in the video. Thats a new one.
It wasnt running perfect during our test drive but it was good enough to fool with a bit until we found the fluid. Around 5:30 in the video we really got into it a little. Fastest the boat has been in 45+ years. But like normal our short ride was expensive and gave us a lot more work to do before it would happen again.
One thing we learned during our ride was how easy it was to activate the trim tab switches when using the throttles. Couldnt figure out why it was leaning hard to port and wouldnt turn. The jet skier behind us loved it but I was in a panic thinking the steering locked up. Once I put the giant tab back up it was all better. The boat doesnt like slow speeds and drives like a tank. Maybe its the prop and thats something that will be addressed now that we are finally getting to that point until then we will just have to take a wide turn when going slow.
But for now we need to get back to the list of repairs needed like the oil pressure in the rear motor is concerning us. Both motors are cooling wildly, swinging temps from cold to hot. Plenty of water but its not getting through the motors properly. Oil has sprayed off of one of the V drive yokes or from a seal or something that has never leaked before. The prop-shaft rattles at low RPM. And then there is this prop burn I found on both sides of the rudder. Also when we were getting into it we found the steering to be real stiff. Maybe something will have to worry about later.
Couple parts came in yesterday which gave us a pretty Sunday to lie in the bilge of a boat. Its our fault. When we were doing the mad motors swap this spring we noticed that the front motor's oil cooler and transmission cooler had been reversed at one time. After looking at pictures of when we got the 454 it had always been like that and I guess was no big deal for a stocker motor but a 6 inch cooler for a 496 off shore race motor was not going to cut it. The 14 inch cooler on the trans could stay and for that matter we already replaced the rear motors transmission 6 inch cooler with a 14 inch. So we spent the day pulling apart enough motor to get to the coolers, swapping them out and then putting it all back together. It had nothing to do with repairs from the test drive but it was on the list of things we still needed to get done. We want it all done this time.
Just like clockwork with the help of the Internet and a credit card we had a solution to our cooling woes sitting on our front porch come Monday afternoon. We have a cooling system that works perfectly on a pretty bad ass (when it runs) 496 now. All we have to do is copy the 19s cooling system and after not having luck with the systems we have thats what we did. New BBC raw water thermostat housings and stats for both motors. The rest of the cooling systems are pretty much the same already.
Not only are projects going on with the 24 but also with the 19 so a couple winter projects can happen and the Donzi 18 is getting ready to go off to its new home. Busy fall ahead but for now I just want to do something creative for a change. We feel like we are just spinning our wheels with this boat sometimes. This will be progress as small as it is.
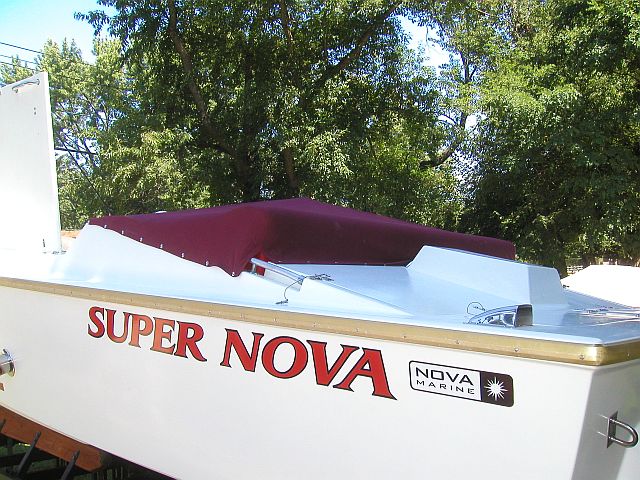
Had a big parts order called in for the 19 along with parts at the machine shop but nothing was happening with it yet. Had most of the stuff wrapped up on the 24 except but I was still deciding on it yet. Bought this roll of Sunbrella fabric last winter with the thought that this year I was going to make a top for the 24. The full cover is useless unless its sitting on the trailer in the driveway and the last time I towed with one on it had a 4 foot hole in the back of it when I got home.
All we want is something that will cover the cockpit when docked over night or when we are towing it. Just enough of something to keep the rain out. So we got out our 50 year old trusted industrial sewing machine and some tape and went at it. Lay it out, do some stitching, lay it out again, tape up what to do next, more stitching and repeat over and over. Never made a top before so we just copied a couple others we have and worked at it until it looked like them.
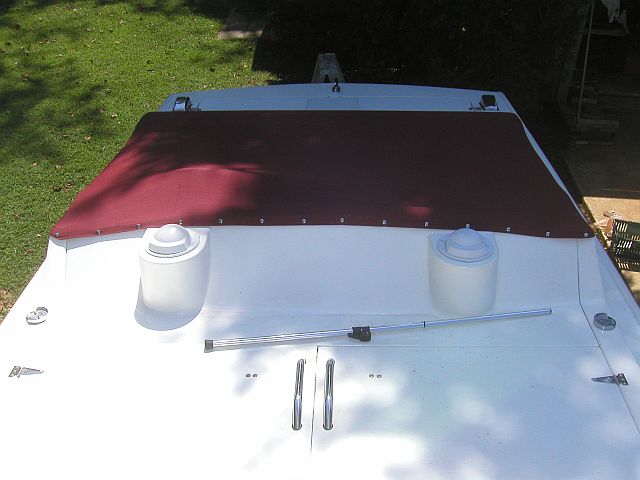
The back side was harder than the front getting it to go around the seat back and such. So we doubled up the inside corners and did the same for where the steering wheel and post holds up the center for added strength.
Drilling that first hole in the hull for the snaps took a couple deep breaths before pulling the trigger of the drill. Once the hole was there, there was no turning back. Used the same stretch pattern as we used for installing carpet and it worked a little too good. The first time putting the top back on it was a bit tight. Not so tight that we couldnt use the same adjustable pole we use for the normal top though. Figure over a little time it would stretch out some anyway.
Really wish we could get this drive train stuff behind us for a little while. Its been 6 years since we built the boat and there are so many things we want to do to the hull. Stupid things like new different rails, front vents (we have already), maybe gas tanks or even paint but as long as we are fooling with race motors and the costs that go with them there is never money for the extras.
We did pick up a couple Ritchie compass covers at like $35.00 each. Insane for a plastic cover that you would think was part of the disposable shipping packaging. Cant use them for towing. They fit perfect but they just sit on the compass. They dont attach in anyway. Still trying to figure out what to do about it. Compasses are a bit finicky and we are trying to avoid any metal or magnets in this area.
I underestimated the issues and attention needed with the rear motor a tiny bit, to say it PC. In the real world, I f_ed up. Having two motor builds going at the same time (for 2 boats), both needing special bearings and special sizes I mixed a number up and ended up getting a size too small for the rod bearings when we did our quick de-water a couple weeks ago. Pretty lucky we keep insane records on all of our builds and on how they progress just to keep them straight. Couple things didnt add up with what was supposed to go in the motor and what we got in the mail when we were filing things away. Put two and two together and we're happy we caught it but kicking ourselves for just trusting it to be right in the first place because we have done it before. So guess what?
Because we are feeling like total morons we are paying for it by being super overly paranoid about every little thing driving us nuts. This is the original Kiekhaefer 482 which I was told should be put under a glass case in a museum. So we put it in the Nova 24 race boat museum, race motor section. But in all seriousness we are a little more protective over this one. Having the wrong bearings in it is inexcusable. Not trusting anything at this point we started over all the way down to the last bolt. Checked the crank for roundness, rods, old bearings, everything and we may have escaped one major repair for our screw up. Still have to rebuild it though.
Things are progressing a little slow because of parts. Had to wait until I got the motor apart down to the crank to make sure the wrong bearings were not the right bearings and not the wrong bearings before we ordered them. At more than 100 bucks a set its not something you buy a couple different size sets of just in case. So they are at least a week behind the rest.
Being already apart just a couple weeks before and not being full of water or anything it was a day of just cleaning off gaskets and such. Simple but wet work on a cold Sept day.
These are the heads that started us on the head building learning adventure that we have been on since the first time we had them apart and here we are again. We have learned a lot since then and a while back we went crazy and bought spring seat cutters, valve guide seal cutters, valve spring height micrometer and an assortment of shims so now if a head comes off a motor it get the once over. Also we learned a lot about what is available in locks and keepers of different heights. Not an expert by a long shot but besides milling we can finally do most of the rest in house.
So the heads hit the work bench. We found new valve springs (kept the originals because of their $500+ list cost). Pretty hard to find the original recommended part number from the Crain cam card. Were sure there was some sort of cross over part number but there is nothing like the originals. Paid about 40% of what most were asking by just telling the seller I am your one and only customer and this is what I will pay. It worked.
I was told the springs should be changed just because of thieir age. The original springs were already shimmed when I took the heads apart the last time so I figure they were adjusted to the right heights before. Get out my stuff and start measuring. Spring height should be 2.000 by the cam card but yet I found spring heights as low as 1.849 without any shims and there was shims under all the springs. So I first get a set of .050+ locks and try them. Measure again and was only getting .025 out of them. Hummmm . So I get a new set of matching (to the springs) keepers. Put them in and measure it up and between the new keepers and the .050 locks they picked up another .075 in height and the locks fit much deeper in the new keepers like they should. Still had to cut the spring seats some but nothing like I would have had to if I used the old keepers and locks combo. Best I can figure after doing some research is the old keepers are meant to be shorter for some reason.
Now everything is between 1.990 and 2.000 spring heights with at least one hardened shim under each spring and everything was measured for coil bind and to see if the keepers will hit the seals. All is good. Not expecting much from the change but always trying to turn lemons into lemonade not only are we going to fix our screw up but we also get the heads upgraded with new/better locks, keepers and springs. Takes the sting out of it a tiny bit.
As things came in they went in the motor. Before long the bottom end was together and then the top end. Like normal we had changes in mind before finishing the last install. One was to change the oil cooling lines to where they went into the oil filter mount from the motor side and not the outside where the lines hit the stringers. Because of the motor being reversed and the filter mount being on the backside of the manifold it normally wouldnt work but this filter mount is universal and has inputs/outputs on both sides. Swaps some lines around and now the lines are much tighter to the motor and away from the stringers. Also after a You-Tube lesson on how to make/remake these Quick-Connect push on lines at home now all the oil lines are just the size they should be instead of making work what they made at the hydro shop with some guesstimate measurements. Its amazing on how screwed up an extra inch on one on a matching set of hoses can be.
With everything showing up the motor was back together and on its way back in the boat. But before that happened we still had to make a couple tweaks to the motors height so we could make further adjustments to the exhaust system. We once again moved the front and rear motor mounts which will put the motor at an even better angle to the V drive and at the same time get another inch for the exhaust. We also ordered another couple feet of 4 rubber exhaust hose and we are in the process of making a couple custom fiberglass 4 tube elbows. They have to be about 7 degrees, not something you get off the shelf. Also going to trim the underside of the deck of anything that blocks the exhaust hose rising up to the manifold risers from the tips. Nothing else worked so far so something has to be done.
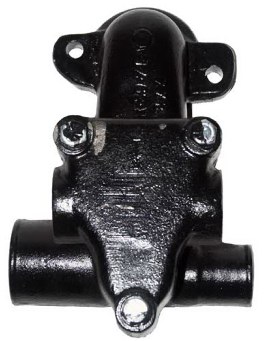
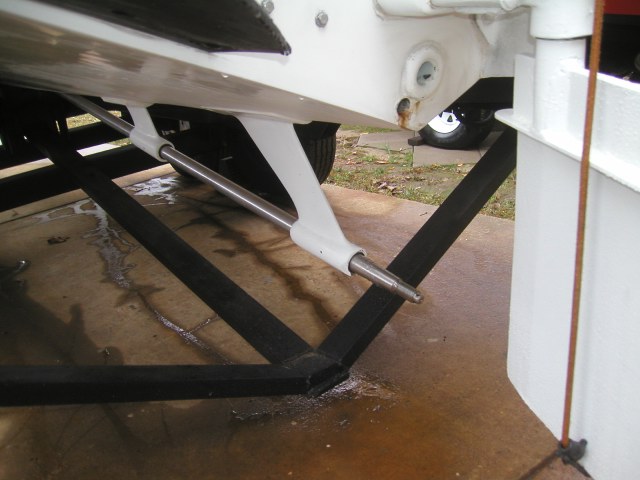
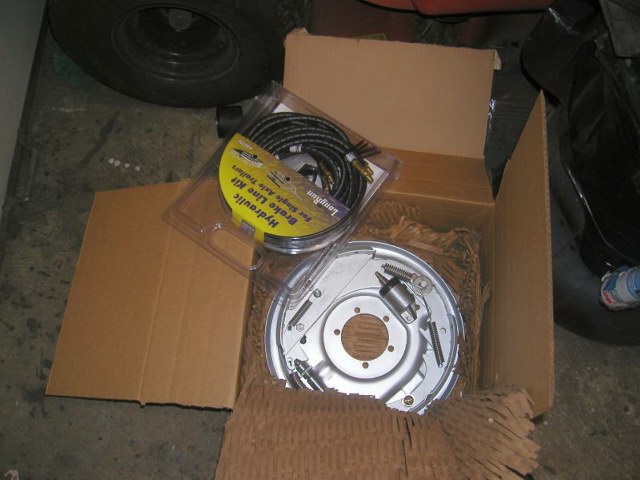
Cutlass Bearings.
Now there's something that will get you off track. Had to do 2 of them in the Biesemeyer this summer. Never done one before until then. Watched a video of it being done and was happy I did because it would have never happened without the instructions from it. With them it was pretty straight forward. Popping the bearings in the freezer overnight makes them go in better. Use a piece of all-thread with washers and nuts on both ends and I used my air ratchet because when I pay 70 bucks a piece for something that will never be seen again it gets the royal treatment. Boy, then the driveshaft with a little soapy water on it slid back in like . Wow! All the way up to the V drive. Put the rudder back on and the Biese was done. Not so bad.
The motor still being out of the 24 and the prop shaft bearings needing to be replaced we bit the $160 bullet (for 1-1/4X5 cutlass costs more). Unlike the way the Bieses driveshaft went back in the 24 is a different story from what we remember. Something about driving the driveshaft in with a big 4X4 or something . So we dropped the rudder which again is turning into the hardest part of the whole replacement. Unbolted the V Drive coupler and like it was put together so it could come apart one day we just drove the two bolts in from the other side spreading the coupler and after a good tug on the prop it slid right out. A minute later the whole prop shaft was sitting in the garage with the rudder. Now the hardest part is getting the old bearings out. These bearings had a brass backs. The Bieses didnt and were easier to cut and break out. Had to use extra time and caution when cutting them out of the one of a kind struts. Dont want to turn an expensive job into a mega expensive job. When done only had to re-tap two set screw because they had to be drilled out but no other damage. After some cleaning the new bearings went in with no issues. Spent a couple minutes detailing the driveshaft where it goes into the coupler so there wouldnt be any snags and polishing out anything else we saw. As we put it back we had our finger crossed. Just like the Biese, it went right in all the way until it hit the V drive shaft as smooth as smooth could be. Just to make sure the prop shaft was straight we spun it over and slid it in and out a few times in diffrent places and every time it was perfect.
And bam! Just like that we are dropping the motor back in weeks later. Lol. This time it went in a lot smoother being our adjustments werent as extreme as they were the last time. Here again we were a little concerned the driveshaft may not have been cut down small enough but that turned out to be nothing to worry about. We even more this time like the way the motor sits. Just seems like everything fits just that much better than it ever has.
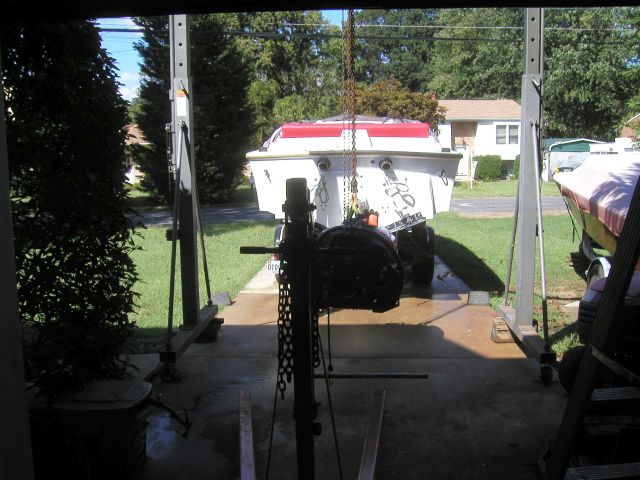
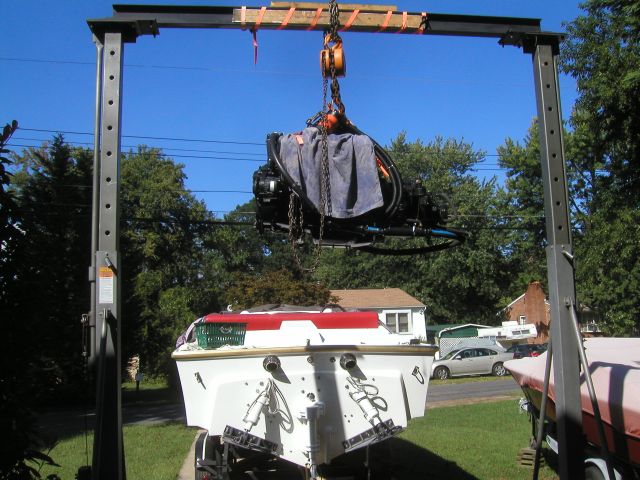
We have to say, at one time we were a bit intimidated about pulling and installing motors in this thing. It requires a gantry that lifts the motor 12 feet in the air. Dont seem like much until you have a 1200lb motor hanging from it. The boat has about 3 inches on each side and the gantry doesnt move the boat has to. For the front motor thats a lot of moving with a motor hanging over top and 3 inches on each side. It wouldnt take much to pull the gantry over either. Ive done it pulling a motor in the garage with the lawn tractor. A hose clamp on a cooling hose hooked onto the pull chain of the chain hoist. Once the motor was away from the gantry a couple feet (what I thought was far enough) I turned around to see where I was going. Went about five feet and I heard the chain snap tight. As I look back I see the gantry fall off the leveling blocks and start to fall over in slow motion toward me. All I could do is floor it and pray. The top beam missed me by about 5 feet as I sat on the lawn mower. The beam bent like a taco over the motor hoist I was using to drag the motor into the garage with. Then the whole thing started to roll over toward the Donzi 18 I have for sale and stopped just short of hitting it. Lucky enough the race boat was pulled out but now we had a life size jinga set and if the tower fell wrong it was going to cost us a just restored Donzi classic besides the damage that is already done. We wont even get into the damage to my pride or the years it took off my life.
Took the rest of the day to clean up the mess. Had to run over the beam with the truck to straighten it back out. To add insult to injury when putting I back together one leg fell over for a second time and besides knocking me off a latter it took out four courses of siding on the house. Lets just say the lesson was learned. Its not as scary as it looks but dont take your eyes off the ball because its not forgiving either.
And nothing will stop a project like having the siding ripped off the front of the house.
This is starting to suck. Its only a matter of days and the season is done. And once again the 24 is not the only boat in house and winter is coming for all of them. Along with the other two having to be put away the 19 still needs the motor pulled and is another reason I need to be done with the 24 soon.
Exhaust, exhaust, exhaust. No more games. All the work we did prior to the motor going in making sure the run was clear to the tips. New, longer section of exhaust hose to change things around with, new custom fiberglass elbows along with the motor move so the risers will be in better locations and angles. Its nice catching things before they become an issue. Usually though if you are catching it its unexpected and its hard to be prepared for every unexpected. This time it was the right thing at the perfect time. When the impeller went it made the exhaust run dry and hot scorching a lot of the old f/g elbows, connections and exhaust hose. Not unsafe but sure to leak at a joint or something at some point. This time all was pretty much new while even eliminating a lot of the old connection. This time we think we have it right. Down angle all the way with no puddles from one end to the other even with the boat slightly sloped down in the driveway. There are only connections with T bolts clamps at the risers to the f/g elbows and for the elbows to the tips. We also replaced the flappers in the tips. Not sure why they are there in the first place. If we take a wave that high up the transom the motor is more likely to suck water down the carb before going up the exhaust. Lol.
We have since move her out of the driveway and back to space on softer ground while the 19s motor removal had to be started. We are pushing the weather envelope as it is but The 19s motor is out and we are between parts orders and arrivals so we thought we would kick over the motor for the first time and at least break in the valve springs. Pretty much all we had time for being you have to get the motor to operating temp without revving it too much and then let it cool completely down to air temp before running it again. Still got to hear it run and see the temp and oil pressure stay where they should be. Staying positive with what we saw when it was running but we dont think there is much hope of it seeing the water again this year.
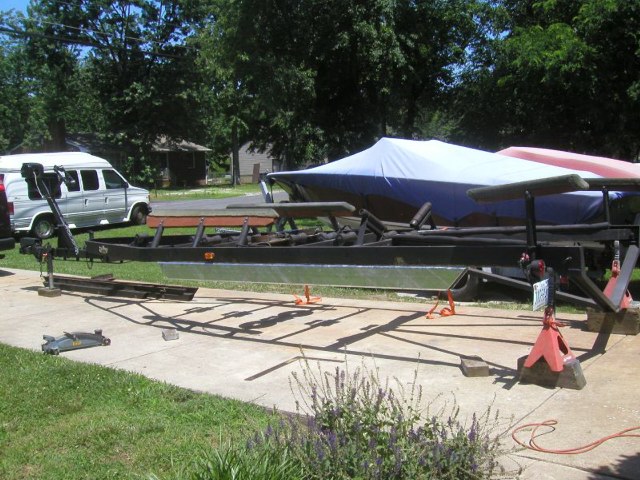
Just like the first day this whole race boat project began here we are again with the 1967 Thunderbird trailer that we've been saving it from the scrap heap we found it on for the last 6+ years.
Been trying to keep it as original as possible by first fixing what was there. Over the years things have been getting replaced cause theres only so much fixin that can be done. A couple years ago we cut everything off the bottom of the cradle. Beams, axels, everything and replaced it all with new. It was all just too far gone to save not to mention half of it was patched up C channel. Still tried to keep the original look but safety had to come first.
After the fenders and such were reinstalled most wont notice that half of the trailer was cut off and replaced but for me it means the ice has been broken and I might as well ...
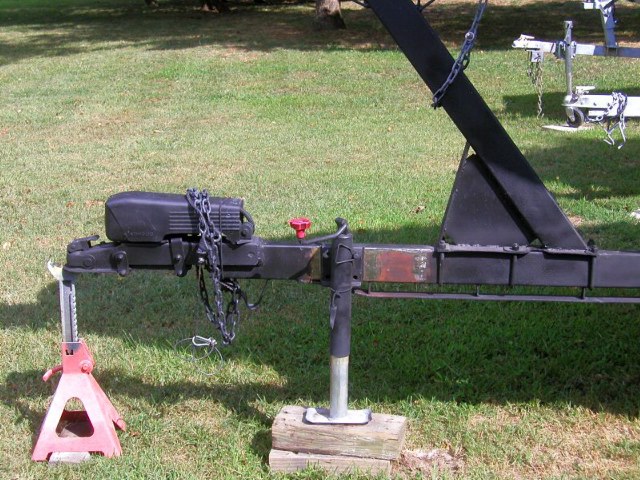
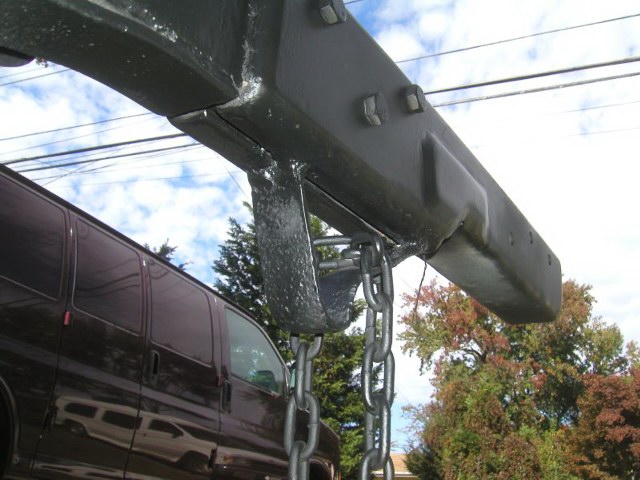
One thing Ive been in a losing battle with since the first day I got the trailer was the surge brake coupler. Spent hours looking for the lost cover in over grown poison ivy just to find it flattened like a pancake. Spent more than a new one would have cost buying one of a kind pieces to put it back together. After working OK for the last couple years it totally failed the last time out and nearly caused a real issue. I had good brakes on the truck but they suffered with the 24 pushing it around. Couple of the special pins in the coupler seized up and even though I got them out, cleaned, greased and reinstalled without totally f_ing them up it still wouldnt move all the way and was a bit cocked. Contact a guy at Atwood thats helped me before but there was nothing to fix the 48 year old coupler left in their parts dept. Throw away generation .
So I figure it has to be replaced as much as I didnt want to do it but it has to because the trailer is really just to get the boat to the water, not kill us. Thats what the boat is for. So we do the research and order one thats a few grades better then what we should have just to see what it will take to install. About all the surge couplers on the market today mount to a 3 inch beam and if you notice in the above picture the trailers coupler beam is a 2X4-od. They stacked what looks like scrap steel and welded it on to make up the difference for the old couplers width (it was also a 3 weld on). Figure we have to do something a little different this time if for anything the new one mounts on top of the beam and when we take the old coupler off there wont be any beam for it to sit on.
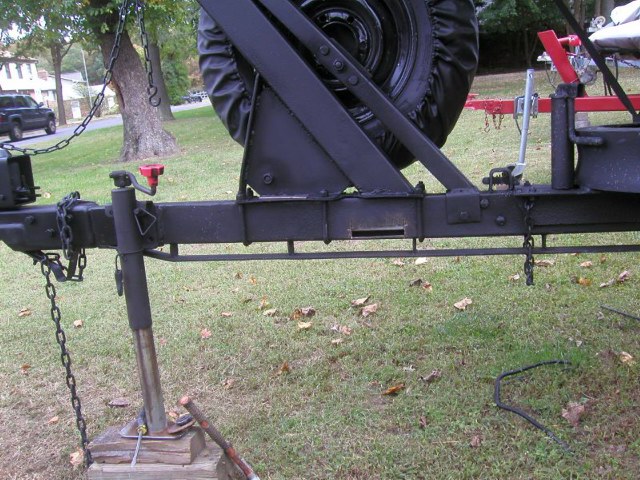
So we got this bright idea to lengthen the beam and at the same time make it wider for the new couple to sit on. Next to figure out how and to do it safely. Back in that first picture you see we were replacing the bottom carriage beams. When we bought the beam it came in on a train car to a steel yard and was 28 feet long. Didnt need it all so we have a four foot piece left over. Its six inches tall but its the perfect three inches wide and its a quarter inch thick. Thicker than what the old coupler was made of and should be bigger over all from the start. So it should be strong enough.
A couple years back just to add reinforcement to the couplers beam (so the winch stand wasnt so flexible) we put inside it, two, welded together from end to end, smaller galvanized box tubes, welded to the outside beam at each end and (both inside and outside tubes) thru bolted every couple feet. The inside square tubes fit was perfect and created 3 separate boxes running from end to end and almost doubled the thickness of the original beam. The bottom box also made a great wire and brake plumbing chase and even allowed for the trailers tilt function to work if anyone ever dared to pull the pin (besides when the trailer is on jacks being repaired). So we kept this in mind as we started conceiving what we were going to do.
Its a little hard to explain now without letting you in my head and theres already too many people in here as it is. But basically we want something that will extend on to the old beam for a solid bite and extend to where the old coupler ended and it needs to let all the wiring and plumbing come out. We figure if we cut everything off the beam within reason we can get the new beam over the old for about 10 inches. So we take the 6 inch box beam and cut off 4-1/4 inches for the first 10 inches and then drop it back to a little over 3-1/4 inches for what will be the new extension. Now IMHO it would have been stronger then the original like it was but oh no thats not good enough.
Our idea is for the new to slide over the old and the part that extends needs to be boxed and a couple pieces put inside so just too totally over do it. Also have an idea about filling the gap between the old beam and the new box beam.
We have to come up with what is going on the trailer before we cut the old one off. It cant be towed like it is but it can be moved if needed. Once the coupler is cut off it aint going no where.
After we put a couple baffles on the inside (where we knew they wouldnt interfere with the mounting bolts) we started to box in the end of the extension. Since our local steel and aluminum place closed we are finding we have to reuse what we have or order it and wait 3 days for it to show. Reusing usually means you have to cut all 4 sides after you cut it off something else and it just slows things down a little. Also we still use 5 cutting disks and a grinder (still waiting on Santa to bring us a plasma cutter).
After things started to take shape we were able to figure out just how wide the opening in the new piece was and how wide the beam it attaches to was and what the gap between the two was. Came to .500 and the beams thickness was .250 so we cut two pieces so we could wrap the original beam from the bottom before we put the new extension on.
And after we did some welding we had to redo some more and some more and some more.
We suck at welding and we ran out of sticks but you can see how its going to sit on the new extension. Some small thing left to do including drilling what holes we can while we have it down on the floor. Dont want to have to drill through a ½ of new steel plus another 3/8ths of old just to get through one side of the 6 bolts needed to install while pushing sideways on a trailer tongue.
Well, for a bunch of scrap that crap was on there to stay and for 46 years it did.
Now that I had the extension partially built we really couldnt go much further with it without actually putting it on the beam it was going on and we couldnt put it on the beam with everything still attached to it. So it was time to do some cutting. The two only goals was to get everything off and leave as much of the original beam as possible in that order. Basically metal surgery with high speed power tools. It took a while of cutting and prying and cutting and prying with a little sledge hammering (with a little sledgehammer) but we got the old coupler and pieces off and then ground it all down without getting into the beam at all.
You can see the 2 box tubes we put inside the original in the picture. Two of the through bolts for the interior beams were also in the way. We decided to cut the heads off the bolts, weld up the ends and do the same to the other ends then grinding them flat. Now they will just be welded in pins with the new coupler extension pinching them in from the sides when its mounted.
That was dirty work but it was done and it was fitting time. Put the new beam over top of the old one as far back as we planned and then slid the two spacers up into place with the second taking a little tapping with a hammer to get in. We then hooked up our little buzz box and tacked them in place and let them cool down. We then spent the next half hour trying to get the damn thing back off. Once we did get it off we put our poor welding skills to use and did down both sides of the spacers to the coupler extension. Now the extension hooks around the bottom of the beam. We so wanted to put the little skid pad back on it too but we were afraid it would have locked the bottom and we wanted it to expand or contract as needed when we put it back on the old beam. At this point after all the welding we are more than a little concerned it may not go back on at all. So we make sure all the corners and such are nice and rounded off, grab a 4 foot section a of a 6X8 piece of wood, spray the nub of the old beam with cold galvanizing to where its dripping, get the extension started and then start beating it over top of the old beam. Took like 5 minutes of pounding but it went on like a glove.
Even though it now wrapped around the old beam we still wanted to weld up to where it met it at the end. The top was easy enough. The side (besides being up and down) was a ½ of steel going to a much different and thinner steel. That took a lot of burning and grinding and burning And just for the added pain we used like 4 sticks trying to get the skid plate back on upside down. We are so happy we thought this 10 steps ahead so 95% of the welding was done with gravity helping.
Lucky enough this trailer is not a 2015 aluminum work of art. Its a 1967 rough steel boat trailer made by a RV trailer company. So being a not perfect appearance is OK with this ride.
The plan always was to through bolt the extension and we did. Two go through the top box tube and the third goes through the bottom. We are fully confident that this joint will not be a failure point under the most extreme conditions. Even though it sticks out a ½ on the sides and a ¼ on the top and bottom, with a little tapering it dont look much bigger at all.
And in typical fashion we put a peice of picture wire on the light wiring and brake line and pulled them half way up the beam so they wouldnt get hot when welding. Didnt get hot but somehow got tangled and jammed up. Not looking good and at this point we would pour gas in there and burn them out if it would work at this point. An expensive project just got worse.
At one point we were driving a 12' long peice of wood 1/4 round in with a hammer and dragging it out with the lawn tractor and still couldn't get the wiring and brake line out of the bottom of the beam. Tried for a couple hours and then stuffed a rod in both sides to confirm the location of the blockage and then whipped out the cut off disk. Still took another hole on the other side further up and 20 minutes to pry all the crap out. Its cleaned out now at the cost of a wiring harness and a long ass brake line... Guess we should replace them anyway and while at it, new complete brake backer plates (cheaper then just the shoes for some reason).
All that for this.
The coupler is attached now but the project still needs a few more things done. Like said new breakline and lights wiring has to be run inside the beam and hooked up. New 2-5/16 ball for the truck. Break away chain has to be shorten and it all has to be painted flat black so all of our work disapears. And the brake backer plates have to be installed before all the lines can be bleed. But that will have to wait until I can get it back in the driveway on a solid concrete surface.
Started working out the logistics. Lights wiring was short. Safety chains were short and I didnt like what they were attached to either and the brake away chain was too long. The reason everything was short is the overall coupler makes the trailer 6 inches longer.
New parts came in. Still freaks me out how cheap this stuff is compared to . anything else. We just did brakes on the truck. The pads cost more than everything in the box for the trailer.
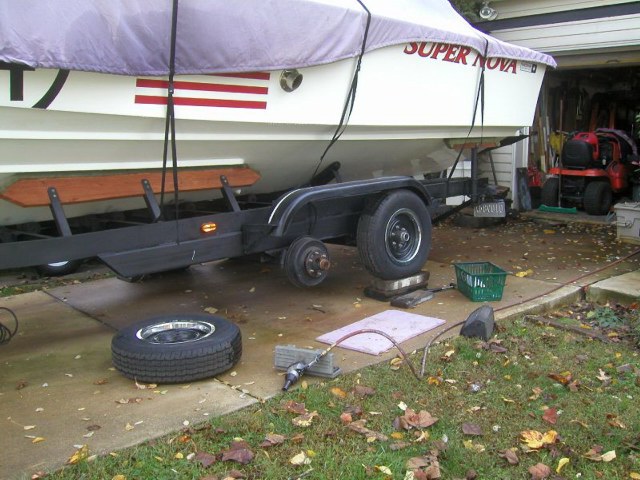
Had to wait until we finished a motor project with the 19 before we could move the 24 back into the driveway. The time came the day before yesterday before we got 24 hours of rain. Today things dried out in the afternoon and we got a chance to install all the new stuff. Still love the way you jack up a torsion trailer. Pretty easy if you have a couple blocks of wood. No blocks and it gets a little more complicated.
Everything is installed and we will give it another look over before we start bleeding out the system on the next nice day out.
A little update. It was hit or miss this Fall when it came to weather but it's been a lot nicer than its been the past couple years but not nice enough to do anything. Still better then shoveling snow which I personally find to be the biggest waste of energy task on the planet. Just a 10 snow and you have to work your ass off for hours clearing it away just for it to warm up and all melt away with all your hard work. No one will ever see the 82 inches of snow that we got a couple years ago that had to be cleared from 5 boats with cloth tops, 2 cars, 80 foot of walkway and stairs and even a spot for the dogs to find grass. All the carefully placed piles of snow melted away when spring finally got here. If you think about it, the labor involved to move all that snow for that one year alone could have easily graded a large section of land or built a driveway with just a shovel or could have spread enough mulch to do our landscaping 10 times over. The worst thing, you want your work to melt away so no one will see it as fast as possible.
We filled and blead the breaks a couple weeks ago and we didnt find any leaks. Havent taken it out on the road so its not a complete project as of yet. By the time we got to them it may not have been freezing cold but its wet a lot and the 24 was where it should be for the winter so it didnt make much sense to move it and then try to get it back in the same place. As late as it was in the year it was almost planned that way when we put it there.
We already have plans to get us through the winterization days with a list of small and big things to be looking for, for spring. Been looking forward to this coming spring for a while now. A new deeper water ramp opens up in the park next door, another go around with the race motors, the 24 is going to the boat show You ever just want to get going on something and had to sit and wait? Now we know what it feels like to be a dog on a chain with that damn squirrel is just one foot out of reach.