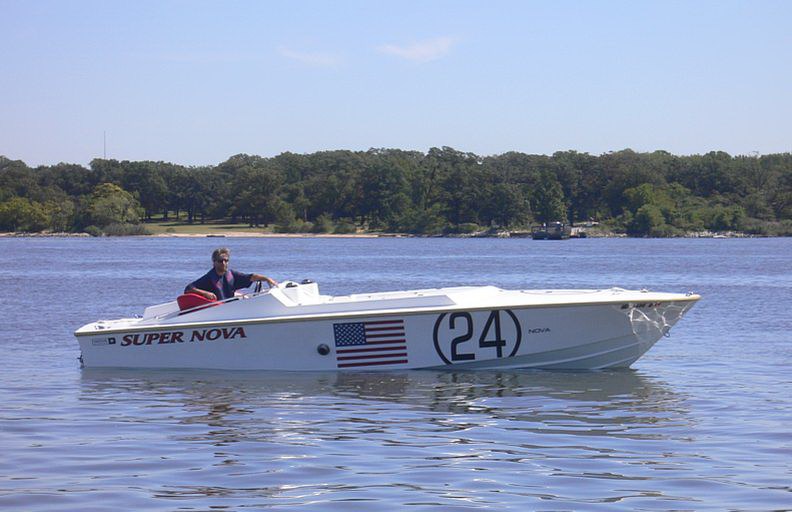
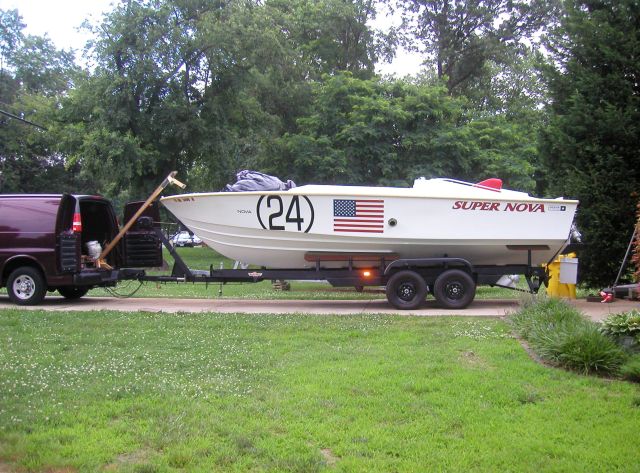
THE SUPERNOVA 24 RACE BOAT
____________________________________________________________________
____________________________________________________________________
____________________________________________________________________
This Year
Jan 3, 2013
Winter has set in and everything has been put away for a couple more months and things has moved inside.
After a major garage clean out and remodel that took a couple weeks I did find a couple things that got hidden away for one reason or another and never were installed like was intended. So a little mini stack of stuff is starting for when the weather gets better.
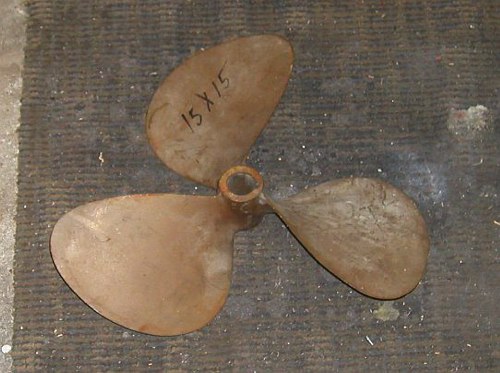
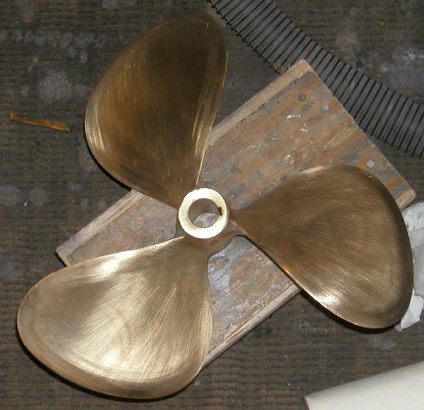
One thing, I'm on a daily hunt for is cheap props. For some reason people want stupid money for these inboard props. Then you find one that someone actually wants to sell at a reasonable price and you have to be ready to grab it. These props are just shots in the dark anyway so I cant spend much money on them. The race boat came with a 15X20R that at WOT ran at 3600rpm's. Being I changed the motors back to how it was originally set up I picked up and have a 17X18L on it now and I just picked up another prop 15X15L the other day for $35. If I can find a couple more of these type deals we'll have a good stock to start off with.
Another little project was this.
This steering wheel has been kicking around the shop for a couple years now. It came in one of the many boxes that came with the boat. Didn't know what to do with it being some of the chrome was not as good as it should be and to replace it cost almost nothing. They are some of the cheapest steering wheels on the market. So at this point it had already been replaced but we never had the thought of throwing it away. Brownie had used this wheel in a few races during the heyday of offshore racing and we are sure a few other historical racers have held this wheel also.
So one of the first projects in the newly renovated garage was to do something with it besides shuffling it from place to place.
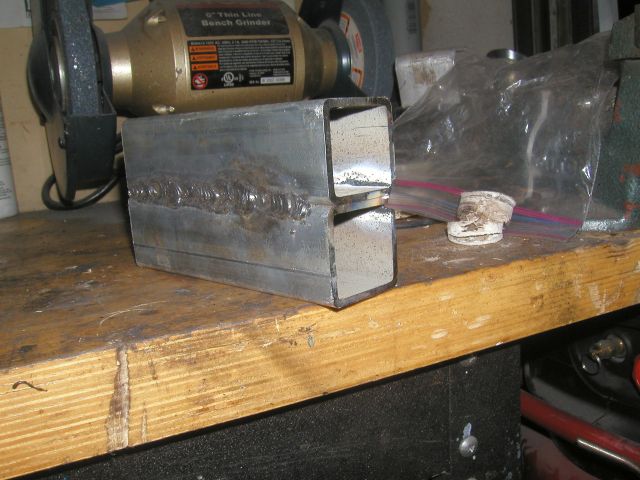
Started off with buffing the chrome up as much as we could and cleaning the decades of dust from boat repair shop off the rubber grip. Bought a center cap and an install kit for it. Then went to the metal shop and found these rings of aluminum pipe about an inch thick. Also a 1/2" X 1" aluminum bar that I cold rolled with my press and an old motor mount and last is a 4" solid round stock for mounting the wheel to. Drilled it all out, painted everything black and then sanded off the edges that I wanted the aluminum to show and then clear coated everything. Got a little plaque saying what it was and now instead of being garage clutter its a pretty cool piece of history.
____________________________________________________________________
Always On My Mind
February 28, 2013
All I can say is, if you're like us, take lots of pictures. They come in handy.
It's taken a really, really long time but we are finally where we feel like the basic boat is done and now its time to do some fine tuning on the project. I'm sure it's going to be a long if not forever process but it's a lot better then the boat being a super size flower planter.
Winter is still here but we get a warm enough day now and then and a couple weeks ago after doing research on-line and looking through those old pictures I came up with a major issue.
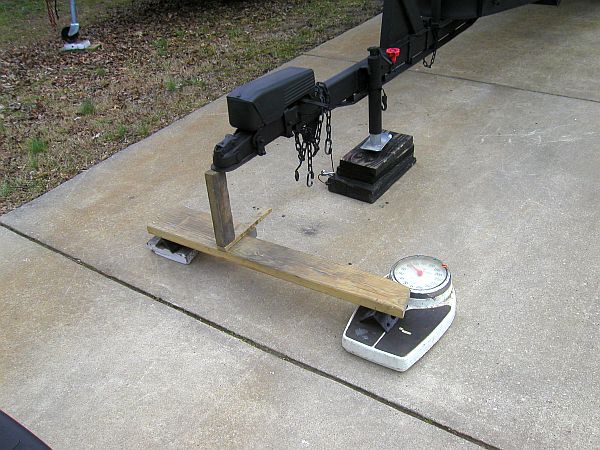
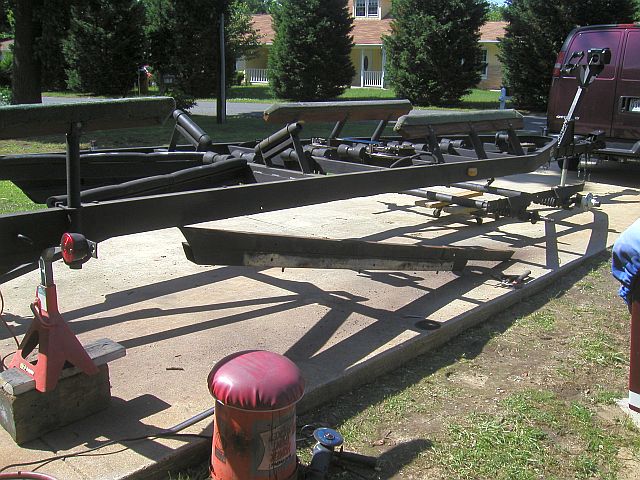
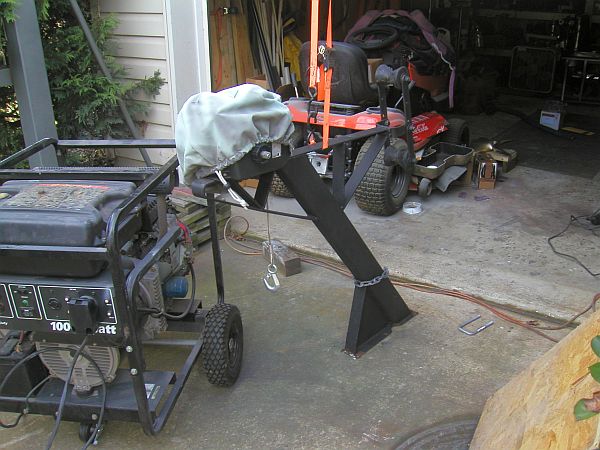
It all started with this.
Being my scale only goes up to 300lbs I found a formula on-line on how to only measure 1/3 of the weight of the trailer tongue and then do the math to come up with a total. Come to find out the tongue was way light and that opened up a whole big can of worms.
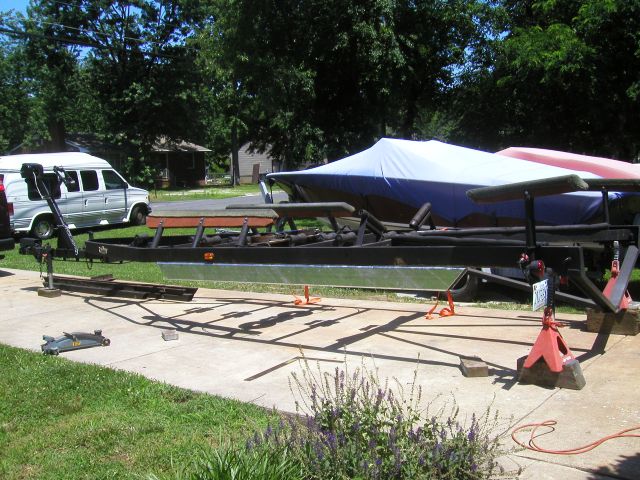
So the boat had to move forward on the trailer but that's a lot easier said then done.
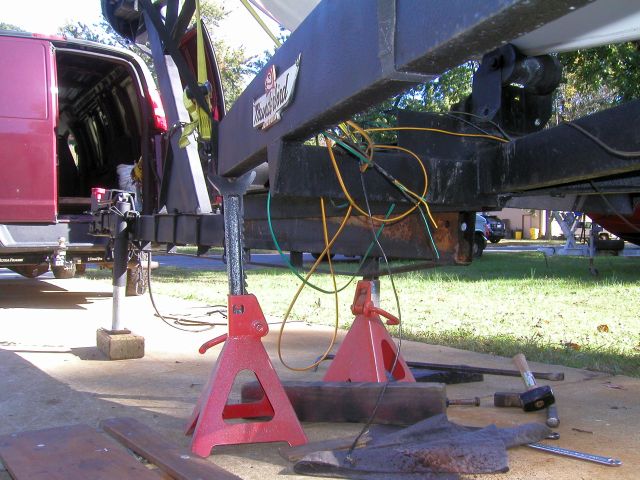
Starts off with the damn trailer is 43 years old and there is nothing off the shelf about it. Not even a simple U bolt. Took a good 5 hours to remove, repair and prep the winch stand for install. When the winch stand was installed a couple years back its placement was a best guess with the evidence that was left on the trailer and another guess on what the boat's final weight was going to be. Its a bit scatchy how it happened but a while later it was welded in place when the center plate support was added to the stand and welded in. It shouldn't have been but it was and it was not easy to get un-welded. After a couple cutting disks and a lot of dust and sparks it was off but then I had to get out the welder to fix the couple slashes that were left behind in the main beam. Being I suck at welding that took a little while, a little grinding and a little paint but it was fixed up.
The stand itself we ground off all the old weld, pounded it all flat, and then welded up the base plate where it was bad. Cut new custom washers that straddle two bolts at a time and changed out the 3/8" U-bolts to 1/2" with nylon lock nuts. Now if our guess on tongue weight is still wrong we can move it again pretty easy. Then we changed out a splitting bow roller and took the stand out to install it. I then proceeded to drop it and shatter winch's plastic cover. More on that tomorrow.
____________________________________________________________________
March 1, 2013
Today I thought it would be a simple completion but it didn't turn out that way.
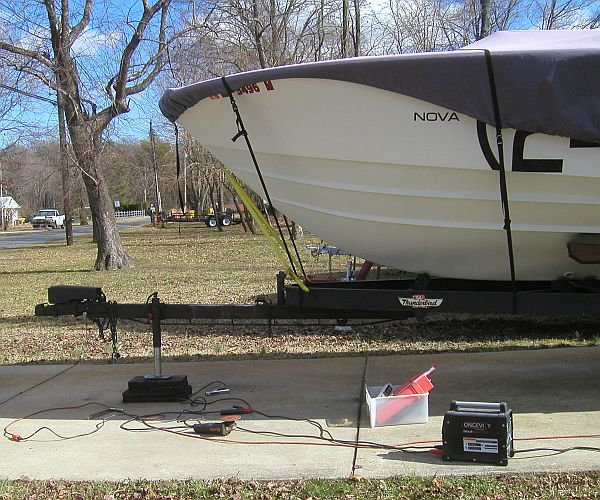
Started off with getting the boat where it needed to be. Slam, bang, jerking the trailer back and forth with the truck to get it moved up. The boat didn't want to move that's for sure. With the 19 if I unhook the winch strap with the trailer level the boat will roll off into the yard. The 24, its like dragging a cruise ship across a concrete slab. Even thought about taking it to a boat ramp but its still winter and I would have looked a little stupid. Not to mention the water is still stupid cold and you get wet with this boat. Then we had to unhook everything from the truck and check how much weight was on the tongue with the weighing set up we used. Only took two times when I reached a weight number I could live with until we can weigh the whole rig at a weight station.
Got the winch post bolted down in the new place with the new hardware and no welding this time. Cant believe how good the new custom washers for the stand work. No more bending the corners of the mount plate with the U-bolts along with not having 2/3 of the weight of the winch stand being held on with just the corners of the plate. Then get the roller stop re-mounted after some customizing and tighten the winch cable down.
And then...
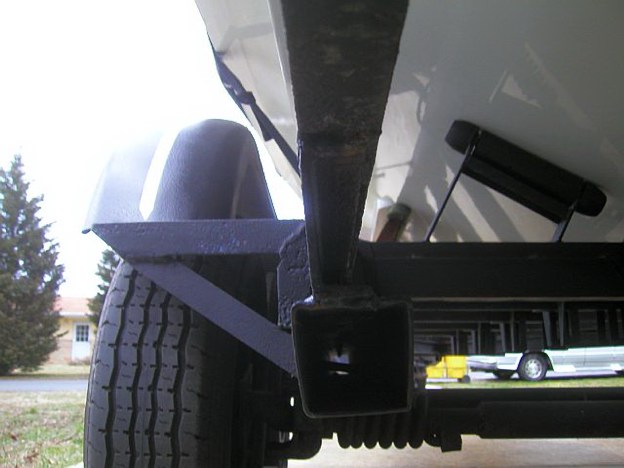
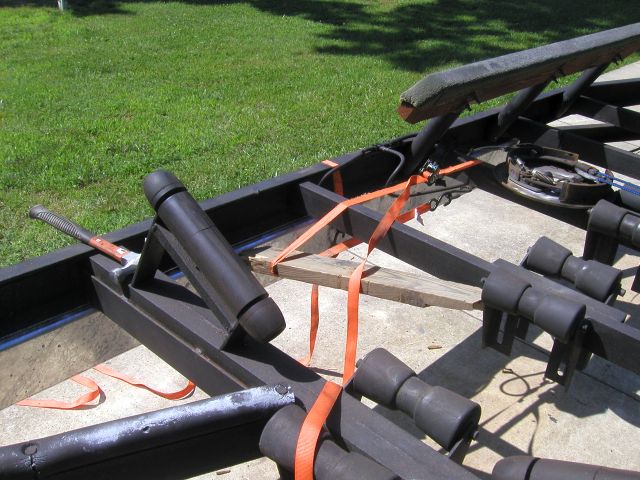
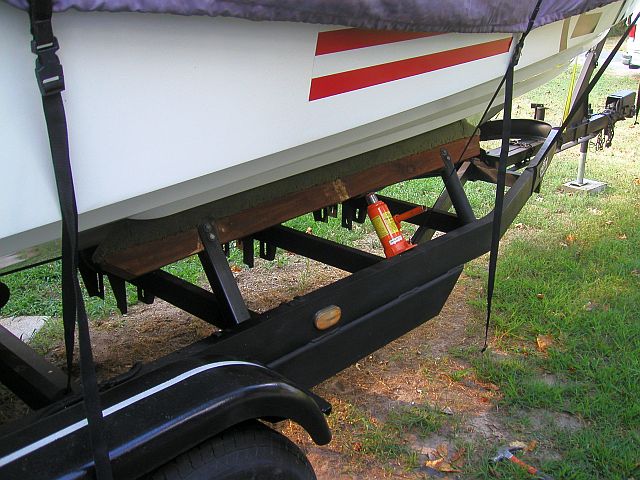
Found the side bunks were holding the boat above the front four keel rollers. So they all had to be unbolted and re-drilled and reinstalled. Lucky enough I left gaps with removable shims so it wasn't to hard. The drop of the bunks fixed all but one roller. It would have been real simple just to move the front rollers up but not only were they bolted on but also they were welded on. Not sure who welded them on and really not sure why they would need to be moved up when the boat was moved forward (the keel should have stayed the same) but they are welded and they do need to move. More to come when we figure out how to get the rollers off because either the boat needs to come off the trailer or ... really not sure yet if there is another option.
____________________________________________________________________
March 2, 2013
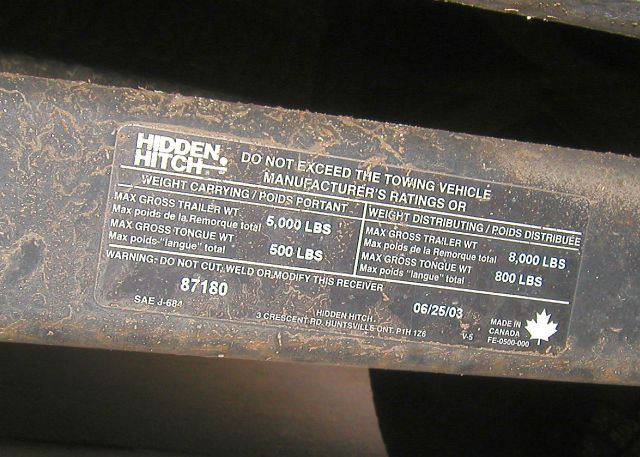
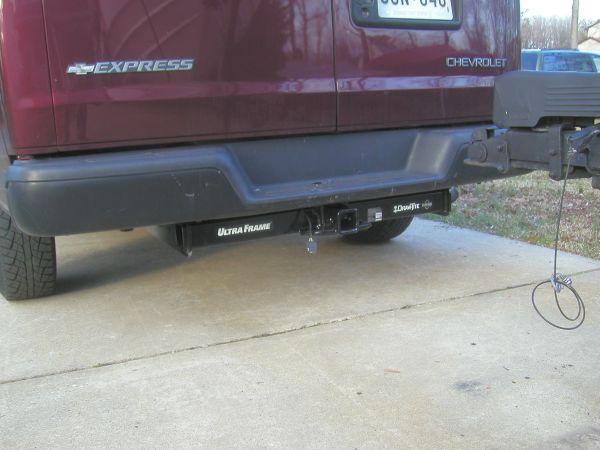
After we realized that the boat's trailer needed more tongue weight it dawned on us for some reason to check the trucks hitch and was a bit shocked when I found the sticker. So I did some research to find out the difference of "carrying weight and distributing weight" for hitch receivers. Still not positive why it makes a difference at the receivers side of the hitch but I'm convinced there is something. So there will be a $200 charge on a credit card for a new hitch for the truck. Kills me to take something off that works perfect just to replace with the next upgrade. My biggest fear is not an accident. Its going through a toll booth and then getting pulled to the side for a trailer inspection. Being its a 10,000lb rated trailer when Maryland issues tags the last letter on the tag is an "X" so it would be real easy to figure out that the hitch is under rated even if it is good enough for what's on the trailer. In the end I think its for the better. Overkill on something like this is easy to live with.
Now to my total screw up.
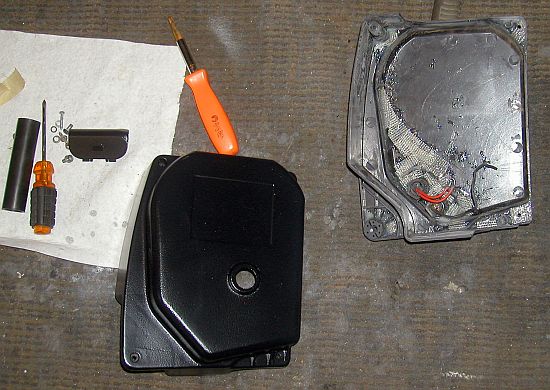
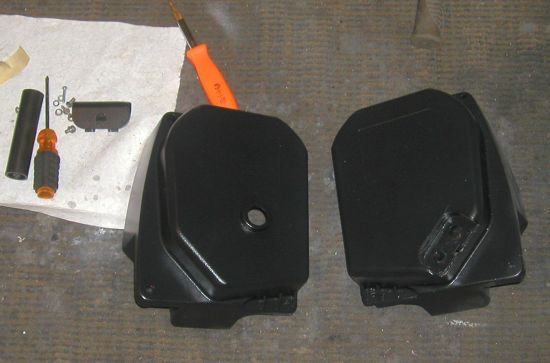
Like I said before, I dropped the winch stand and shattered the winches case. When it fell it sounded like a dozen eggs hitting the ground. I guess we were lucky that the cover was still on it and all the pieces ended up inside. So the first thing I did was take the cover full of plastic chunks in the garage and dump it all out on a couple paper towels. There must have been 40+ pieces. Every corner and screw hole was busted off along with the electric plugs and some more pieces inside the case. After we found out we cant buy a new case we got out the superglue. I got to say superglue is great for this type of plastic. It really did bond it as strong as the original plastic. Got about 98% of the pieces glued back together after three days of putting pieces together so the next day I could put some of the pieces together that I made up the day before. Then I took nylon mesh and two part epoxy and reinforced everything on the inside. Four tubes of superglue and two units of two part epoxy later and its good enough to sit under the winch cover. LOL.
____________________________________________________________________
March 6, 2013
A side project that I may not even use but its nice to have in stock.
Found this on eBay from a local guy that sold me a transmission for the Biese project. Meet up, paid cash, walked away with a great deal. Not that it looked anything like it does in the picture. That took three days fixin'.
Now we're talking.
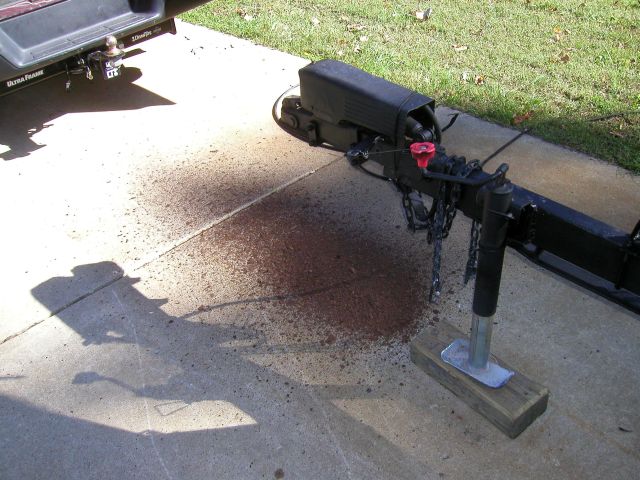
1500-lbs tongue weight 10,000-lbs tow weight. May be a bit overkill for the Jon-Boat but the race boat should be a whole lot more secure.
Makes my old hitch look like a toy and you don't even see the extra brackets that goes inside the trucks frame that also bolts to the sides of the frame. Everything is bigger then the original. The cast box is twice as thick. The cross beam is much bigger and the mounting brackets ... just look at them. We'll tow anything now.
We also are going to keep in mind that we didn't have any issues dropping and pulling the boat out at the boat ramp with very little weight on the hitch. Now that its a got weight on it that's a lot closer to where it should be traction at the boat ramp should be an afterthought.
It's not always about the boat. Sometimes its about what gets it there.
____________________________________________________________________
Trailer Time Again
And Other Stuff
March 28, 2013
Remember that can of worms I spoke about a while back?
First let me say I hate winter. But it's good for us that need time to look back.
On a cold winter night and I'm fooling around on the web. Run across this site that a guy is replacing his trailer axles on his camper. In the first picture I look at I see that his trailer has the same axles on it as we do on the Thunderbird trailer. Coil torsion axles. Only the second set I've ever seen and I've looked more then once.
As the website goes on he shows why he is replacing the axles and what to look for when they go bad. So I go out the next afternoon with what I need to see if the axles are good or bad and it wasn't five minutes and I was already measuring for new axles.
After lots of research that I'm glad we did to figure out just what we needed to order (because these axles like everything else are a special custom size) we put the order in for a pair of Flex Ride 5200# torsion axles.
Now that we are going for brand new custom axles it's only proper to fix everything else.
The goal now is to hook the trailer to the truck and just go for any distance with very little concern of brake down. Like it should be.
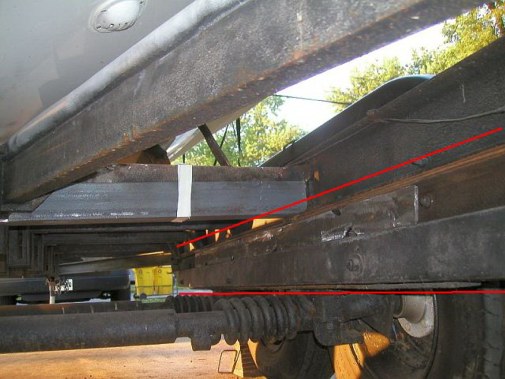
The first time around with this trailer we removed the bottom 3 inch "C" channel and replaced it with a 3X3 square tube. The second time around we boxed the middle "C" beam. This time we are starting over and everything between the red lines is getting replaced.
No the trailer is not held together with tape. The picture is from when we were adding more metal to it before the boat show last year.
The main issue was with what's there is that it has been put together piece by piece. Metal was wedged back in place, welded and bolted so it was safe and moved on. The carriage is almost a separate piece that the trailer frame rode on so no matter how you bent the other frame metal it had to come back in place at the bottom. No separate carriage this time. The new torsion axles doesn't have a frame either. They bolt to the trailers frame. A lot of work and a lot more money but it's what has to be done and really is something we wanted to do from the start, just not now but its time.
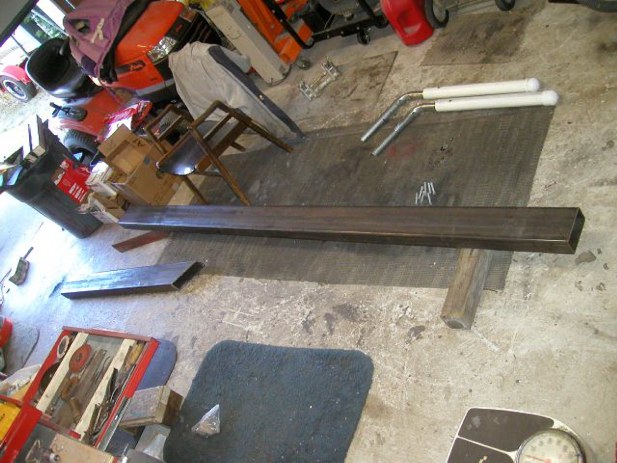
The last couple pictures are of a 24' long 3 X 6 X 1/4 rectangle tube.
Now that was a challenge just getting it. This is one time I had to do a web search just to find someone local that could order it. Shipping for an on-line buy was insane and for that matter you couldn't even find 10' long pieces at all. So I found a small steel yard in Baltimore. I say small but it was big enough that it had a train car inside the building and you couldn't see the far end of the open floor from the other end but... Had to buy a 24' long piece just so I could get my two ten footers. It was cheaper that way anyways. Now we have to cut it up so it mirrors the 2 pieces (per side) of 3X3's that's under the trailer now. When done we want the trailer to look the same as it does now just stronger but we know there is going to be a slight change already.
____________________________________________________________________
March 29, 2013
Finished cutting up the beams yesterday. Wasn't as bad as I thought it would be but... Even though I wear glasses when cutting it I still got something in my eye that's bothering the crap out of me as I try to type this.
Decided to galvanize the beams even though the rest of the trailer is not. The rest of the trailer is made of C-channel and is easy to get to for wash down and painting. No chance of getting 5 or 6 feet inside the tube for any of that. So I go on-line again to find another local company that will do it. Come to find out there is a couple close by but they have the same minimum charge up to a certain weight. The beams come up to about half of their minimum so I'm looking for other stuff to be done but coming up with nothing.
So I took them down to the galvanizes today. What a pretty yard they have. Stacks of metal things all over that are shinier then a new penny.
____________________________________________________________________
April 1, 2013
Even though it's still cold out (will it ever warm up??) I had to have the garage door open because the new axles were due between 12 and 5pm. I like to be ready when the UPS or Fed Ex freight shows up. You never know what or who you are going to get. One time I had a complete motor and trans delivered. The driver was so nice that it was sitting on blocks in my garage before he left with the pallet and such going with him. Another time I was having a 40lb stick of metal tube delivered. Drove up, sat for about a minute and started to drive off. Never got out of his truck. Lucky enough I caught him before he got to far. The drive must have been 90 and told me that he didn't think anyone was home to help him carry it.
Now what's this got to do with it?
While having the garage open and all the precious heat rolling out I figured it made sense to do something. The easiest thing was these tie downs. The one on the right is what's on the race boat. The one on the left is an original from when we re-did the 19. It was to big for the 19 and they got replaced with a more reasonable size and then they were put on a shelf intended for the 24 at some later point. They then got lost for a while until the garage make-over this past winter.
They make the old ones look like toys and were an easy install. A little 5200 (they way above the water line anyway) they wont be going no where any time soon.
And with more time to kill.
Now this is just something that ticks me off. Installed the one on the left a couple years back. Even though its a couple years old it's only been on the water a couple times and washed after. I go out with Mike last year on the "first ride" and the first thing I notice when I take the cover off after only a couple weeks and it looked like it does in the picture. The one on the right is the type I used on the 19 rebuild. The ones on the 19 look perfect after a couple years and a whole lot more use. So I went ahead installed them. Again with very little issues beside making sure the screw holes lined up so they were all reused except for one per side. I kind of like them better anyway.
After the first vent install it started to sprinkle and then the truck showed up. Took an extra effort to finish the second one. The wind picked up to about to 15 to 20mph steady with 30mph gusts but its done and also checked off the master list of things to do this spring.
Did I say the axles showed up?
Now check these mo-fo's out!!!
4X4 box center tube. 2-1/2" frame mounting surface that will work perfect with 3" tube its going to mate up to. Already started to paint them up the flat black they need to be.
____________________________________________________________________
April 4, 2013
The new beams came back from the galvinisers already. All of this is so unexpected. I only started this project a couple weeks ago and everthing is done and here. I was thinking that none of this would be here yet. I figured a couple weeks for this and a couple weeks for that and it would be a lot closer to May when all this stuff would come in. Now I have to wait until Ferd gets a few boats from winter storage out of his marina yard.
____________________________________________________________________
April 9, 2013
Still in a hold pattern for the trailer project. Decided to do a couple other projects and one or two included the race boat.
We first sucked out some of the transmission fluid from both trim pumps and replaced it with some transmission stop leak. This stop leak stuff is one of those things that you would think is just a scam but farmers have been using it for years for all kinds of stuff including soaking old rubber belts in it to make them like new. I've even seen it work on a couple things in the past. I have my fingers crossed it works here. It's not the trim pumps that has an issue it's the rams. Some slow seepage. There is little chance that rams can be repaired and if so we are sure it would cost a fortune.
Another thing is the gas fills. This time we bought two custom hoses just to chop up because they had the one bend we needed. Now there is no hump at the neck or restrictions with the fill hose that goes into the tank.
We have a few other things to do but being we cant do the trailer for a little while now and we are paranoid about taking it anywhere but Ferd's it may have to sit while we get the 19 and some other stuff done. Got a boat show coming up.
____________________________________________________________________
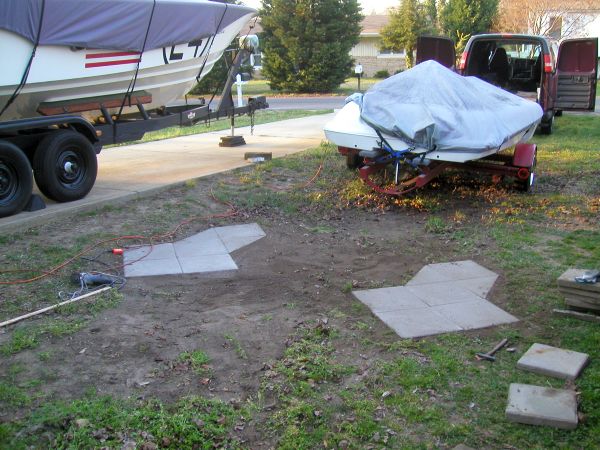
April 12, 2013
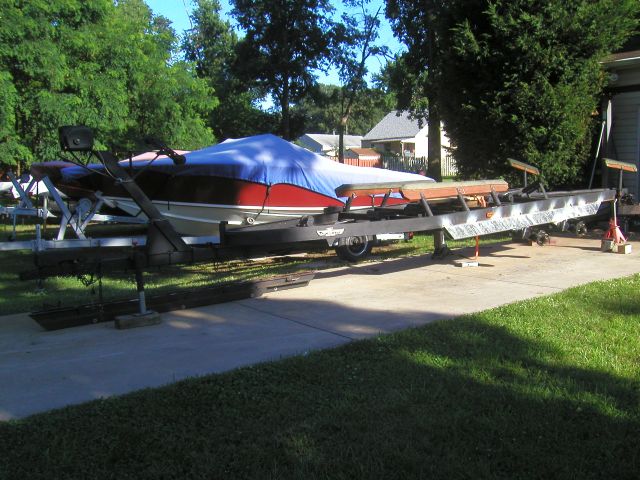
Still waiting to get the boat off the trailer for the trailer project. Spent a couple days on another project making parking pads so we can move the boats around when we need to (we just don't have a driveway big enough) without fear of them sinking into the yard. We already had smaller pads but after a couple years they were starting to sink in to far and was a pain in the ass getting the trailers lined up perfect due to their size so it would sit on them correctly. To add to the mess only two out of the five trailers we have here now had the same size tire print so one trailer wouldn't fit on another parking pad. One is wider, another is longer (the race boat), one is much shorter ... you get the picture. They all had their spot and if we had to use that spot for another boat we were laying down plywood or something to keep the tires off the dirt.
So we made these.
The width is short enough for the Jon Boat, wide enough for the Biesemeyer's trailer (go figure the little flat bottom drag boat would have the widest trailer foot print) and long enough for the tandem trailer of the race boat. Or... they are universal for all trailers. The race boat sits in the driveway most of the time unless we need it for a project but its nice to change things around if needed by simply backing it up and dropping it.
We have come to the conclusion that things with the 24 are going to sit for a couple weeks and is one of the reasons we did the pads now. We have a couple things we need to do to the 19 to get it ready for the boat show along with all the stuff we have been gathering up over the winter. Like a new MSD ignition box and a 1.31 to 1 Volvo "A" drive that we are dying to see what happens with it when we get it installed. So the driveway is needed.
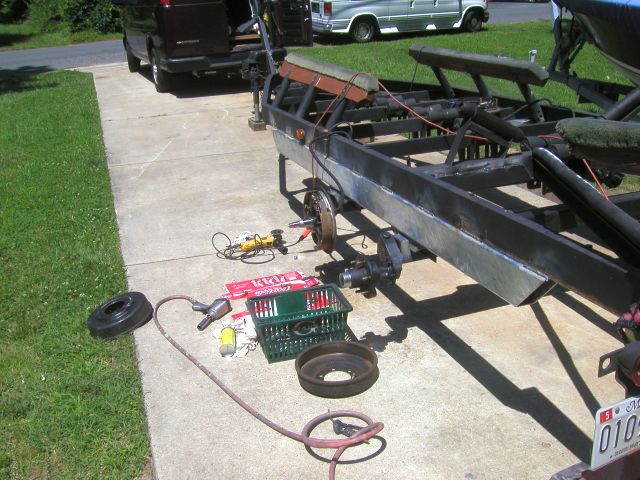
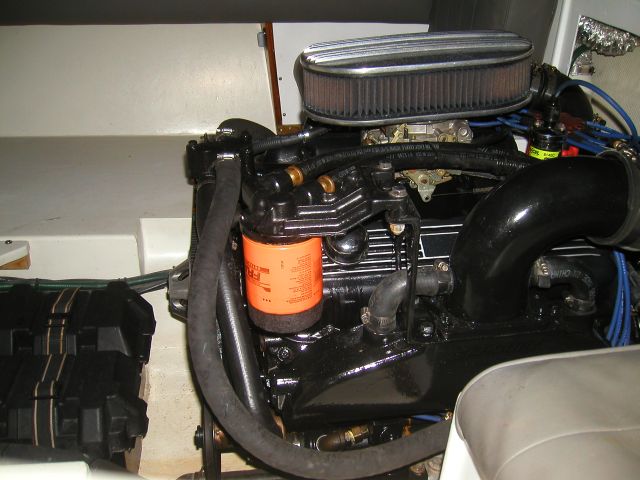
With that in mind we have moved to the master list of things we wanted to do to the 24 before the trailer issue came up. So today we pulled the distributors from both motors, added brake in additive, spun the oil pumps to get oil pressure and reset the distributors. Got all the cooling systems back together. We may be changing them soon to make it more convenient to winterize and unwinterize because it sucks now. Or maybe we will just start taking it to Florida for the winter when the trailer is done. lol. Pretty much got everything off the "to-do" shelf that needed to be done and the motors are key ready for another first start after all the upgrades like cams, exhaust and such last fall.
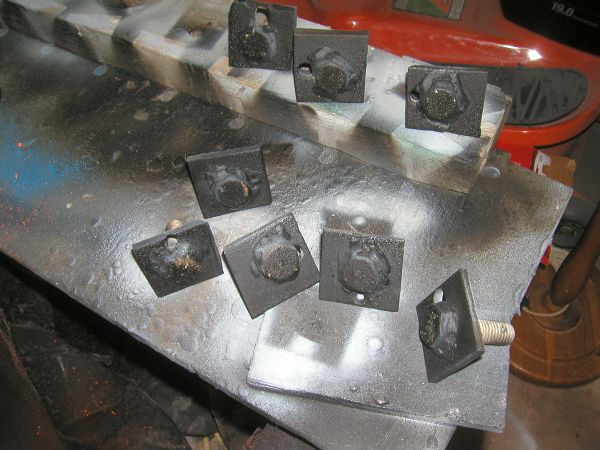
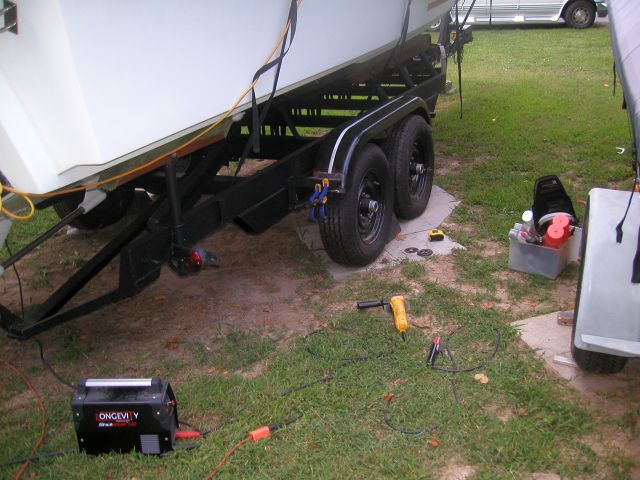
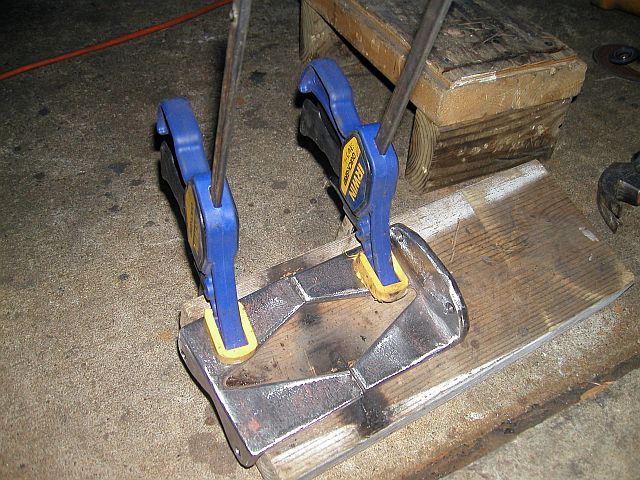
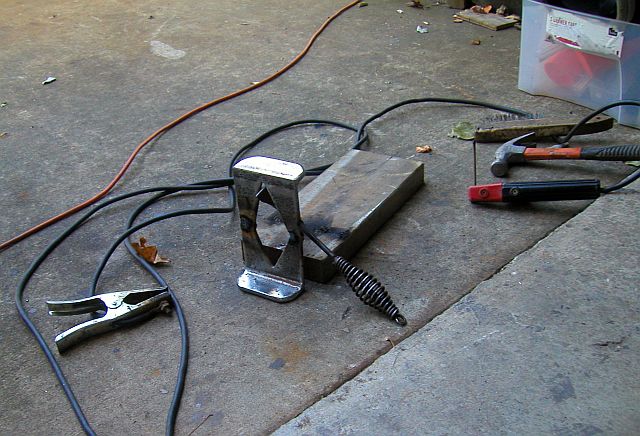
Check these ugly things out. Another attempt of me welding. Had to find something that would go inside the new box tube for the trailer axles but wouldn't spin when I put a bolt to the other side because I'm never going to get a wrench in there to hold them. So I had this left over 1/4" galvanized metal from some trailer project with these slots already cut in them. The slots were to small for a 5/8 bolts so I had to drill them out. Slipped in the bolt and tightened the nut on the other side. Attempted to tack the top SS bolt to the Gal metal. Took forever but I think I got it done. Took the bolt off and filled the slot from the underside with weld like a "key" and anything else I could do. Ground them off so that will lay flat when install and hit them with some rubber undercoating just to seal them up. It may seem like over kill but when I put the bolts on and torque them down without issue it will be worth it.
____________________________________________________________________
April 12, 2013
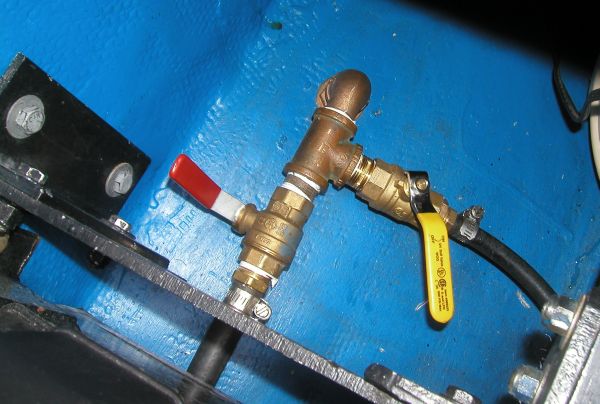
Here is the last thing we wanted to do this spring after filling up the gear box with water last fall.
The original water pick up for cooling the driveshaft and V drive had one shut off for both hoses. It was all on or it was all off. When I found the V drive was full of water I was about 5 miles from the ramp and had to keep letting water in while going back or I would have had to shut off everything off and took a chance of burning up the driveshaft also. Now we have valves for both. Hopefully we will never have to use them and maybe just because they are there we wont.
____________________________________________________________________
Spring
June 6, 2013
Not starting the trailer project yet. A really cold and wet spring along with the ACBS St Michael's boat show has been killing all of our time. No, the race boat is not going this year. It's won it's prize last year and is not eligible for another 2 years. This is the 19's year to go and we have spent weeks getting it ready. It's all posted in the 19's section of this site. It's been a nonstop race against the rain and wind storms but we think we are ready.
Meanwhile the race boat has sat. Motors have been built and installed, V drive has been rebuilt, new exhaust, etc, etc. It's hard to believe we can leave it sit but it has to. The next ride the trailer is going to take is to Ferd's so we can get this project done and get all this stuff out of our garage.
We did have this grab rail sitting around in the garage and just enough time today to install it. The center seat has a couple hand straps built into the seat but unless you were use to grabbing them you would never get your hands in them in time. Also a little nervous about getting a wrist hung up if something went real bad. Sometimes its better to be thrown out instead of literary being tied to the boat. So we centered up the dash with a couple strings and a tape measure and drilled a couple holes. Didn't turn out to bad and is perfect to either hold on to sitting or standing.
____________________________________________________________________
June 18, 2013
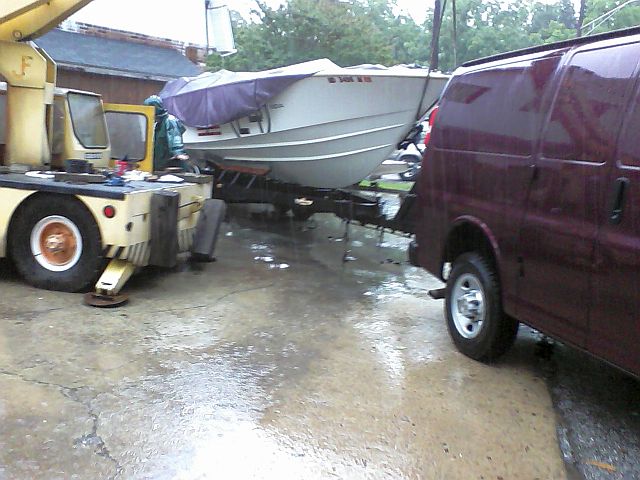
Wasn't ready for this.
It was a rainy day so I figured I would run some errands this afternoon and then stop over at Ferds and see when he thought he could take the race boat off the trailer. I was thinking maybe in the next couple weeks so I thought I better get things going. After talking for 20 minutes I hit him up with, when do you want to do this race boat thing? He says, we can do it now if you want. I look at the sky and say, are you sure? It's only sprinkling now but they are calling for big storms, you sure you dont want to do it tomorrow? He says, you can get a little wet, it won't hurt you. He may have wanted to think twice about that one.
So I rolled back over to the house which is about 10 miles away and as I'm going up this main road it was raining for like 50 feet and then the street was dry again for another hundred yards then I was raining again. Off and on like that for about 2 miles. I knew it was coming but with Ferd you strike when the iron hot. By the time I started hooking the boat up to the truck it started coming down in buckets. I get to Ferds, walk-in his office soaked and dripping and say, now it's your turn. He stalled for a few minutes but knew it wasn't going to let up and finally had to say I didn't expect this. But we did it and all three of us even with the rain gear on were beyond soaked when it was done.
Had to use my cell phone to take the pictures because things moved so fast I never even thought about bringing my real camera. Being off the trailer and not in the water you can see that the boat has amazing lines while sitting on blocks. It's been a long time since I've seen it this way. The last time was when it sat under that carport on the left-hand side of the picture.
Even though the rain didn't let up until I was done absolutely everything, the trailer without the boat is now sitting in our driveway ready to be cut up.
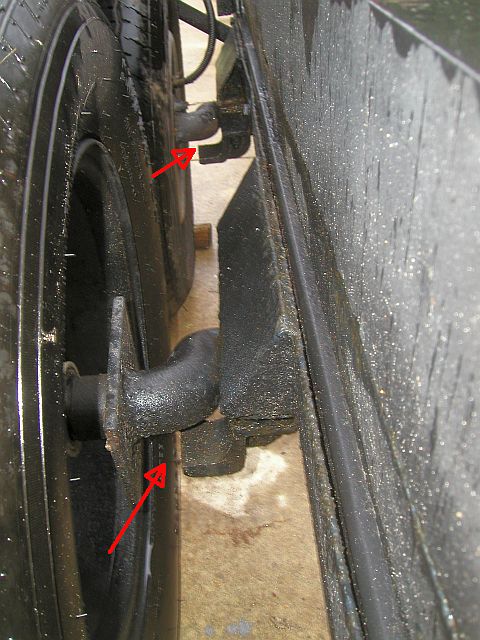
There has to be someone watching over the race boat. Like I've said before, I've been all over this trailer hundred times and never thought that there was any issues with it. Now that the boat sat on it for a couple years and is now been taken off I'm thinking that the trailer may not have lasted another trip. Still hooked up to the truck and on a level road the rear wheels are off the ground by about 2 inches. Also with no weight on a trailer both axles should be almost twisted back around to the stops but they almost look like they're in the same place they were when the boat was sitting on the trailer. These are turning out to be some major issues and I'm glad that in the next few days they'll all be behind us. Fingers are crossed.
____________________________________________________________________
June 19, 2013
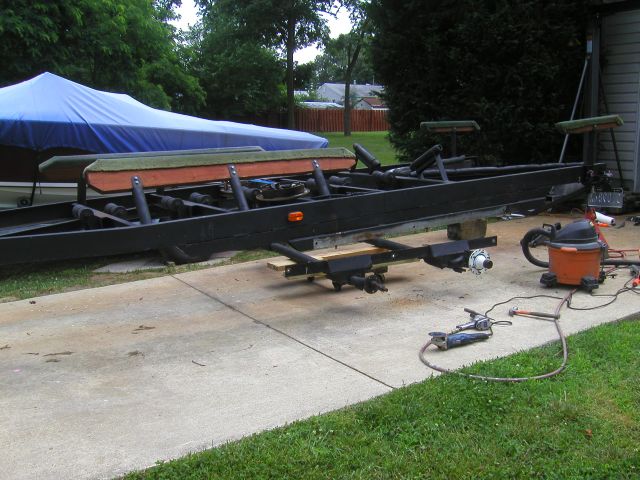
It's like taken apart an erector set that's been bolted and welded together. I finally got my air ratchet to work properly and man was it a big help.
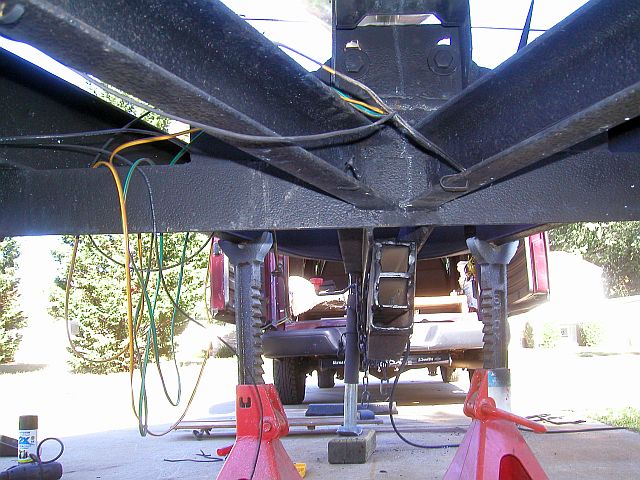
First, jack the trailer up and get it up on stands. Then off came the tires. Next were the fenders. I would've left them on but the bottom half of them bolted to the bottom beams and just to make it more convenient they had to go. Then came the torsion axle carriage. This was only bolted on so I strapped it up with some rope and un-bolted everything and knocked out the bolts. Then lowered it down on a dolly so we can roll whole carriage out at one time.
Being that the axles are 45 years old I'm sure they lasted well beyond their warrantee. The metal looks like hell but there's still a whole lot of beef there. If the axles would've been good the carriage would've still had a few years use left in them but we are not playing around this time. Everything must go.
Next thing that had to come off was the hodgepodge of box beams and C beams (that were boxed in). I feel bad in a why being my neighbor has more then a few hours into welding these things up to make them safe. Should've done this the first time around but to be honest I didn't know any better.
One lesson I'm learning while doing this trailer with all its special order and special custom design pieces is the majority of trailers are pretty easy to work on. When I did the 19's trailer it was almost an afterthought. Measure up what you need for an axle and order it, make a trip to the trailer store to pick up U bolts and you have a new axle and hubs installed in no time. For the amount of money (most are pretty cheap) that a new axle and hubs cost compared to the years of always having that thought in the back your mind that the axle and such was many, many years old it is so worth it just to replace it all and forget about it. I think the 19's came to a total of $300 for new axle and hubs. I'm not saying $300 is something to sneeze at but to me $300 to replace pretty much all the moving parts on the trailer was an easy check to write. As long as a frame stays bolted together which it looks like it will the 19's trailer should be good to use for another 20 years.
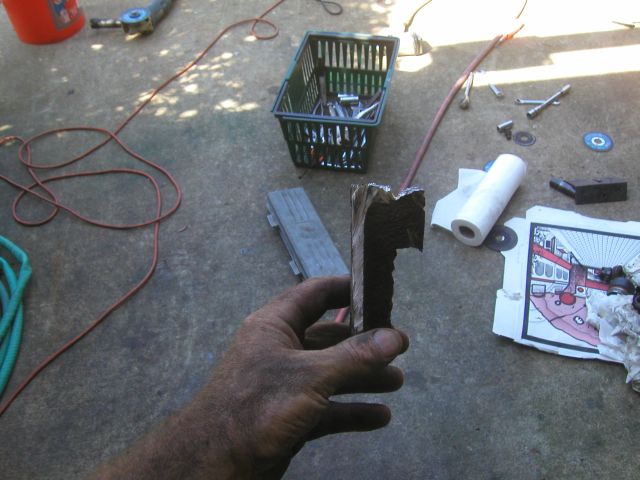
Having all the issues we have had with the bottom beams of the trailer it did also have me concerned about the main frame also. Had to trim small piece off knowing that the new replacement beam is a little wider. Even though the exterior of the metal tortures me with its rusting it's all seems to be surface rust. There's no rust through or anything like that. The chunk I cut off as you can see the picture is solid all the way through and just as shiny as the day it was made.
I know this seems like a lot of work for just a trailer but to me this whole race boat thing and trailer is a package deal. When I asked Ferd about buying the race boat one of the selling points was he still had the original trailer. When I first looked at it I thought it was on its way to the scrap heap. Then I saw (after it was unburied and pulled out of the weeds) the thing was pretty solid and the more I got into it I knew it could be saved for a lot less than a new trailer that really didn't belong under it in the first place. I just wish I knew more back then about these spring over torsion axles and what to look for when they're bad. Probably would've went in a whole different direction. Live and learn. Like the expression says, life is a lesson that you learn when it's through.
Came up a little short today. The intention was to have everything off so we could start setting the box beams tomorrow. Then my third grinder of the year burned up and I had to make a trip to Home Depot. This time I got a Dewalt. Twice the Amps, twice the RPMs as the last one. We'll see how long this one lasts but I like it already. Got everything cut off that needed to come off the trailer. Cleaned up the bottom half of the main beam on one side and started to run out of daylight so with what little time was left I cut up the carriage and got it all loaded in the back of the truck. Then I swept up about 5 pounds of metal dust off the driveway. Literally had two big dust pans full and that's what didn't blow away when doing it or when I was cleaning the driveway off with my air compressor. One more side of grinding and then it will be time to start fitting some of these pieces and putting it back together.
____________________________________________________________________
June 20, 2013
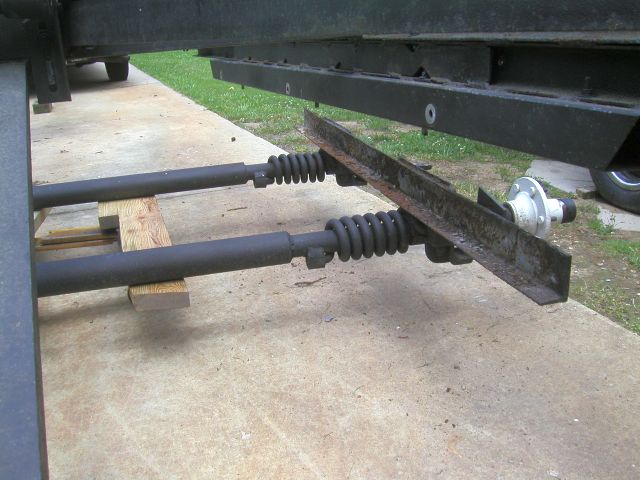
After completing the grinding down of the last beam and what was left over from last night it was time to start building. First was the new beams. Wheeled them out on a dolly and used ratchet straps to raise them up in place. Got everything lined up and then used a couple holes they put in the beams so they can hang them up when galvanizing to bolt them up to the main beam. Once I got the ends bolted in I drew up the center in with another ratchet strap then bolted them in.
The centers did require a little tweaking so we broke out the hillbillies frame straightener and went to work. Didn't require much but we are shooting for perfection here. The other side was better than this one and only required the beam to be drawn in a little while drilling out the center bolt hole. Once it was bolted down to the top frame the ratchet strap was no longer needed. This side is staying strapped up until tomorrow when the welding begins.
Pretty much reached all my goals for the day. So I thought I would start prepping for tomorrow by moving an axle out and getting ready to lift it in place. One thing led to another and just trying to figure out how I was going to do it I pretty much got the rear axle halfway installed. Started by a couple lines that I put on the main beam that showed the center of the old axles. I then transferred the old lines onto the new beams and then measured out where the front bolt hole would be. I did this also for the front axle too. I then drilled the box beam for the front bolt of each axle on one side. Using a string we pulled inside the beam the bolts with the welded plates that I made up a couple months ago. Jacked the axle up and got the first bolt hole lined up. Once the nut was on I jacked up the other side tight against the frame and then got out the tape measure. These axles grease the bearings through the axle itself so there is a grease fitting dead center in the middle of the axle. I've been using a little ball bearing that's inside the grease fitting. That's about as close as I can get.
And to finish off the day, I had one side of the axle still jacked up and I was beating on the other side and wouldn't you know it gravity works all the time if you are paying attention or not and over the whole trailer went. Didn't take too long to get back up on the jack stands but when it was on its way over it was a bit scary. With the boat it could have been very costly if not deadly. One plus was the bearing cap was still on so when the axle dug into the dirt nothing got inside. After this I called it a day.
____________________________________________________________________
June 21, 2013
Today started off with more hole drilling. Not easy to start with and doing it upside down and then trying to be as precise as possible made it a real challenge. Started off with using an old drillbit to punch the center of the axles mounting holes into the beam. Then used a small bit to make a pilot hole. Then jumped to half-inch to get things going. The whole time measuring and re-measuring to make sure that the axle did move. Last but not least was the wrist breaker. A half-inch drill with a three-quarter inch drill bit. Man when that thing grabs it will about rip your arms out of socket. I did use my brain a little bit and used a pump jack under the drill almost like an upside down drill press. If didn't come up with it I would still be out there drilling now with arms of rubber.
Next was the second axle. You would've thought it would have been easier than the first but of course it wasn't. It wasn't lining up right and then after getting it straightened out one of the bolts that I made out a while back was snaked inside the beam and dropped into the hole. Flat washer, lock washer and then the nut. Halfway on it jams. It wont go backwards or forward and there's a gap between the mounting flange and the trailer beam so before welding this nut has to draw the beam up. I tried everything I could and finally I just decided to heat it up to a couple thousand degrees (it was glowing red hot) and put the breaker bar on it and snapped off the three-quarter inch bolt. I was happy to see that my welds held on the backside because if not it would've made for a really bad day. Had to go to the hardware store for a new bolt, cut and drill out a new backer plate and then weld it up. Before the night was out I did finally get the axle in its final place and bolted up tight. Tomorrow I'll take my turn at welding.
But today my neighbor Gary was the star of the show. Now he welds and rebuilds boilers. With the heavy zinc coating (even after I did some grinding on it) the welding was giving him a bit of a fit. When that zinc got popping it looked like a 4th of July sparkler. But the master performed and the new beams are now part of the old and short of a torch they're never coming apart again. He did everything down both sides inside and out, couple support beams on the front that join the sides, the rear axle and a couple other little things and I know his welds are good. Like said, I am going to give the front axle they try. Being it's already bolted in place with 3/4 inch bolts I don't think it's going anywhere but I don't want to shift or even move a 16th of an inch and a couple welds will prevent that. As long as I can get an inch or two to stick it's all good. LOL.
Somehow I did make a slight boo-boo. When I measured the axles not sure what happened but the new axles hubs centers are further back toward the rear of the trailer by about a half-inch. In a way I actually wanted do something like this but I didn't plan for it. I liked the way the boat sat on the trailer a couple months ago before I had the tongue weight issue. Had to move the boat up on trailer which puts the winch stand too far forward for my liking. Not sure what the half-inch will give me for extra tongue weight and these axles are different anyway. Started the hubs out with a 20° down angle where the old ones were at a 20° up angle I guess from collapsing. The new axles swingarm is a different size, the axle diameter is a different size so it's pretty much a crapshoot anyway.
Then there is this little brake issue. Is uses hydraulic drum brakes. The old brake drum, you would take all the wheel studs out of the hub, put the drum on the back of the hub and then put all the studs back in through the drum and into the hub. The old hub also had a nice flat surface for the drum to mate up with. This has these nubs sticking out but after some measuring I think the drum has to go on the same way. Not really sure?
____________________________________________________________________
June 22, 2013
Where to start?
I guess one place is we will be spending a number of hours getting rid of a virus that is on SN19.com's server that pretty much screwing up the whole website and making it unviewable. Now that's always fun. It still baffles me why people do things like that. There was no gain and cost me time. It's like someone breaking your window just because they wanted to throw a rock. Extremely little gain by them and a whole lot of expense for you. Been fighting with those f_ers for too many years now. I build it and they destroy it. One day I will catch a hacker and lets just say it's not going to be pretty.
Today started off with a little welding but this time it was by me. The front axle wasn't ready when my neighbor came over so it was my turn. It's not pretty but I'm sure it'll work. I also wanted to do a couple other little things so while having the generator and the welder out I put them to good use.
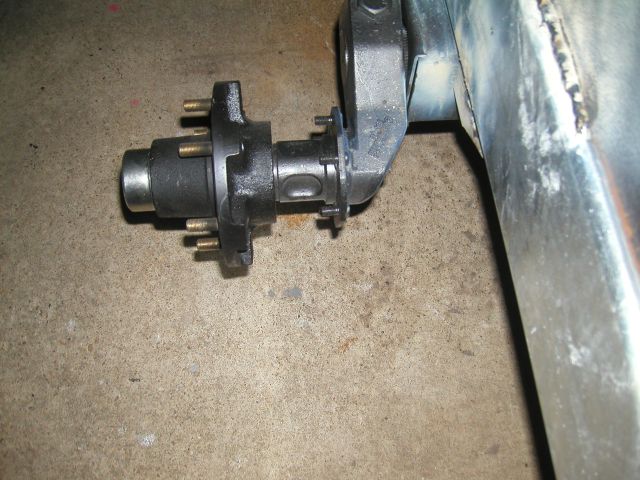
I think I may have panicked over the brakes a little early. The bolt pattern made getting the backer plates on a little tough but will little persuasion with a blunt hammer they went in place. My main concern was how the drums mounted to the hubs. Had to go online and take a peek at some pictures of how others were done. Still didn't think it was going to work but I don't engineer axles either. Mounted the drums on the backside of the hubs and drove the wheel studs through them both and then use the impact gun to draw them in tight. Slipped the hub on to the axle and they fit perfect. To be honest I was a bit surprised and already had other plans ready to go. Looking back I'm glad I didn't need them.
After the brakes were on the axles and even though the new axles went in the same place the brake lines are now in the wrong places mainly from the angle of the swing arm. So we also had move the lines around and then re-secure them. The ones at the hubs are the worst. They have to be able to move around but at the same time not hit a tire or rub on the frame. A pain to get just right. Finished it off with bleeding the system. I had to take one fitting apart moving the lines around and it was a good time to flush the system anyway.
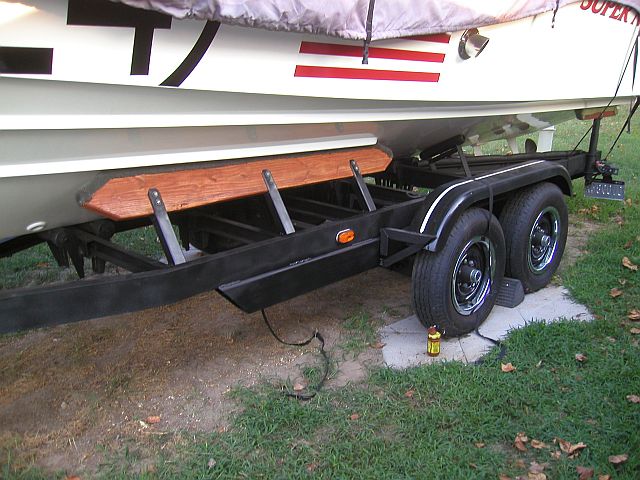
Not necessarily part of this project but something that has to be done while boat is off the trailer is moving a couple of the keel rollers. They use like 5/8 inch bolts to hold them on and they've been on a real long time. To add to the misery they also decided to weld them on. So when I finally got the boat on the trailer right I had to cut the front roller off while the boat was still sitting on it. It was a major pain but had to be done but there was two more rollers that needed to be raised also but there was no way to get to them without risking hitting the boat with the grinder or something. No boat on the trailer meant it had to be done. This time when I put them on I also used the 5/8 inch bolts but when I welded them I only tacked the bottom sides so they would be easy to get to if needed again.

The main goal for the whole day was to get the trailer sitting back up on its wheels before dark. Getting it back on its wheels meant that a lot of things to be cleaned up and put away when it was dark out. Just trying to utilize what's left of our time the best we can. Times getting tight. I'm sure I could leave the race boat at Ferd's another day or two if needed but I would prefer not to push Ferd's hospitality. He has been great about it the whole time. No reason to end on a sour note.
So before we could put the wheels on we figured we better paint the area behind them just to make it easier to do. Been buying cans of flat black spray paint for what seems like every time I go to Home Depot. I think I started this project with having 19 of the 2X 's cans in stock.
It was dark by the time I got the wheels on so pictures will have to come tomorrow.
____________________________________________________________________
June 23, 2013
This is how the day started and then shortly after it rained and continued off and on all the way up until late afternoon. On the last build day it couldn't suck any worse. What should have been an easy day of fenders and spray paint turned into an all day adventure of waiting out rain showers.
Even though the fenders were going back on in the same places, of course they didn't fit like they did being most of what they were attach to had been replaced. That required a bit of welding. I've been using the same sticks (6011) since I started using a welder all those many weeks ago but I ran out modifying the fender brackets and had to try a couple others. Just when I started to get a hang of this welding thing I'm starting to see that a welding rod makes all the difference in what you're doing and all of them have their own characteristics. Amp settings, different metals, rod thickness ... So much to learn but at least I can stick two pieces of metal together now and that is light years ahead of where I was just a couple months ago. Doing this kind of stuff and not being able to do at least that is a major handicap. The thought of waiting days for someone to tac a oil pick up to an oil pump now is something I just cant imagine anymore. Today it would take less then a minute.
So with them but back together we got them mounted up to the trailer. Used the original top bolt hole so we know they're going back to their original height.
A little different then the first time it showed up here.
The fenders look real tall for some reason but after going back and looking at some pictures we didn't realize how low the trailer had gone since when we first got it. It was like slow motion. We rebuilt it and it sat up pretty tall. Then we put the empty hull on it and sat a little lower. Then we added a little bit of weight with the fit out along with a couple big block Chevy's and transmissions and the trailer got even lower but still looked O.K.
The trailer now sits about an inch higher then the first day we took it back to Ferd's to pick up the race boat. Will have to wait to find out how it sets with the boat on it. Nice thing about these axles are they are extremely adjustable. If needed I can probably lower the whole trailer by about 4 inches just by adjusting the swing arms.
When the sun finally did come out it was time to break out the remaining 15 cans of flat black spray paint. My main concern was the areas that the boat sits on and the under side of the trailer. Spraying black paint upwards only inches from a white hull you know you're going over spray it at some point. Used all 15 and besides the bottom beam none of the outside of the trailer was done. I dig get the insider of the frame real good and the should be good to go for couple years at least.
Just a afterthought, there were six half-inch bolts on each side holding the carriage to the frame. I found all of them to be bent and someway. I'm really starting to get convinced that there was a tragedy in waiting if I would've left it like it was. Someone was smiling down on me to find that website, to be able to figure it all out in the dead of winter and then be able to fix it all. It wasn't cheap but it was a lot cheaper than a new trailer and the peace of mind is priceless.
____________________________________________________________________
June 24, 2013
The big day had arrived.
You almost never see the hull truth about this boat until you see it like this. Either it's buried in the trailer or its under water so it's pretty cool to see it like this.
Before I got to Ferd's I made a run to the recycling center. The axles and the hubs had no more use in them and a couple of the steel pieces taken off the trailer would've required more work than they were worth to get them freed up. So after dropping off a few hundred pounds and picking up another six cans of spray paint I stopped by the house and picked up the trailer for it's first time out and went got the boat.
Not the way I wanted to do it but we were out of time. No test drives, the real deal right out of the box. The drive over would have to surfice.
Home and all safe and sound. The ride over it tracked perfectly even though I only got it up to 55mph. Put the boat on it and it didn't make a sound or budge and not a single squeak all the way home. But wouldn't you know it the rain came once again and as soon as I drove up it was a race to get the cover put back on. The plan is to let it sit for couple days and see how it settles. So far even though it feels a bit high, according to the pictures it looks like it's right where it should be.
There is a few things left to do and then the fun begins. Rebuilt and upgraded motors waiting to be fired for the first time.
____________________________________________________________________
Old Ghosts
July 10, 2013
Finally getting around to waking up the race boat.
If you have been following along, late last summer during a test drive we burned up a motor to the point that when the throttle was brought back to idle the motor locked up solid. Add in that the V drive also filled with water because of a gasket failure to the point that it was blowing water and gear oil out of the oil fill cup/vent and all over the inside of the hull, things didn't end well.
Not wanting to give up that easy we tried but it wasn't a week or so into it that we knew it was over for the year. Things still had to be done though. Not like we could just leave it like it was until this spring. If anything there was a lot of stuff that could be done during the cold months in the garage at least to get ready for this spring.
One thing, coming to the realization it was not going to be a quick fix made us think about going in a totally different direction then where we have been. The story behind this boat and how it was originally put together has been a bit of a mystery for a long time. After we got the whole boat together last year the way we thought it should be and with all the hell it took to get it that way it would have took an act of God to take it apart again and put it back together the latest "way it should be" but now we had to fool around with all the things that could make it happen. The motor that had to come out and be rebuilt was the reverse rotation. There was a big chunk of the changes that was needed. Also the V-drive not only had to come out but to clean it out right it also had to be rebuilt, again. That was also a major part. But then some things started creeping in that we would have to change that was in perfect working order. That's one thing we hate to do. I learned a long time ago (except when it comes to the 19) if it aint broke don't fix it but to make this happen even a perfectly good running motor had to be taken apart. If we are going to do this I'm not going to be stuck with the only lame cam that's available for the reverse rotation motor which almost makes it worth doing alone. Even the RH prop that had 1969 stamped on it had to go.
So after a lot of thought if to do it or not and knowing we had the time we decided the deal this time was to use two standard rotating motors going to the V Drive configured differently so the front motor was basically a direct drive (we still have transmissions so it's not as bad as it sounds) and the rear motor would go to the top gear and use a Left hand prop instead of the Right that came with the boat (the cause of mass confusion on the set up). Seems simple enough.
Did I mention these motors were the motors from hell?
When I bought them online from a guy they were supposed to be "drop in ready" Blue Water, Mark IV Mercruiser 454's. One standard and one R/R with everything from the pulleys to the ends of the transmissions. Just rebuilt and were going back in his cabin cruiser until the divorce started. Would have built my own from scratch but I needed everything. A motor is an easy build. When you have to buy every hose, pulley and bracket is when it adds up. Had to drive 400 mile south to get them. Even though I talked to the guy the day before and set up a time I start calling him when I was close and get no answer. Get to the address, no one there. Now I'm thinking I should have brought a gun, got that creepy feeling like things weren't right. After about 45 minutes I do get ahold of him and he does show. When the car was pulling up I made sure I was on my cell phone just in case. What it would have done I don't know. The guy is an ass. No help getting them loaded out of his soggy backyard. Spent more time doing that then looking them over. Checked the oil and gave them a quick look was all I had time for. Get them home and within a week I have them apart enough that I learn they were both recently rebuilt but one has a cracked block and the other has a cracked head. One is a 4 bolt Mark IV and the other is a Gen V and it goes on and on. I ended up using the 4 bolt Mark IV to build the 496 thats in the 19 now and the block of the Gen V was broken so I pretty much ended up with expensive brackets for the race boat when it was all said and done.
I ended up building 2 Gen V's for the R/B. I don't know why the Gen V's get a bad rap. All are 4 bolt blocks with improvements over the Mark IV. They just didn't have all the improvements that the times required like being a roller motor like the Gen VI is. But because of that people think they are a lessor motor then even the Mark IV. Makes no sense to me but I like what it does for the cost of them. Usually about half price.
Good in some ways and bad in others things flew back together but everything was not done (exhaust) until late October. Being it was already getting cold and because of the work that had to be done to both motors they were basically already winterized so there was no reason to start them and the whole project sat. Then came the trailer issues over the winter and then the boat show and then the trailer rebuild this spring. More sitting time. Last I wanted to spend a few days working on the Monza on things that were on the big list of things to do. With that done now it's time.
I go to wake the new set up for the first time yesterday. Already pulled the distributors and ran the oil pumps in the motors. Checked and rechecked everything over and made sure everything was tight. Hooked up the water and hit the key waiting for the electric fuel pump to fill the glass fuel filter. I hear the pump running but there is no gas getting to the carburetor. I have a new electric fuel pump in stock so I switched it out and after an hour I'm back ready to hit the key again. I get the motor started after a little bit of effort but for some reason I can't get it to idle anywhere near where the timing should be set at. The motor sounds strong and has 50psi oil pressure at idle but no matter what I do unless the base timing is set at 30° the motor is not really happy. So I figured there something wrong. I moved on to the rear motor. It's a total monster getting starter for the first time. Spit and sputtering and not staying running. I end up pulling the distributor and resetting it twice before I finally did get it to run but just like the first motor the timing marks were nowhere near even close.
Call up a friend and asked him what he thought. He thinks there's something wrong with the harmonic balancers but I tell him that they are the same harmonic balancers that I used before and set the timing according to them. As we are bouncing ideas off each other it dawns on me that the last time I was out on a test drive with Ghost one of the first things I had to do was advanced both distributors. So I get out a piece of coat hanger and pull the number one plug and hand crank over the motor until I feel the piston stop moving up. The timing mark was nowhere near close. So I then continued to crank the motor over until the balancer should have been at top dead center but the piston was already on its way down by the time the mark got there. Without a timing tape on the balancer I really can't tell you exactly what it was but I figure it was something close to 22° difference between the mark and top dead center.
Crisis averted. I guess I'll just have to time the motors by ear. Even though I have this hundred plus dollar timing light again it looks like it's going to sit on a shelf while I do it the old-fashioned way.
I did finally ignore the harmonic balancers and set them by ear while in the driveway. The motors sound strong. The new cams and exhaust give them a much more throaty sound and are very responsive to the throttle. Like I said before I never saw below 50psi oil pressure from either motor. Broke the cams in and the oil on the dipsticks look like when I put it in. A lot of rebuild parts that seem to be working together for the moment. Have my fingers crossed they stay that way.
Seems like for some reason I start a lot of motors for the first time (after a rebuild) and it rains while I'm doing it. Maybe it's just coincidence but there is a sprinkle to a downpour almost every time I start a good one and this time was no different. I'm getting the feeling that these motors are going to be good ones. Let's just hope the harmonic balancers was the last of the ghosts from the past.
____________________________________________________________________
July 22, 2013
Speaking of old ghost ....
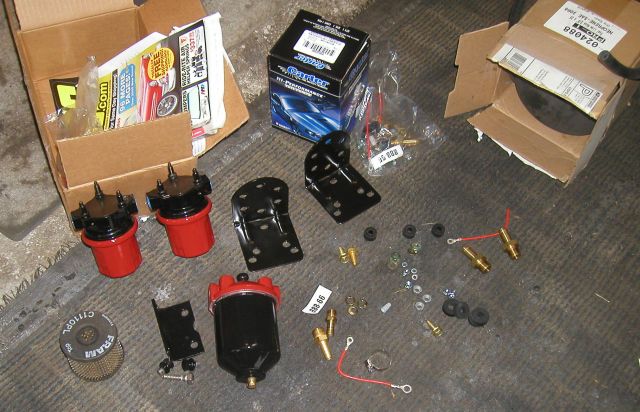
Here is another thing popping up from the past. But this time we are taking no chances.
Started with getting the motors started and something I picked up at the boat show this year. The fuel filter / water separator is what I found at the show for five bucks. Looked nothing like it does in the picture. There was another one next to it for ten bucks I should have picked up also but didn't think I was going to need the one I bought when I saw them.
Did a lot of cleaning, painting and got a new filter set (filter and seals) for it. Then I had the issue with one of the fuel pumps a couple weeks back. Come to find out that if electric pumps run dry you will have to prime them like an outboard motor before they will start pumping again. Apparently they are great pushers but not so good suckers. The race boat don't get used that often so the fuel system is dry a lot.
So we came up with a plan before we went on vacation for ten days and made a couple orders and everything besides a trip to Home Depot for fittings was here when we got back.
The fuel pump is a Carter #180-P4600HP Competition Series Electric Fuel Pump with a 100 gph free flow. Now they should feed the motors with no drop off. It was my idea to paint them red and black. One thing that's not in the picture is the second filter / water separator I had to get. Let's just say I didn't pay five bucks for it. The idea is, even if the boat sits for a very long time I don't think the filter cup will dry out. My past experience I've seen them sit for years and still have gas in them. So that means if I install it just before the fuel pump there will always be gas at the pump so it shouldn't dry out.
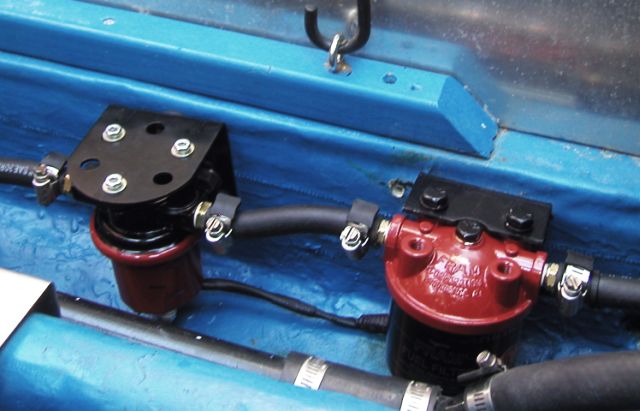
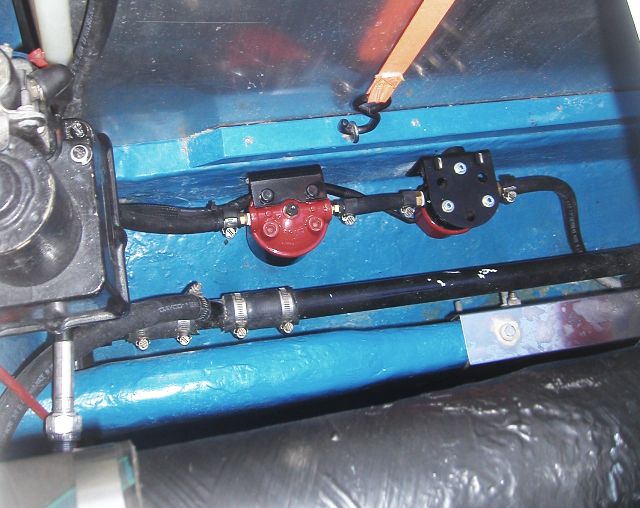
Bit of a tight squeeze. Still cant figure out how they ever planed as changing so much as a fan belt if needed at sea.
Got all the brackets lag bolted into the small stringer and made all the new connections to get everything in working order. Still have a hole to fill from the old system.
Then had to do it all over again. Two motors mean two fuel systems. For that matter it almost feels like there are two of everything in this boat. The second side went quicker then the first. Just before it got dark I did get to turn them on and check the fuel pressure. Something wasn't right and it was almost dark so I'll hold off on the fine tuning the fuel psi until tomorrow.
____________________________________________________________________
August 23, 2013
It's so easy to get side tracked in our world. Jumped into the Biesemeyer hydroplane drag boat (this years ACBS Best Race Boat winner) for a couple weeks. It's a fair weather boat (meaning you get very wet driving it) so while it was hot out was the time to be using it and making the changes that were needed including moving the motor.
Once again though it's time to get back into this never ending saga of this race boat.
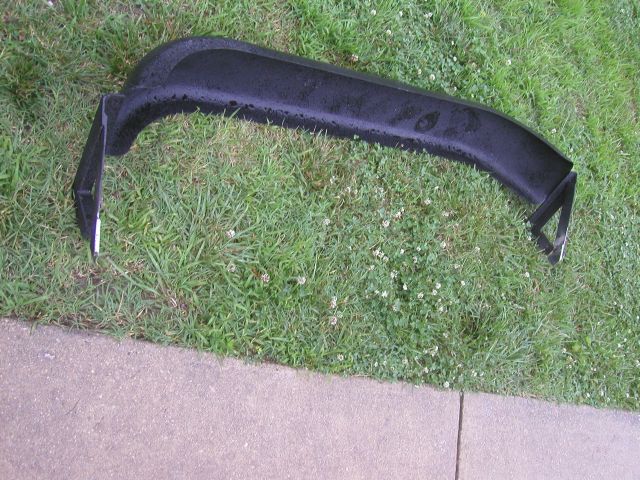
Needed to finish a couple things on the trailer project to start off. Had to move the fenders. The new axles raised the trailer by a couple inches and they were way high to begin with. Thought about lowering them awhile back but it was just something that wasn't a priority and didn't get done. So now that the trailer sits even higher then it did before the fenders just looked stupid. It's time to finish off some of this stupid stuff. Out came the cut off discs and the welder.

They were put on like everything else on the trailer. Some raw steel stock and a welder. Came up with the idea on how to drop them and still be able attach them without making new holes in the trailer. Took a little while and a lot of pulling, bending, tacking and more bending, pulling and tacking. Kept them looking original as we could. Even re-did the white stripe. The white stripe represents the original color of the trailer. Yes, it was white and I bet it was pink with red stripes the day after they dipped it in the Florida saltwater from all the rust marks. Still have some paint to finish up after the picture but when done most would never know they were moved.
Last but not least. Now that the boat is on the trailer right and we think the winch post is in the right place it was time to mover the trailer jack so you wouldn't smash your fingers on the post every time you wanted to jack it up or let it down. Cut it off, ground all the old weld off and put it back on. Did I say how much I love my little buzz box.
____________________________________________________________________
September 9, 2013
And some more trailer activity.
Been spending to much time on other boats and not this one. So over the last few days I got the motors tuned up pretty good. Made up a different system to strap down the bow. A lot of folks don't think about that. They depend on the winch stand to hold the boat back during a hard stop. Not that I don't trust mine to do that but when making real trips why not add a back up for it just in case. Everyone straps down the back of their boat why not the front to? It's only a 5000lb strap, doubled up, hooked to the bow eye and the front of the trailer. That should at least give it 5000lbs of holding back force before the winch stand has to do anything.
But back to the pictures.
Something we have been noticing the last few months was rust bubbles forming on the posts that hold up the bunks. We originally used galvanized, round fence post from Home Depot. They seemed a bit thin so for the hell of it we filled them with concrete. I guess the two didn't mix and they were rotting from the inside out and had to be replaced. This time around we are using 11ga 2X2 galvanized box tube and we are not filling them. Also along with bolting them in, when everything was tightened up we busted out the welder and burned the 2X2 and the trailer together just for added strength.
____________________________________________________________________
September 12, 2013
Now we are getting somewhere. Usually we like to start a project at a certain level and then upgrade it from there. I don't think we ever started at a lower level as we did with this whole race boat project and to say the trailer has been a challenge would be a understatement to say the least. Just this summer alone we have done the new beams for the new axles project, replaced all the bunk supports, moved the fenders and supports and repositioned the boat on the trailer moving all the keel rollers (welded) that was needed. With all that done we are getting close to saying it's a new 46 year old trailer. Guess now would be a good time to pretty it up a little and maybe see a little of our work.
We really do like the way it looks with the fenders lowered. Changes the whole look of the boat on the trailer so we figured that it was worth picking up some very cheap PVC/chrome plated rim trim rings. Being they are PVC they will never rust and for as cheap as they are they fit the trailers look perfectly.
After moving the wood bunks around a couple times the mounting holes were getting elongated and such so we decided to replace them with new one. we cut them to size and just for added bling we used a router to put a rounded bead on all the edges. Also put the carpet on a little straighter. It was the least I could do be I'm a former 25 year installer.
____________________________________________________________________
One Last Thing
October 22, 2013
I think I need to reset the date and time.
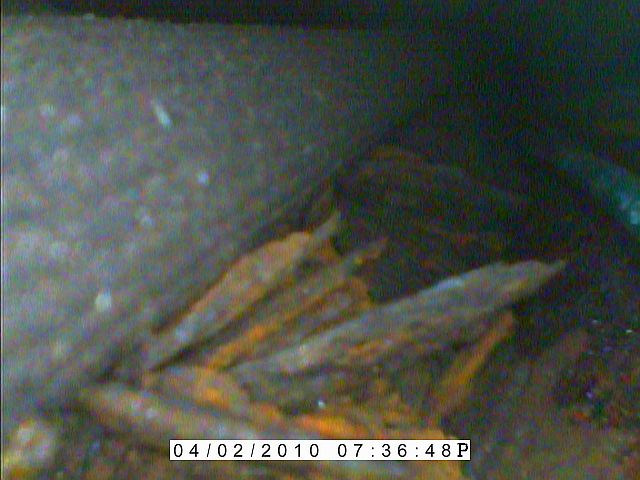
No, you are not looking down an abandon subway tunnel.
I decided to pull out a toy I got last year for Christmas (snake scope TV/camera) and take a look down something that has been in the back of our minds for a while. This is the inside of the beam that goes from the trailer cradle to the trailer hitch and yes that is flakes of rust.
So now we had to come up with a plan and what's in the tube is part of it.
The real issue? We don't want to take the beam out that is there now with everything on it just after we got everything where we wanted it for the first time ...ever. Not to mention that everything but the winch post is welded and most likely will come off in chunks.
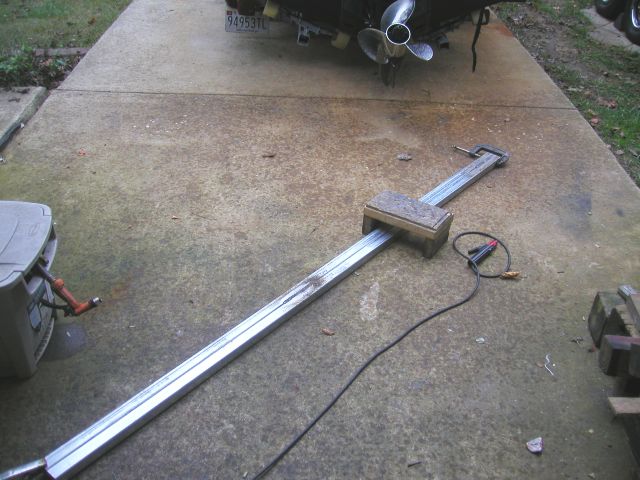
So the plan is to take these two pieces of 1-1/2 X 1-1/2 galvanized 11ga box tube and stack them on top of each other, clamp them up and weld them together. Basically turning them into a 1-1/2 X 3 but with a center section and a bit stronger.
Started off thinking we would just burn a couple areas to tack everything in place and leave it at that. Being we could use the practice and it was nice clean steel for a change (even though it was galvanized), laying nice and flat on the ground with no gaps we decided to run the whole thing on both sides just for the practice. We tacked up three places on each side first and then ran the rest of one side. We then noticed that it bowed big time. Tried stomping it down a couple times and then just flipped it over figuring doing the other side would bow it back and it did. Took 20 sticks to do 16 feet. Not sure what it means but we are happy that we could even do it at all. The finial thing was cutting it to length.
Then it was trailer time.
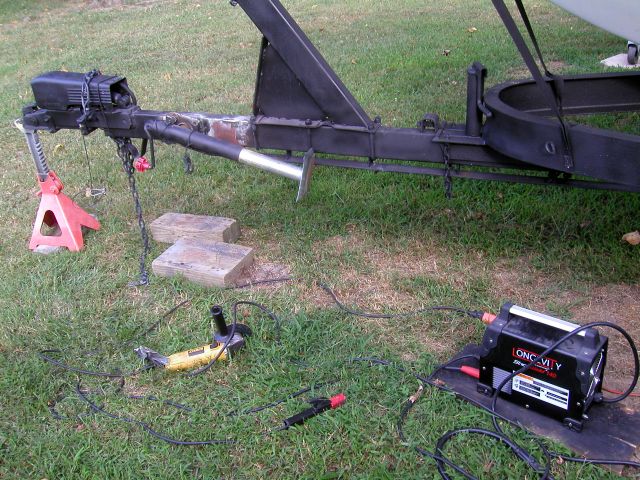
Put the trailer on stands so the tongue wouldn't have weight on it and then started to take it apart. Let's just say doing it with the boat on the trailer is the hard way. Had to pull the brake line and lights wiring out of the beam.
It's basically a tilt trailer and the whole thing hinges on a single 3/4 inch bolt. Lucky enough I replaced the bolt a while back so it was easy to get out. Then getting the beam out of the slot was a bit tougher. A little soaking, pry bars and a pump jack and out it came.
Then with everything out of the beam we got all the rust out with a long piece of metal and compressed air. Two dust pans full so we think we are doing a good thing here.
We then took the galvanized beam we made up and slid it inside of the original beam letting it stick out of each end a 1/4 inch. Took a couple large metal chisels and wedged it up tight to the top of the original beam on each end and then welded the old to the new all the way around on each end. Then drilled out the 3/4 inch hole for the pivot bolt through the whole thing and ground off any extra metal. Got the beam back up in place and the bolt back in after new paint. Then we got it all back to where it should be and squared up, drilled some holes along the top in the original beam down to the new one and then tried to weld them together while filling the hole. Just to be on the safe side we passed couple 1/2 inch galvanized bolts through each box in a couple places along the beam.
Not a perfect way of doing things but it worked.
A couple reasons we did it this way. First, like said, to replace everything (meaning really the 45 year old, impossible to find parts for and in perfect condition break system) would have opened up a big can of worms. With a crap load of nasty welding that we are not very good at. The reason we went with the 2 pieces 1-1/2" box instead of one beam was we couldn't find anything galvanized in a 1-1/2" width besides these. Also adding the two boxes together is much stronger then a single rectangle tube because of the double center wall. Last, the look would come out a 100% original. You would never know any of it was done unless you look up inside the beam on you hands and knees.
I know a lot of folks would have scrapped this trailer a long time ago and think things like this are ... well ... just stupid. I have to tell you, saving this trailer was one of the best things we ever decided to do. We thought about buying a new trailer when we bought the boat just because we didn't think it had one. We even thought about it again when Ferd said he did have it and really though about it again hard when we saw it the first, second and third time. After getting it home for a few days we still weren't convinced that we were able to save it but at that point we needed to get the boat home if it meant just patching the trailer up for a few last miles. Worst case we had to get it to the trailer store for the boat to be fit on a new trailer. The project moved along and we got the boat home. The trailer would work for now but if you read through the pages you will see it didn't work for long and the upgrades and patches started to pile on. Then this summer's projects happened and it all started to come together. The trailer sits and looks right now and is more solid in every way then it was when it came from the factory. Bigger beams that are boxed, heavier modern torsion axles with true independent suspension on each wheel.
It's a 100% in every way and is truly a great package deal with the boat.
This is where we would have a picture of the finished job but like I said, there is nothing to see.
____________________________________________________________________
October 31, 2013
The remote oil filter mount on one motor was a hodge podge of brackets and spacers. It started off tall enough but when we changed to a larger / taller oil filter is when things got messed up, pieced together and the bottom of the filter still touched the manifold to the riser hose.
I think one of the biggest complaints when using 496 manifolds on a other BBC is the lack of a remote oil filter mount. We already have enough issues keeping things clean when doing an oil change and using the 496's remote system with it's upside down oil filter is just out of the question and to expensive to change now anyway. So we are keeping the 454 remote oil filter system so to make it right.
Did I mention how much I love my new (and first) stick welder?
So we have a couple chunks of left over stainless steel brick sill we picked out of a dumpster on a jobsite a couple years ago. We originally used it to make little platforms that could be bolted to the stringer's sides for the transmission mounts to sit on. Since then we have found a 100+ uses for it. Without a welder though it just a big piece of "L" metal and limited to that use only.
Now we have a welder and looking for things like this to practice on (if it failed it's not like it critical or anything) we gave the existing oil filter mount on the 19 a look and thought why not just make a new one but bigger. So we took it off the motor and copied the foot prints (has to fit around the risers just right) on each side on the sill metal and then got out the grinder and cut off wheels until we had the two pieces that we could just reverse and put back together.
After some welding and then a little more grinding this is what we came up with. For only being four inches by seven inches tall, about an inch and three quarters on the top and bottom and most of the middle missing it still weighs almost three pounds. Solid is an understatement. After a couple coats of paint you would never know it was two pieces.
I hate flash photos at night. It always look so bad.
Having the old one as a pattern made all the holes perfect and it bolted right up (the picture is from the one I made for the 19).
We only had to make one. The rear motor because the remote filter is on the back side of the motor (because the motor is in backwards) and the filter mount is different with longer legs and "U'ed out" it only requires a couple small spacers.
____________________________________________________________________
Current drive set up as of March 2013.
Race Boat Motors
 Front Motor
91-up...4-bolt, Gen.V (std deck block) 7.4 - 454 Big Block #10114182
Dip it and hone the decks and cylinders (cut .30 over)
Block was detailed with all casting debris removed
Stock seasoned crank (also cleaned up)
Reconditioned connecting rods
Flat Top Speed pro pistons and pins ZH661CP30
Molly piston rings
Federal Mogal bearings (cam, main & rod)
Cloyes true double roller timing chain
Jegs #555-200123 Cam 296°/306° - .540"/.540" lift, 114 l/s
Pro Comp 1.7 roller rockers PC2330
Melling H/V oil pump
Melling HV oil pump shaft
EDELBROCK AIRGAP INTAKE
MSD 6T # 6400 MSD Ignition Boxes
Pro Comp distributor
Super Stock coil
8mm Accel Hi performance wires
Edelbrock 750 carburetor #1410
JEGS #555-15912 Fuel Pressure Regulator
Carter Competition Series Electric Fuel Pump
Brass freeze plugs
Custom Mercruiser 496 - 4" Stainless steel risers
Mercruiser 496 exhaust manifolds
Rear Motor
91-up...4-bolt, Gen.V (std deck block) 7.4 - 454 Big Block #10114182
Dip it and hone the decks and cylinders (stock size cylinders)
Block was detailed with all casting debris removed
Scat Cast Crankshafts - 910454L
Reconditioned LS6 Dimple rods / 7/16 bolts
Flat Top Speed pro pistons and pins ZH661CP
Molly piston rings
Federal Mogal bearings (cam, main & rod)
Cloyes true double roller timing chain
Jegs #555-200123 Cam 296°/306° - .540"/.540" lift, 114 l/s
Pro Comp 1.7 roller rockers PC2330
Melling H/V oil pump
Melling HV oil pump shaft
Pro Comp AIRGAP INTAKE
MSD 6T # 6400 MSD Ignition Boxes
Pro Comp distributor
Super Stock coil
8mm Accel Hi performance wires
Edelbrock 750 carburetor #1410
JEGS #555-15912 Fuel Pressure Regulator
Carter Competition Series Electric Fuel Pump
Brass freeze plugs
Custom Mercruiser 496 - 4" Stainless steel risers
Mercruiser 496 exhaust manifolds
____________________________________________________________________
____________________________________________________________________
The SuperNova19 Network