My Super Nova 19
MOTOR BUILD II
____________________________________________________________________
The next step up.
The original build of the MerCruiser 454.
From a junkyard in Pennsylvania where it should have stayed to becoming a true, running "VolCruiser" and everything in between.
____________________________________________________________________
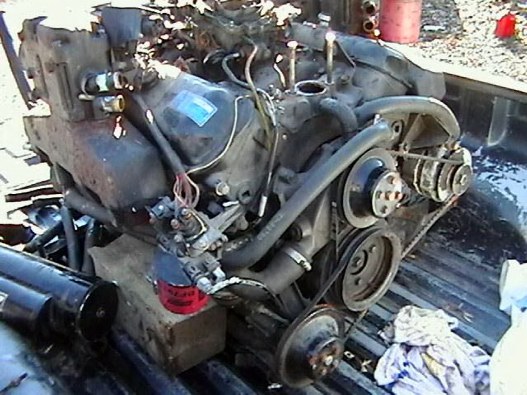
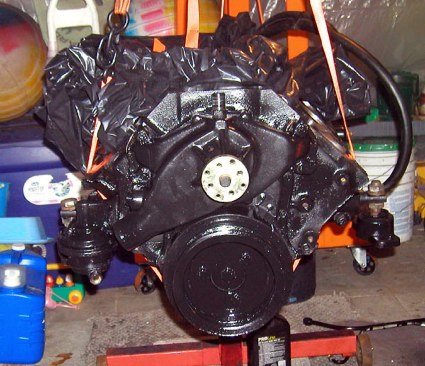
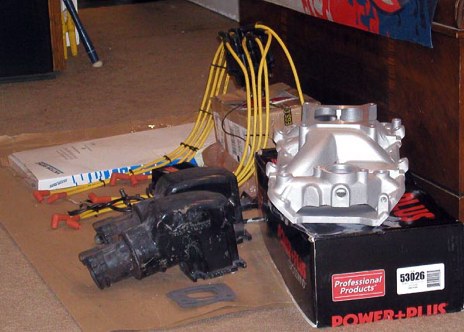
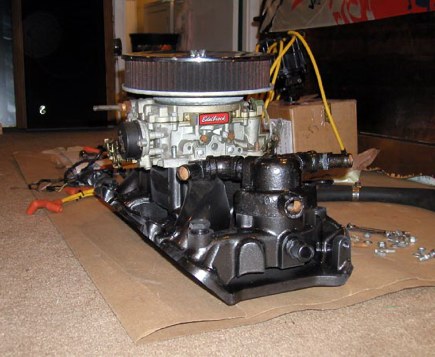
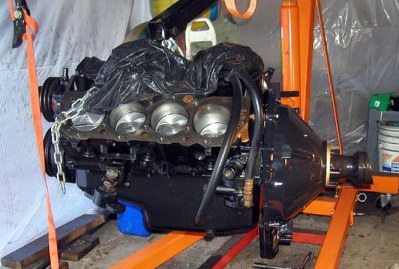
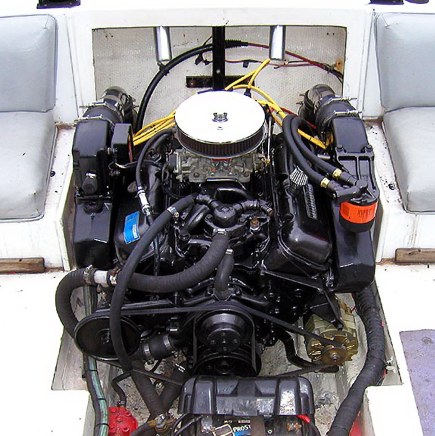
Look what we found. 
eBay auction picture.
____________________________________________________________________
____________________________________________________________________
____________________________________________________________________
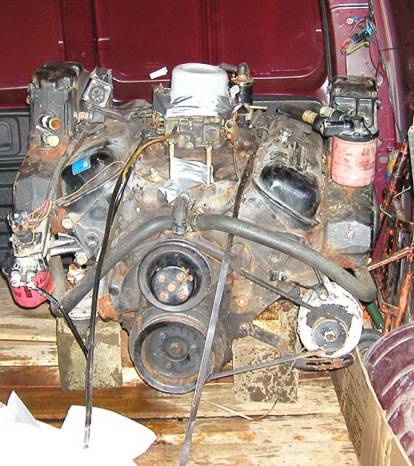
It doesn't look like much to anyone but a gearhead like me now but it will soon enough and I have time. Lots of time being its winter time.
It is a 1986, 454 (7.4) MIE/340 Big Block. Its out of a skiboat with a Mercruiser Vee drive set up.
I bought it off of eBay for $660.00 and had to go to Pennsylvania to pick it up on December 2nd. Got it home and before the day was out it was torn down enough to get it under the back deck for a winter time overhaul.
I have been so busy with it and other things that today is the first chance I have had to update the website and its already the 13th.
I have it almost all ripped down and cleaned up. There is some good news and some bad and I will get to all that later but for now I've got a 454!!!
I'm getting ahead of myself. Lets start at the beginning.
It all started off on my last ride of the season. Not that I haven't thought about a "Big Block" before for the boat. It sure could have used the extra power but I had a good set up with the Mopar and a lot of (to much) money into it to just throw it away. So it would take almost an act of God to get me to start over.
And then it happened. Tap, tap,tap. Bang,bang,bang and I think off a rod went for no reason..........(you can add all the expletives here). It had less then a mile to go from being put away for the season.
If it had to happen it could not happened at a better time. First, it just capped off what had to be one of my worst boating seasons to date. I spent more money and time working on the boat then I did driving it that's for sure. Second, I am not better off by a long shot then I was at the end of last season. So what better time for a change? And a change I have dreamed off doing since I bought the boat.
____________________________________________________________________
The First Thing I Did.
November 2006
This time I had to do some research before I did anything else. After the nightmare of the Volvo / Chrysler combo and what it took in money and effort to make it work I had to find out about everything I could before I spent a dollar. What was easy to find, the cheapest, most reliable and the list goes on and on. I came to the conclusion that a Chevy big block was the best choice. Parts are cheap, easy to find and a lot of after market support, etc, etc. Also with a big block I wouldn't have to run it near as hard as I would a small block.
____________________________________________________________________
12/7/2006
So I started looking. I wasn't a week into it and still had a lot of questions when I found the motor in the picture above on eBay. The only reason I was even watching it was just to see how much it sell for in the condition it was in. I did notice a few things about this auction that caught my attention. One thing was the auction ended on a Wednesday at noon (a horrible time to end a auction like this), it was not to far from me (120 miles) and it had a bad listing. For some reason it didn't come up on a normal search. Then being a boat motor I am sure the salt scared off some car guys. Best thing about that, it was "closed cooled" motor. The only thing that motor has seen is antifreeze and that also helped in the decision about if it ever had freeze damage. So I made a bid early (I also had to work at the time the auction ended) thinking it was a long shot. I figured someone would come in the end and "snipe it" like I wished I could have done. The auction ended and I got my email when I got home that I won. You could have picked me up off of the floor.
Its mine now. Time to go get it and bring it home for some winter time fun.
In the back of my van.
Didn't realize there wasn't anything to tie down to in the van except sheet metal until it was to late.
Thought for sure on one of those back country roads it was going to flip over and kill me or crash through the side of the van.
____________________________________________________________________
Tear Down
12/10/2006
I arrange a pick up on Saturday but the guy had something to do and had to leave by 8AM so..... I get up at 4AM on a very cold Saturday and drive through the back country of Pennsylvania in the predawn hours to get there on time. I pick it up and now its daylight and I find a shortcut so the trip home takes a hour less. I roll in around 10AM and by noon time I am tearing it down. I have to get it in a workable sizes so I can get it under my deck. Remember I still don't have a garage but I have a plan for that also later. The tear down went OK Only broke two oil pan bolts off. I was so happy that they were not head bolts or something like that.
I almost immediately noticed that the motor must have been sitting for a long time. I even think that there had been some creatures evicted from the exhaust manifolds within the last few hours. As it is coming apart I notice that everything inside (crank, rods, etc) all still have oil on them but it is sticky. Looks like a little water got down the carburetor but didn't seem to do anything that could not be fixed. The heads would need a fresh start. The oil drained from the motor didn't have any water in it so it must have stopped at the head. I wasn't going to use the intake anyway so I could forget about it also.
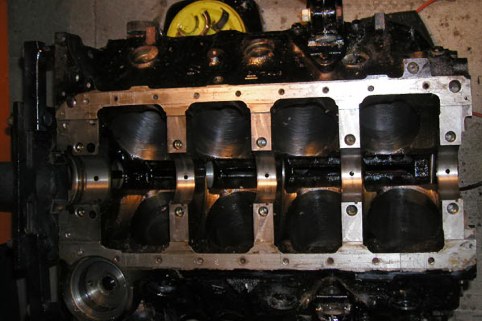
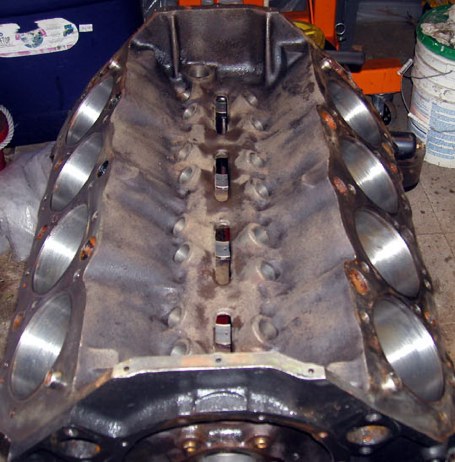
I get it under the deck and finish the tear down. Some is good news some is bad and I am thinking that this may have not been the smartest idea I have had before. The heads look real rough. The pistons are stiff on the rods. You can move them easy enough but not as easy as they should. The exhaust manifolds have major issues . The risers are totally shot and I haven't even thought about seeing what the inside of the manifolds looks like. Maybe one day when I am real bored but there is no reason to now. I don't think these manifolds will be going back on. Even the water pump has a bent shaft but don't get me wrong I see plenty of good things also. Almost everything is there. There is some minor stuff missing but I have most of it on my Chrysler that will swap. The inside of the block is great. No scares on the cylinders or the crank. No cracks or rust. Now I need to clean all the rest of this parts up and see where I stand and what will be needed.
Just a couple more things to take off.
Its getting there.
____________________________________________________________________
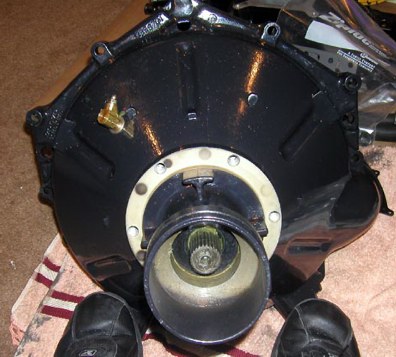
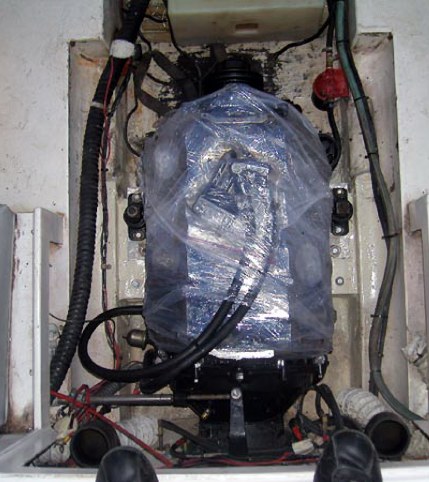
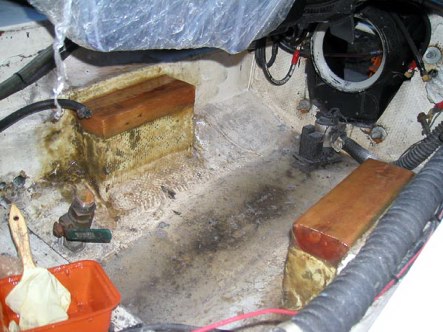
Shanty Town
Welcome to Shanty Town
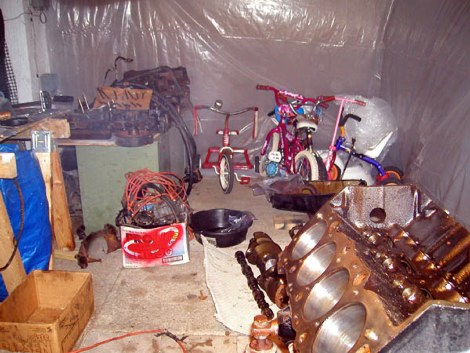
Told you I had a plan. I covered the whole inside of the deck with plastic. Roof and all. It will be good enough except for the coldest days but for the most part its a workable area with electric, lights, heat and shelter from the wind and rain. Everything else after that is just luxuries anyway. Another plus is just out of frame is the backdoor to my house that goes into my tool / laundry room. The only major drawback of this set up is, the room is only 5'3" tall. Now I am 5''7", not tall by a long shot but this is even short for me. You end up trying to do most things sitting or kneeling down but its what I have so I'll make it work. I just wish I would have dug this area out last year like I wanted to. To late now.
Amazing what you can do with a roll of plastic.
____________________________________________________________________
The Journey Begins
It took about two weeks to get it all torn down to its basic pieces. Then a couple more days to get everything cleaned up well enough to be inspected a hundred times. Then think about for a while and inspected another hundred times again.
It also doesn't cost anything to clean parts and very little more to make them look pretty. Even though this project is on a budget if it is needed it will be bought but there is no money to waste on just replacing things "just because".
The block and crank passed but some other things are going to need attention. I worked on trying to loosen up the pistons but nothing I did seem to work over the last week or so. The only thing that worked for a little while was heat . Put a torch on them and warm them up 50+ degrees or so and they would free up like they should be but when they cooled off below 70* they would stiffen up again. Cant have that in a motor that will sit for a couple months before its installed. All of the normal stuff will have to replaced for a refresh / rebuild. The heads are going to need real work but being they are the "peanut port" style heads they are not worth sending out. I will have to replace them later but for now I will have to get them back to working order for a season or two. There will big much bigger fish to fry with this project and new heads can come after I get this whole set up working.
Even with the few unexpected issues I am pretty pleased with what I have. It could have been much worse and I never thought I would be on the verge of building this thing with all the parts (well, most of them) so soon. I didn't think I would even buy a motor until after the first of the year so I am ahead of schedule for now but come January the clock will start ticking again.
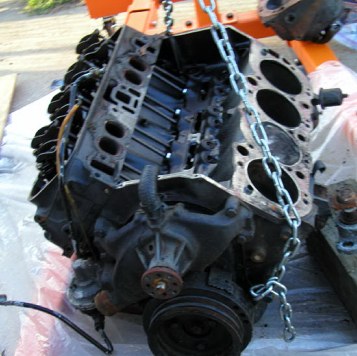
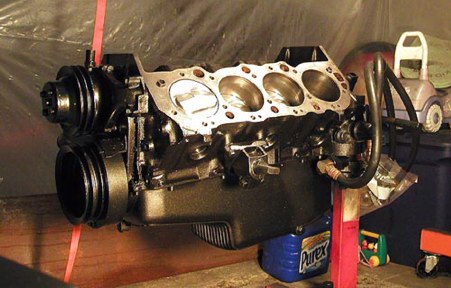
The block looks real clean just after a simple honing. Got to love it!
____________________________________________________________________
The Plan
12/22/2006
Its getting close to Christmas and I have only done a few little things this last week and there is a couple of reasons why. The first thing is I need a few parts/kits and they are killing my monthly budget for the build. Chevy's are cheep but when you need about everything and only can buy a couple things at a time it sucks but it has to be. Of course the first things are big ticket item's so its buy pistons, wait, buy re-ring master kit, wait, buy cam, wait.......
At least it is giving me time to do more research on the 454. Like I said before I was not ready to buy a motor yet but I could not let this one pass. As long as I knew it would work I had to do it. Now to do it right. So far the plan is this but is subject to change until parts are bought.
Strip the motor down to the block (done). Dip it and hone the decks and cylinders Completely refresh the heads. A lot of work but I am cheep labor. Molly rings, new bearing (cam, main & rod). True Double Roller timing chain. Yes I will degree the cam when its time. A new cam (I haven't decided on which one yet, I've have a couple in mind), lifters and valve springs (matching set). Melling HV oil pump with HV shaft (gotta have good oil pressure). Edelbrock Air Gap dual plane manifold. Mercruiser Thunderbolt ignition and distributor with a Super Stock coil. My cooling system off of my Chrysler and the brand new alternator also. Topped off with my Edelbrock 750, some 8mm Accell wires and a few other tricks. The last thing will be some sort of header exhaust like I had on my Mopar.
That should get it going for a while.
____________________________________________________________________
Decisions, Decisions
First I made my "keeping pile" and my "hold on to until after the first ride pile". My "hold on to until after the first ride pile" is a lesson I learned many years ago. Never throw away anything until you are going 50 mph and then still hold on to it for a couple weeks after that. You just may need something over looked or a tiny part off of it that cost more then you care to spend if you can even find it.
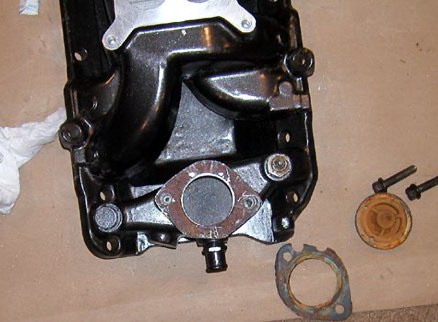
Everything in the "keeping pile" got a total make over inside and out. Most of it was just cleaning and wire brushing parts. Anything that just needed a little attention was done first. Things like the oil pan, motor mounts or solid pieces were cleaned up and painted then set aside.
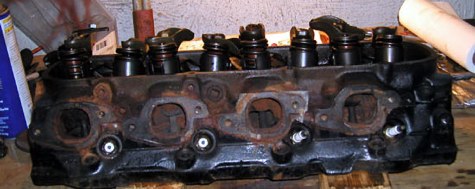
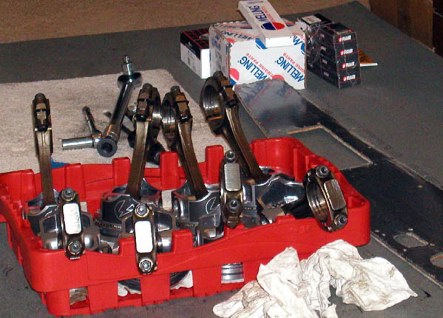
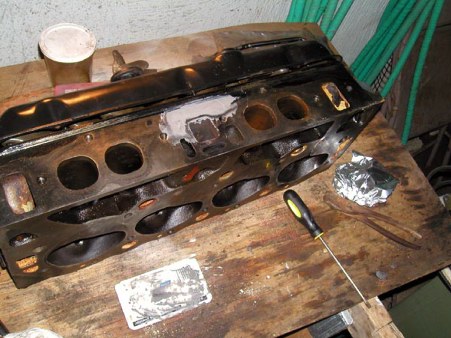
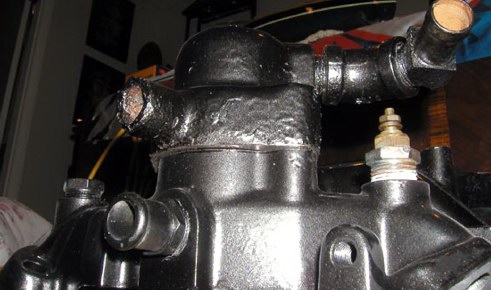
The next thing was the heads. What a total mess they were. Some of the valves had a globs of dried oil on them. Like it ran real rich for a long time and again like the rest of the motor the oil in the head had almost become like glue making everything stuck.
Surface rust and rodent nests falling out of the runners.
What a mess and it was like that on the intake side also.
Took the heads completely apart. Did everything just short of polish and port job. I may have but I am not a professional so I wont say I did. Use a gun barrel brush on a drill to clean the guides. I then checked for to see if the guides were sloppy and the valve seated properly. Everything checked out good. Reassembled the whole thing with new seals and they are like brand new. I still don't have springs for them though. I haven't picked a cam yet and I want them to match. So I put the heads back together with the original springs just so no parts will be lost.
The more I read about these Chevy 14092360 heads the more they don't sound that bad and pretty good for what I am looking for. There power ban is in the right area. They should provide the horsepower I am looking for easily. So I will see and if they suck as bad as all the hot rod folks say they do their time will be short. Mercruiser/Chevy had to use them for a reason though. Maybe torque monster heads is just what the boat needs. For now though I need to make the bottom end right and the rest are just "bolt on's" including the heads. I bought a new motor hoist just for this project. My first. Most times I rent, beg and borrow them or use the forklift at work. With my luck now that I own one I will only have to use it once. I can only hope my normal luck holds out.
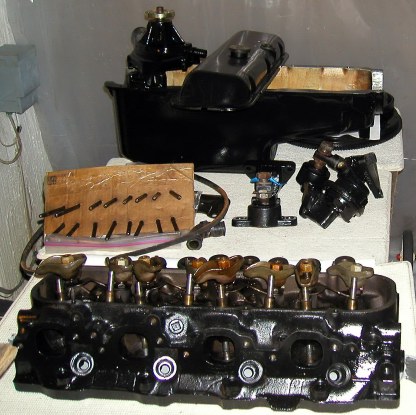
One head almost done and a few other parts ready to go.
Including a new water pump from eBay.
Over the last week I also have spent a ton of time on the net. Researching which parts to buy, looking for it, finding the cheapest price and then buying what parts I can afford. I had to pick up the Master Re-ring kit ($160.00) because I needed the valve seals out of it to finish the heads. Now I just need the springs but before I get the springs I have to chose a cam and I still have not done that yet. Its down to one or two but I want to run it past a couple of folks before I buy it just to be sure. I found a cam kit for about $200.00 that will take care of the cam and lifters (both are Seal Pro), Cloyes true double roller timing chain and Seal Pro valve spring. Also new rod bolts. Everyone says to replace them and I plan on it. A bad bolt could be a reason I lost my last motor. It would explain a lot.
While I have been floundering about on the cam I did make a decision on pistons and wrist pins. I just bought .210 Domed Speed pros. That should give me 9.38 to 1 with the heads I am using now and also will give room to move a little when and if I pick up a different set of heads in the future. They just came in today and look bad ass.
Just making baby steps.
____________________________________________________________________
Another Day
12/26/2006
Today is the last day of my 4 day vacation (the shop closed for the 4 days for Christmas) and I thought I would use it wisely. I started off by dropping the pistons to the machine shop for mounting on the rods and sizing of the cylinders. I also ordered my cam kit. It took all weekend to come up with what I wanted and finally I just had to make a order and get it over with. Everyone has their own ideas of where I should be when it came to the cam and everyone's idea was different. So I made my best guess after doing all the research I could. It was not far off of what Mercruiser (Chevy) put in the motor in the first place. The spec's are as follows, Chevy 396-502 cid, RPM Range 2000-4500, Adv Dur 296 intake/296 exhaust, Dur @.050 218 intake/218 exhaust, Valve Lift 519 intake/519 exhaust, Lobe C/L 110. Some are going to say I am crazy because its to mild and some will say its to wild but that's about as close as I could get to the original cam. Little more lift, slightly tighter pattern and just a tad less duration. Should make it a little more snappy with the new pistons. The cam actually tops out around 48000rpm's so I will be able to get every last once out of it. With the kit I also upgraded to matching Speed Pro valve springs, a Cloyes true roller timing chain and a new set of rod bolts. That set me back a cool $230.00 The machine work and the kit should be here by Friday so it looks like I will be building a new motor for the New Year. Or at least the bottom end. I still have to get a couple things before the weekend but time wise this could not be better.
Right now I am off work and I actually had nothing really to do but the above so I decided that I would spend the day to get my dash board re-install out of the way. Its not really part of the motor build so the rest of that story will be on the  page.
page.
____________________________________________________________________
12/29/2006
Well Friday is here and I have most of everything I need to get most things done this weekend. I picked up the pistons from the machine shop. It was only $60 bucks to have them mounted. Not a bad deal. Now I feel better. They have been in 30* cold all night and they are just a loose as they should be. Now I can put the motor together and still sleep at night. I also received the cam kit from Northern Auto today. Right on time. Only one problem. The kit is missing the cam and 4 lifters! WTF!!!
Time to make some phone calls tomorrow. Again I am lucky its December and not June or I would be having a cow right now. I will continue the bottom end build tomorrow and I can complete the heads also now that the springs are here. I really wish I could have got the cam installed. Without it I can not put the timing chain cover on the motor. No timing chain cover no oil pan and etc, etc. Figures. I have a nice 3 day weekend and only about 4 hours of work to do.
____________________________________________________________________
1/1/2007
After I finished installing the valve springs in the heads which takes forever because of the oil splash shields getting in the way of the spring puller, I moved on the block. Well in some ways I'm glad that all the parts did not show up on time. It left more time to do some little things I should have done before. The first thing I did was detail the block as best as I know how. It may not be perfect but its better then it was. An example is the lifter valley. You can see the jagged edges from the casting that was never cleaned up. I never saw a block with so much motor killing chunks ready to fall off. After a grinder, files and a hour or so it looked a lot better.
About every edge had casting overhang still stuck to it.
Everything filed off smooth, block scrubbed and washed.
All the passages blown out and two heaters blowing on it to finish drying it out before the build.
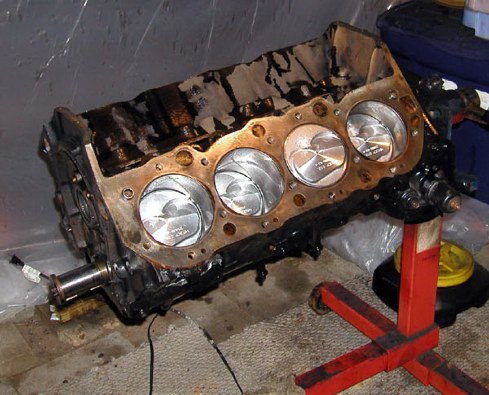
Now its time to load the "rounds in the chamber." Took my time and had everything laid out for the job the night before. Rings were filed to size and on the pistons. All the tools were out and ready to go. You would think I was ready to do surgery or something but honestly I was just trying to clean up some of the crap that has been laying around for weeks. Parts for this, parts for that but nothing complete. Some parts have been around long enough that they were becoming part of my rec rooms decor. If you have a basket of flowers sitting around some may notice. If you have a basket of cool ass pistons sitting around you have a conversation piece.
As nice as it was having them sitting in the basement.
I hope they never see them again unless its elective.
So the bottom end goes together pretty easy. After the new rod bolts were installed the rod caps were a little tight to get on. It took about 15lbs torque just get the caps seated on the rods. I torqued the caps down to the rods before I put them in the motor and checked the big end for roundness. They were cool so I figured it was just the fat end if the bolt being new.
I have never bothered with all this stuff before. Slap some rings and bearings in it and go was the way. Some ways it was better then not knowing what I do know now. The more I learn the more I think I am doing something wrong. Also if something goes wrong the answers are a lot harder to come up with because you thought you did it right the first time. Not to mention the money.
As everything went together I stopped and made sure nothing was binding in anyway as each piece was installed. Checked and double checked over and over. Now I am just waiting on parts believe it or not. They are lost in the mail according to Northern. Which brings up a new concern. If they are found do I even want them? A cam being banged around in a mail room in its box alone is not a good thing.
Man those Speed Pro .210 dome pistons look nice in there!!!
____________________________________________________________________
Progress
1/4/2007
I guess progress is not the best name for this section just because not a lot has happened but a couple small things.
I finally got the cam situation straightened out and a new one is on the way. That took a couple days and something that has never happened before. UPS wanted to come look at the box it came in. I guess they get a lot of folks stealing cams out of auto parts boxes or something. I about had enough when I made my third phone call to Northern Auto tonight but before I said anything they said they were going to send the parts again and they will straighten it out with UPS. That is exactly what I expected from them. They are a great company even with this mishap. Lets hope I will not need to be but if so I will still be their customer again in the future.
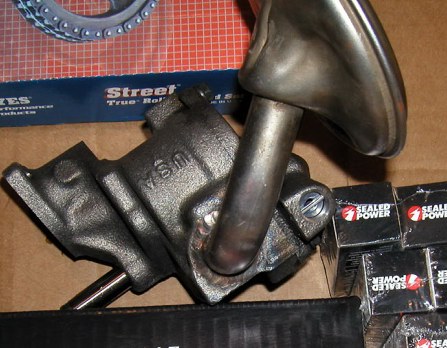
Today I also dropped off the oil pump so the "pick up" could be welded on. I am so used to small blocks that I never even thought about it until last night. Small block "pick ups" all screw on to the oil pump. Big block's are pressed on or in my case, hammer on with a rubber mallet but then the pick up needs to be tack welded to the pump. I really need to learn how to weld. Its just something I have never done before and for what I needed done this time it has to be right. It also doesn't hurt that its only $25.00 to have it done so off it went and I guess I will learn another day.
The final thing is just spending money. On my normal eBay hunt last night I ran across a deal I could not pass on. For $153.00 bucks I picked up a "Air Gap" intake manifold. Its not a Edelbrock though. Its a Power+Plus, CrossWind Series aluminum Intake Manifold from Professional Products. This thing is so close to a Edelbrock that it should be illegal. Everything but the name and the extra 75 to 100 bucks to buy one. It also has a cool feature in case I want to get stupid one day. Cast-in nitrous bosses! Plug in and go!
Just a stock photo.
The real thing should be here in a couple days.
____________________________________________________________________
1/13/2007
Well it been a couple steps forward and a couple back. Nothing major. I had to wait for the oil pump until the 12th before I could pick it up from the welder. It sure is done right but it took 7 days. I really need to learn how to weld. The cam and lifters finally showed up on the 11th. That's about 15 days past the first shipment. Glad I didn't need this motor to get to work or anything like that but again that's why I am doing it now instead of in the spring. I almost put this thing on a shelf in our shop for a few months. I really didn't want to do it at all now but I knew I had to "just in case". Looks like that is going to pay off now. That and it will give me time to come up with the bellhousing kit money. Then there is exhaust. I still haven't even looked at the manifolds. Best case is I need risers. Worst case I need the whole set and that will suck. I don't mind putting a couple bucks into them but a new cast iron set will cost about half of what a good set would cost. Eventually that will be wasted money because I sure cant afford the good set this year but it will happen sooner or later.
I also got my intake in the mail. Another issue. It was listed for oval port heads and in reality it was for rectangle port heads. The seller knew he screwed up when I first contacted him. He even offered to pay to have it shipped back. I guess there is still some cool folks on eBay. No big loss but time. I really don't need it until spring but wouldn't mind having it so I can get everything fitted to the motor. Also off of my long check list of needed parts.
Tomorrow I will finish off the bottom end up until its time to install the heads. I'm leaving them off for now. I want to be able to set the motor in the boat and get it lined up without them in the way. Line up on this set up is going to be critical! I will dry fit everything before hand to make sure all the pulleys and such are right but the final top end build will happen inside the monster. Not the preferred way to do things but once I get the motor set right in the boat I'm not moving it again.
More to follow.
That pick up isn't going anywhere.
____________________________________________________________________
Good News
1/20/2007
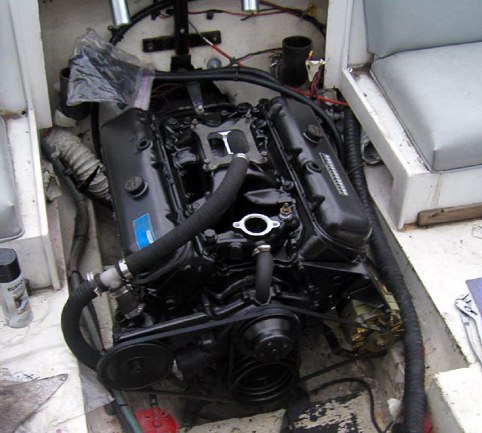
Not having a intake I did what I could. So I installed the crank pulley, water pump, motor mounts, oil filter bypass and fuel pump to name a few. Didn't want to add to much weight to the motor while its still sitting on the stand.
It was a little to cold out today to take the cooling system off the Mopar. The next warm day I'll have to. I want to get the belts lined up before I put it in the boat. I wish I could finish the whole motor but if I did it would be a total pain when installing it in the boat. Also I'm not a fan of the whole thing hanging on a motor stand by four bolts for the next couple months. Just being a short block now I already have the front end strapped to a overhead joist just in case.
Don't look like much but there is a lot more there then yesterday.
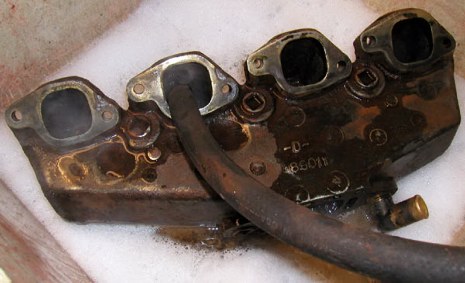
So I finish up some of the loose ends and I am looking around for what's next. Everything that's here is ready for install but its not time to do any of it yet. I find a couple little things but its nothing I can do without a trip to the store and none of it was worth a special trip. So I am cleaning up and it hits me. Take the manifolds apart and see how bad they are. That way (knowing they were bad) I could get rid of them and make some more space as it is very limited in Shanty Town. As I am taking the first riser off its about crumbling in my hands. I also figured that I would break a bolt or two off but they came out. I then break the riser off of the manifold and surprise!!!!!!!!!! The manifolds looks like they were brand new. Besides the mouse nests and piss inside the runners they look real good. After every wire brush I have and a lot of soaking they are almost new. I will pressure test them just to be sure they are alright but the way they look it would surprise me if they were bad.
All and all it was a good day but now with not much to do its time to start ordering parts again. Looks like this week I'm going to start working on the electric system. That will be a job. My home made electric system in the boat + 1986 Mercruiser Thunderbolt system ='s a pain in the ass.
They cleaned up nice but it took a hour just to get the smell out of them.
____________________________________________________________________
1/21/2007
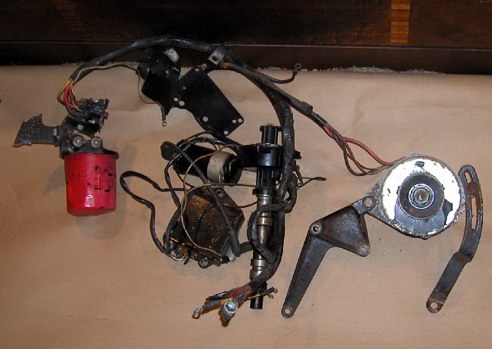
Its amazing what you can do with 30 bucks, some elbow grease and a can of paint. Got the parts in for the distributor today. Another ebay buy. I checked all the places I would normally buy these parts from and it was cheaper by a couple bucks. Add in it was a simple as point and click to buy it made it a no brainier.
Did most of the cleaning and rebuilding last night. repainted the control box and got it all sorted out. As long as it worked before it will be good as new.
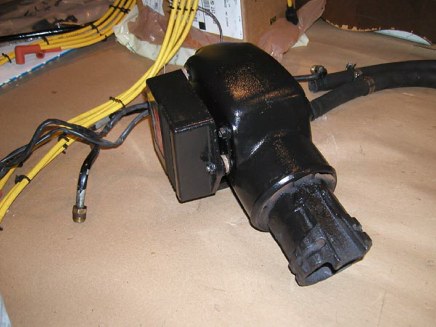
This is how it came out of the box I stuffed it all in during the tear down.
This is about I am going to keep and inside and out its as good as new.
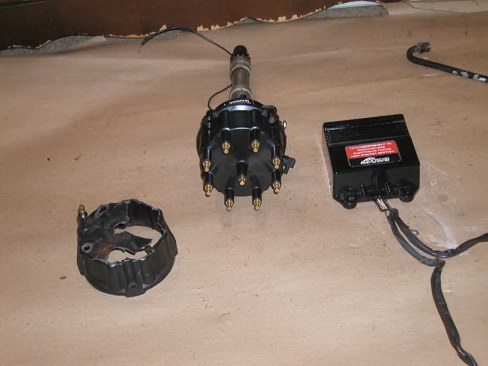
After looking over everything I think I am going to keep my electric system that's in the boat now. Not bragging but mine is better then theirs. Heavier wire and solid (no splices) from dash to motor. Also I would have had to adapt my ALT (its a brand new single wire that I put on the 360 about 8 hours on before it blew) to the MerCruiser set up and other stuff so it will be easier and better this way. I am keeping the Thunderbolt ignition. It is a lot better then anything I could buy right now. Also a great feature is it has a rev limiter for those times out of the water. 5800rpm's and every fifth spark to the plugs gets interrupted keeping the rpm's down. Hopefully I will get a chance to test it now and then.
Wires with new ends and the ignition system is ready to go.
____________________________________________________________________
Loose Ends
1/27/2007
This weekend with not a lot going on the plan was to clean up some loose ends and get ready for the next big step. What step? I haven't a clue but I am sure something will come up.
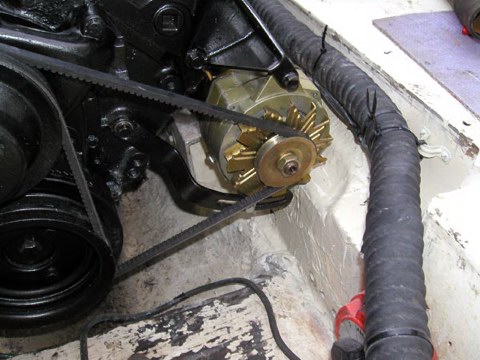
I am glad I took the time to get some of this stuff done now because what I thought would be easy turned out to be a little harder then I thought. The main thing was getting the front of the motor lined up. There wasn't much but what there was came off of my Mopar and was not made for Chevy. After putting the top end of the motor together with a bolt or two the alternator installed easy enough. Pretty much used what came with the Merc motor for brackets and with a couple home made spacers this Mercruiser now has a single wire alternator. A little better and simpler then the five wires that came off the old one. Also it means that my electric system in the boat will need a little tweaking but will work.
Then the next thing was the raw water pump. Not so easy. The bracket that came off the Mopar and was nothing like a Mercruiser piece. Racked my brain on it for a couple days before I attempted a build. I also went and looked at a top mount alternator bracket for a big block and got some ideas. I basically needed to use the same Mopar bracket (it worked with the pump well and was real solid with no flex) but it needed to move out 3 and 1/4 inches away from the head to line the pumps pulley up right. So after a Home Depot trip I had the right length bolts and spacers that I didn't already have and with a couple new fan belts I put the plan to the test. The first attempt was almost right but the pump would not slide out right (like when tightening the belt) and it more wanted to tilt or twist down the bracket so the inlet and outlet would be at weird angles. That wasn't going to work. I then realized that was because the slots in the bracket were curving down. I then take everything back off and drill another hole in the bracket so I can make it mirror what it would have looked like on the other side (the side it was made for). I basically flipped it over like a turning a page of a book. Cut my spacers to the right size and bolted it back up.
Perfect! Worked just like it was made for there.
Getting everything right sure took some time though. Glad I did it now because in the boat it would have been extremely hard. Just all the times I would have had to jump in and out of the boat for different tools would have been insane. Now to take everything back off and line them up on the bench for install and hope they all go back in order.
All the building is done.
Now to take it all back off and make it look pretty.
____________________________________________________________________
I'm Bored
Here it is the 1st of February and I'm bored.
I guess in the big scheme of things its not all that bad. It could be worse and I could have way to much to do but a early start got me ahead of schedule. Way ahead.
All I can say is "WaaaaaaaaaaaaaaaaaaaHoooooooooooooooooooooo", in my best Nascar voice.
Everything is almost ready to go. I say "almost" because there is still a couple things left to buy but when bought they will just sit and wait for install until spring. So I have time.
I finally got the intake issue straightened out. The money was returned (along with shipping) and the same night I bought the same "Cross Wind" intake but with oval ports this time. I had to add another 30 bucks to what I bought the first one for (never get the same good deal twice). That sucked. One good thing about all this happening though is I did get a chance to look over the intake from, to me, a unknown parts company. If the new one looks anything like the one before, know one, including me will ever notice the difference from the brand name intake. And for $200.00 bucks its will have to do.
I also picked up the fine spline yoke end for my outdrive for 50 bucks. I need it because the new bellhousing for the Chevy comes with a fine spline drive shaft. The bellhousing is brand new and it must be the new style. So the small change to the outdrive had to happen.
Hopefully with all these changes I will not have that harmonic humm this time around. It has drove me nuts chasing it for years. When the new motor is in I will have installed and reinstall and then replaced almost everything in the drive train. Even with the only thing that's still original to the boat (the outdrive) has had the "U joints" replaced a couple times and many different props on it. Still that humm at 32 to 3600 rpms. If I still have it this year I will have no clue where to go next. Until then I will have my figures crossed.
With those two off the list its down to the bellhousing kit and exhaust risers and that's a short but expensive list but again I have time.
One more thing off the list.
____________________________________________________________________
Quick Pick Up
2/2/07
Well thinking I would never find a good and cheap set of risers has come to a end.
Knowing the risers that came with the motor were bad I have been looking for exhaust from the start. I watched set after set of risers on eBay for days and weeks, ready to make my move just to lose the auction in the end. This time it was for a set of stainless steel 4" risers. For a week I watch again without them making any movement. But for a auction ending 12 noon on a Friday in February there sure was a lot of folks trying to snatch up these boat parts. Again I came out on the losing side. I was second but as they say in racing, "that's just the first looser".
So I start the hunt again and like I already knew there was not much to look at. But then I run across a new auction for manifolds and risers and the risers were also S/S and they had a "buy it now" price set at $150.00
I get the bright idea to send the guy a email asking how much shipping would be (shipping can kill deal as heavy as the whole set was) and also adding a "P.S" asking if he would split up the set. I get a email back saying, "sure, $70 bucks for the risers and gaskets and they will pay for shipping". The only response I could say was, "sold!". So they should show up next week and my list is down to one last thing.
Just the S/S risers.
____________________________________________________________________
2/7/2007
Just a quick update.
Its cold as crap out and everything has come to a stand still. Not for just being cold but there is really nothing to do until I can take the outdriver off and the Mopar motor out of the boat and that wont happen for a couple more weeks yet. Not that I am complaining. I cant say how happy I am that I have this problem. Never thought I would be no where near this done. Yes there is still a ton of stuff to do yet but being ready before the weather breaks is more then I could ask for.
The Cross Winds intake and the S/S exhaust risers came in today. There is a little work to do with them. Sadly I have to take this not so much as a finger print on it intake and paint it black. I have used aluminum intakes for years and tried about every finish I could think off with not luck. After a couple months they all look like crap. Mercruiser's are black for a reason. Black shows nothing. Not dirty water stains, oil drips (from checking or changing) or soot and you get all that stuff inside a closed motor box. So black it is.
One of the studs broke off a riser when it shipped and of course its the side that my ignition box bolts up to. For what I paid for them they are not going back so I have some options to come up with. I could mount the control box to the other riser, lucky enough that both risers have mounting studs and I just may do that but I would like to have it on the side (it was on originally) and that means fixing the stud. But then again its a stainless steel stud and it may be a little more then its worth. The exhaust is temporary so I may just end up mounting the control box to the transom. I'm not sure yet but its no big deal.
Almost to pretty to paint.
____________________________________________________________________
Catch Up Time
2/15/2007
I didn't think much was happening but now that I think back over the past few days there has been a few things.
Like I said before I had to paint my intake. Wanting it to stand out a little I bought a can of Rust-Oleum, black metal flake spray paint. Now any other paint that has made these claims of being metal flake, chrome etc, etc end up looking like nothing close to what they claim it will. So I buy one can of it and a couple cans of gloss block to use as a base coat and if needed, for a coat over the metal flake if it ends up looking like crap.
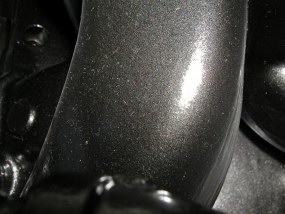
I then paint the intake and I'm shocked on how nice it looks.
Its hard to get a good picture but this one turned out so you can at least see the color.
Its really hard to get a picture of.
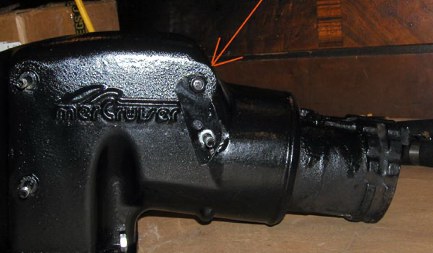
Then there was the exhaust riser and Thunderbolt box issue. I solved that by first deciding that the box must go on the side I wanted it to go on in the first place. On the other side there would have been to much in the way. So with that I had to figure a way to change the bolt pattern of the riser so the box would bolt up the properly. Being that this exhaust system is temporary I made up this simple little bolt on bracket to fix the issue.
Don't look like much but it will work.
After I got it all bolted up it didn't look bad at all and it works perfect so I don't see any reason not to keep it like it is until I change exhaust. Also being under the box and facing the transom no one will ever see it anyway.
Now it don't even look bad.
Then I started to dry fit the top end of the motor just to make sure it all fit together and also to find out something but more on that later.
I first started off making sure that everything fit proper on the intake. Then I installed the Temp sender and some other fittings in the intake. I did discover that the thermostat housing was needing a little attention but all and all it was good.
A nice start!
Now for the fun part.
With that done I needed to set the intake on the motor so I could find out where the choke holes in the heads would show at. That's the reason I did all this. Whenever you install an aluminum intake they never cover all of them and water and crap gets in there and end up being a eye sore. Being the carb was already on the intake, it went with it. As for the distributor, I wanted to make sure the wires were long enough. They are off my Mopar and only have about 10 hours on them so they are a must to reuse.
I wish this was true but it all fits.
So I get everything set and find out what holes show. Mark them off and then take everything apart again. The choke holes were real deep in the heads so instead using a gallon of JB Weld I first filled in most of them with tin foil up to about 3/8th's of a inch from the top. Then I mixed up some JB Weld and filled in the rest. Then did some grinding and filled again. Sanded that off and they was ready for paint.
All filled.
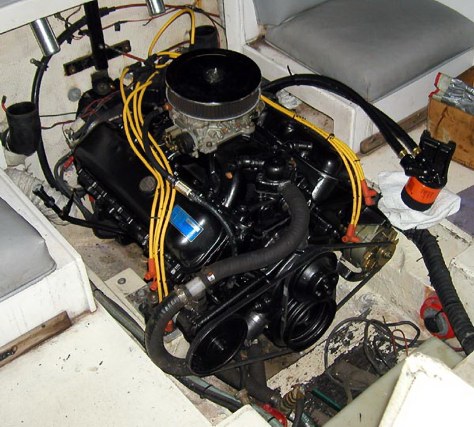
After I got the motor all broke down I was so impressed by the metal flake paint I decided to paint the whole motor with it. Thinking I had to paint everything again not to mention the expense ($5.50 a can and I am up to 5 so far) made me almost not do it. I knew it would not shine like it did on the intake on the block but it gives it a really cool metal look and should shine some in the sunlight. To me it gives that little "pop" I wanted. How long it will stay like that is a good question.
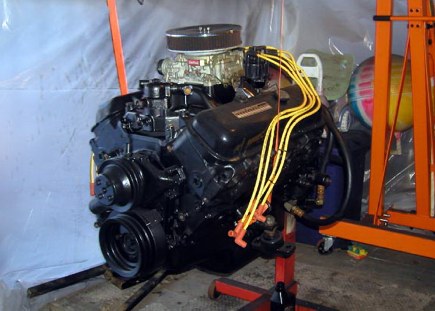
After the intake I had to do the whole motor and it looks good to!
I'm sure there is still a few things to work on and the best thing is I still have time. Its nice to look for things to do and if I find something I have the time to do it right.
At the same time though I am starting to get antsy. Did I do this right, did I forget to tighten up that bolt that is now inside the motor? Will it start? Will the cooling system work? Will it kill my Volvo (Naaa, that's not going to happen unless its ready to go anyway). What prop will I need? Will my 750 Edelbrock be enough for it? Will it be a dog? Will it be to much? Will it fit in my motor box? How will the boat drive with a big block? Will I be able to steer without hydraulics?
And that's for a start. If I think any more about it my head starts hurting.
____________________________________________________________________
Its The Little Things
2/24/2007
With all the down time I have had I really have not done much. Just some little things.
One thing was I need to use the thermostat housing that was on my Mopar. At this point I'm not willing to buy a Chevy housing for a hundred plus dollars that does the same function as the Mopars. I would be if there was more issues then there is but right now its not worth it. To my surprise the bolt holes line up already and it fits almost properly. Its the almost part that lead to a project.
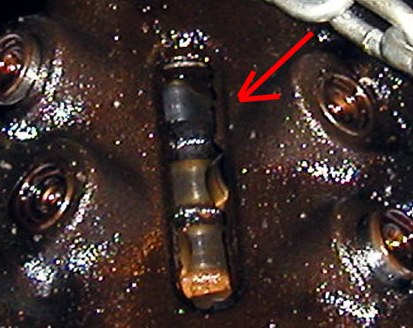
The only issue is the housing is a little wider then the intakes water neck. As you can see in the picture there is a little over hang and there is only about a 1/4 to 3/8 of a inch (with some rough areas) of metal to metal contact between the two when fitted together. Besides that it fits perfect.
Close but needs a little more.
So I figured it was like a giant bolt (intake's water neck) that is a little to small for a hole (thermostat housing) and I needed to come up with some sort of washer for it to make up the difference. The thermostat housing and aluminum intake already makes enough contact to be solid but I am a little worried about the gasket having enough metal to hold on to. There is a lot of water pumping through there and I don't want it to leak all over my new motor.
So I find a piece of metal and spend a few hours making a "washer" for the water neck. It didn't turn out to bad and should work fine. If so I will just have saved a hundred plus dollars on buying a new one and I am going to need it.
Now the neck is wide enough.
The next and last thing on my hit list is in the picture below and it is not cheap at all. About $550.00 total. When I started this project I thought it would be a very easy score but these things have become very scarce. I have looked all over the place the last couple months for the parts to put this kit together. To my surprise what I found (if I could find it at all) was some very over priced junk. Nothing I would even consider buying no matter how cheap it was. So I have to bite the bullet and throw out the ducketts. I know its the right move in so many ways but...... It sure is a lot more then I thought I was going to pay for it. If I knew then what I know now I may have not done this project but now that most of the pain is behind me (I hope) I am glad I did all of this. Well I am for now. Get back to me after the first ride.
Lots of money but it's the right choice.
____________________________________________________________________
VolCruiser
3/4/2007
Its official.
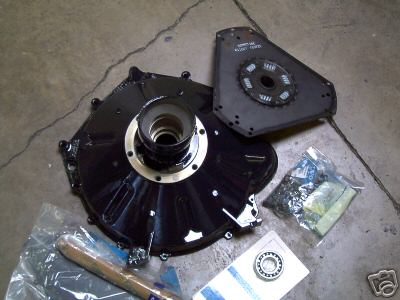
This MerCruiser has been Volvo'ized. Who would have thunk of such a thing?
The kit came in after I ordered it in three days. I guess when you spend that kind of money good shipping comes with it. I thought it was a after market kit but its actually a Volvo kit straight from the factory. This kit is nice too and compared to what used junk that's on the market and for how much they want for it anyone would be crazy to buy anything else. It came with everything needed to connect to 454 to the Volvo outdrive and its all new.
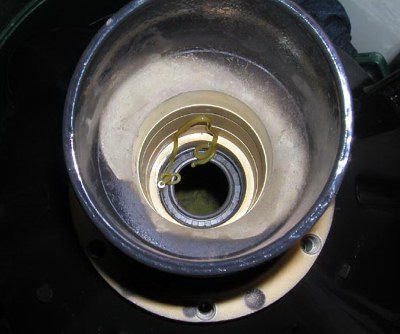
One of the things that came in the kit was a pilot bearing. Pilot bearings have been a nightmare for me for almost 7 years now. For some reason I could never find the right one for my Chrysler. I ended up making one at home out of another bearing (you should have seen that rig I made so I could make it) and it worked fine for a few years. The second to last time I blew the 360 up with that bad timing chain cover I figured the one perk I could give myself for doing all that work was having the crank drilled professionally and a pilot bearing installed. I do that and less then 15 hours of use after the install it threw a rod or something in the bottom end and I still think to this day (I will find out in a couple weeks) the newly installed pilot bearing had something to do with it.
With the pilot bearing from the Volvo kit slipping right into the crank like it should and the bellhousing drive shaft slipping right into it as it should as of today my pilot bearing issues are over.
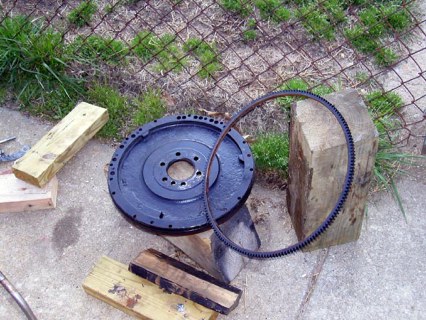
That to me is one great picture.
Also today, just to make sure there wasn't any fitting issues (rather find out now and not on the day of the install) I dry fitted everything together. The bellhousing is not ready for permanent install yet. I still have to have the driveshaft pressed into it. But I had to know it would fit over the 14" flywheel. It was supposed to and did but I had to see it for myself just so I could sleep at night.
So its official, with a MerCruiser 454 at one end and a Volvo 280/270 at the other end I have a "VolCruiser".
It all fits!
____________________________________________________________________
Update
3/23/2007
Its been a few weeks and I'm ready to get started. The only thing that has been holding me up is the weather. All the parts are in line to be installed, Shanty Town is all cleaned up and ready to receive anything it needs to off the old motor, I even have my first box of tools packed up. Everything I need to start the removal of the old motor from the boat but up until now its just been to cold and wet to do anything. I thought this weekend was going to be different but its not starting off to well. Its a Friday night and when I got home from work I wanted to uncover the boat and maybe take the outdrive off but now all I am doing is watching it rain. Its warm enough but ...... They are also calling for rain tomorrow. After a work week of sun shine its killing me.
The plan was by the end of the weekend to have the old motor out and the new block (and internals) in the boat. Now I am hoping to just to have the old motor out and I'm crossing my fingers about that. No matter what something will get done before Sunday night if its just taking the tarp off.
Now again with more time on my hands then stuff to do I have been playing with little things. One thing I did notice, there was a issue with my new bellhousing. This one for some reason did not have anyway to deliver grease to the bearing that the drive shaft rides on. Now my Mopar has 2 grease zerks on it and any other bellhousing has at least 1 and some even have a place to use heavy engine oil in place of the grease but all had a way to lube the bearing. This one had nothing. I thought about changing out the bearing with a sealed bearing but I would also need to keep the shaft splines greased somehow so it would mean taking the drive off now and then to do this. That's not a option. I am a little to fanatical about maintenance to take the drive off every time I wanted to grease it so I had to do something about it.
I gathered some parts together and came up with this plan.
With a couple grease gun parts I came up with this.
Now to install it.
I drilled a hole into the bellhousing so I could insert the needle into the bearing area and in between the two seals that fit on either side of the bearing. It took me two days to get up the courage to do it. I knew if I screwed this up I may have to buy another bellhousing and it would have been months before I could replace it. I measured angles and depth a hundred times and just like that needle you screamed about for a hour when you were a kid it was over before I knew it. Inserted the needle in and JB Welded it into place. Then drilled a couple holes for ties to hold the hose from rubbing on the driveshaft and then drilled a hole so the inlet zerk was on the top, outside of the bellhousing.
Looks a little messy but it works fine.
Just a test squirt and it looks good.
Ready to go.
With everything put together it filled the bearing cavity perfectly.
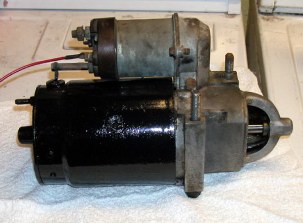
So that's about all I have come up with. I have been looking for a starter but I haven't came across one yet for what I want to pay for it so I am still looking and waiting for the weather to get better.
____________________________________________________________________
Good By Old Friend
3/24/2007
The weather finally got better some what and even though they were calling for rain all weekend and it did, it was warm enough to get started on the project.
The first thing that had to happen was the removal of the outdrive and the Chrysler 360.
It was a sad day for me. This time it wasn't coming back. This motor and I have a long history together over the last 6 years. Lots of fun times and lots of bad times but all and all I still like the motor. I just think it was the wrong choice for this boat. I also don't think many other small blocks would have stood up to the weekly beating I whipped at this thing.
I also had to find out what was wrong with it so while I had it on the lift and with daylight running out to quick to do anything else I broke down the motor to just the block and it internals. Looked all through it and didn't see anything. I even spun it a couple times and nothing. So I brought it back to "Shanty Town" and soaked it in some WD-40 and wrapped it up. When this project is over I think I'm going to fix or at least find out what's wrong with it, just because.
Until next time old friend.
____________________________________________________________________
It Begins
Week of 3/25/2007
I have been waiting for this day for a long time.
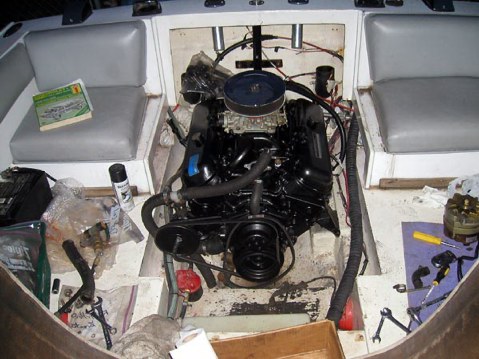
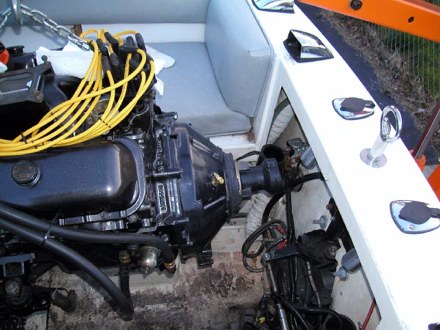
Regardless of what I could get done today just setting the 454 Big Block in the boat was a big deal to me and would also give me a plan on what would have to be done to make it all work. I really didn't think it would fit like a glove and it didn't. But at least I had a stating point.
Lets get this show started.
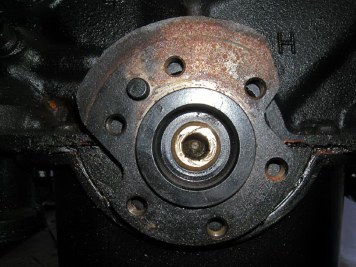
The night before I took it out of its trash bag and shrink wrapped the whole thing so nothing would get into it. I have been trying my best to keep the motor as clean as possible, not even dust. If it wasn't being worked on it has been wrapped.
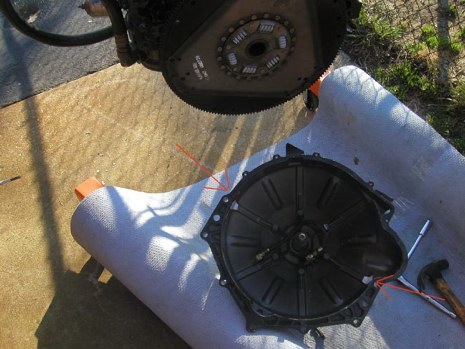
Before I could set it in the boat though I had the drag it out of Shanty Town and down to the driveway. I then pick it up with the cherry picker and after 4 months I finally get to take the motor stand off one last time. I get all the bellhousing stuff out and bolt up the flywheel and vibration damper to the hanging motor. Then I go to install the bellhousing. It goes on easy enough. All but 3/8th of a inch and there it is stuck. I pull it on with a couple bolts and then think I better see if the motor will rotate with the bell on for some reason. I go to turn the motor and it is stuck. After taking it off an on a couple times I notice flywheel teeth marks in part of the bell's mold that sticks out. So I whip out the grinder and grind the tabs off. Now it slips on like a glove.
Could have stopped the whole show.
After I dropped the 454 in the boat I knew right away I had a couple issues and one was it sat way to low in the front. I pulled out my trusty tape measure and found out the cause in about 10 seconds. The way the Chevy and the Mopar motor mounts mount are two different heights. I forgot that the mounts on the 454 are for a inboard. No big deal. It ends up that the 454 will sit lower by a full 2 inches. Now in a car you can get different, longer mounts and move the transmission some to make up the difference. In this boat that is not a option. Any special mount or even the I/O mount is going to make the motor mount stick out further in which case will make the foot of the mount sit to far off the mounting stringer block (lack of a better term, the block of wood they fiberglassed in place for the motor mount to sit on). You have to remember this boats insides are made for a center console. There is no stringers so to speak, just boxed fiberglass for structure so you have to use these blocks or do major re-construction to fix it. Allmand went as far to make up and use aluminum "L" brackets to extend the mounts forward some because when they installed the S/B Mopar it was easier to use the brackets then it was to fix it for one last boat. Also the brackets help with the weight of the motor being spread over the whole plate and on two sides instead of just on the motor mounts base. I think another reason Allmand didn't fix the mounts was Allmand copied Nova Marine's molds to a "T" also thinking they were going to sell inboards. If you flip the motor around like you would for a Vee drive it would sit perfect. The funny thing is I don't think Allmand ever sold a inboard SuperNova.
Couple boiled red oak blocks fiberglassed in place fixed that.
With the extra two inches of wood, fiberglassed and lag bolted down added, now I could start to get the motor lined up right. With 4 or 5 trips to the store I got the right length S/S bellhousing bolts to hold on the transom shield donut and a couple missing motor mounts bolts and lag bolts that were needed. Then I spent a couple nights after work adjusting this up and that down over and over until I got it just right at the bell housing. Then I took this picture below and it opened up a can of worms for me. If you notice that one motor mount is closer to one stinger then it is to the other. The motor is actually "off set" or the stinger is crooked but it really screwed with me for a while. It doesn't matter now. Its square to the transom shield and that is the most important part. Now its in to stay.
Its crooked but its straight.
If for some reason I do have to move it later there is enough room for it. It wont be pretty but it can be done.
It has to be right the way it sits though. Before I set it for the final time I lifted the front of the motor slightly from a single, center point. If it was being pulled one way or another by the transom shield it would have swung that way. It didnt move a millimeter. If its not right after using a feeler gage at the bellhousing and also lifting the front of the motor like I did it will have to be done by someone else better then me.
____________________________________________________________________
Kicking Ass Now
3/31/2007
Now for the fun stuff and more.
Some odd shaped head gaskets.
Or at least I thought it would be. All and all the build didn't go that bad. Nothing that wasn't expected. I was a little thrown by the head gaskets. Being they are for the "peanut port" heads the cylinder holes are not round. They kind of have this bump out on two sides. I know they are right but after working with S/B head gaskets for a while now it made me do a double take. After I got over that things moved right along. Heads, rockers, pushrods, intake and valve covers were all installed before the afternoon was over and then I moved on to the accessories. Being I have had the front of the motor together before I figured it would be a snap and it pretty much was except for the water inlet in the bottom of the boat was real close to the oil pan. A couple plumbing connections I have yet to get and a little thought got things where they should be and a trip to the store will finish it. Then there was a ALT. It fit on the motor just like it did before but didn't really fit inside the motor box. It was to close to a stringer and the bottom bracket was actually touching the stringer. So a couple modifications were needed.
Just a little tight.
Not having time the time to fix the alternator area today (its started to cool off to much for fiberglass to set up right) I finished up what I could. I will be honest. Some of the stuff I grabbed was easy to install and easy on the eyes. There was no reason the carburetor needed to be installed now but I have been waiting to do it for months. I saved the more involved stuff for tomorrow (Sunday) when I have time to do it all at once and time to kill between glass coats.
Man I can make a mess.
____________________________________________________________________
April Fools
4/1/2007
Only fools and fanatics are working on their boats this early in the year.
Got a early start on it today and there is plenty to do. The first was easy. For the alternator I simply shortened the bottom bracket by about a inch and drilled a new mounting hole in it and it was all set. Then I needed to take out a little more of the section of fiberglass around the ALT. There was a chunk taken out before and glassed back in for the original motors install. I just needed to extend it a little. Out with the sawzaw and glass stuff and a hour or two later everything was cut out and back in like it was always like that. Now it has enough room to adjust out as far as it can and enough room around it for air movement to keep it cool.
I also put in a bracket to tie the fuel inlet hose to just to make sure the alternator wont rub through the hose. Friction, heat, rubber and gas fumes would not be a good thing together. I think I just may install another bracket and ties just in case.
Just needed to give it a little breathing room.
Besides that I haven't found any other fitting issues so far. The 454 and the 360 motors are real close in size to one another. If the alternator on the 454 was mounted higher up on the motor like how the one on the Mopar was the 454 would have fit in the same footprint as the 360. I didn't have to do the glass work. I could have bought a top mount alternator bracket for it but I kind of like it lower on the motor.
When glassing in the area I did notice something I didn't like. The oil filter relocation lines leaked. Just a drip but the motor hasn't even been started yet so they would need to be replaced before real pressure was in them. There was two things I did not want to do after the motor was in the boat and that was put a starter on or replace these lines. I didn't have a starter yet and the lines had to replaced. Just like the old saying goes, "The best laid plans......"
From there I finished up what I had time for. I got the fuel system straightened out and done pretty nice if I do say so myself. The cooling system is almost complete but I need one more fitting from H/D I will get tomorrow and a few other things. By the end of the day I am pretty happy where its at. As the week progresses I will do all the little things I can after work and hopefully by this weekend I can get this thing started (that's if I have a starter) but there is still a list left to do a mile long. I just hope the weather holds out.
A lot of hidden stuff done.
Its funny how what you think will take 10 minutes ends up being more then a hour later. I am in no big hurry though. I have no plans on starting it for at least a week and like I said before, I don't even have a starter. So without the starter I'm not going to install the exhaust on that side yet to make it easier to install the starter when I do get it. Also I think there may be some need to do some modifications like I had to with the alternator and the exhaust manifold would just be in the way. But for now I have plenty of time to do all the little things right and be done with them the first time around.
____________________________________________________________________
After Work
Monday
I only end up with about a hour and a half of daylight a night but I'm trying.
I stopped off at my favorite hydraulic shop in my travels at work today and had a new set of oil lines made up. A quick $50.00 bucks later they were done. I guess one benefit of this having to be done is I could shorten up the lines a little. They were a little to long for my set up before. Now they fit like a glove. I also stopped at H/D to get that last fitting for the cooling system.
Got home and went to work. The lines took forever like I knew they would. Everything is a tight fit back there and the size wrench that is needed doesn't come in a short version unless I want to cut one off and with the price of tools that isn't going to happen.
After that I moved on and did the finial install of the cooling system. I install the modified thermostat housing, thermostat and all the lines from the bottom of the boat to the housing. I think and hope it is all done. It should be. I also lined up the oil pump and dropped the distributor in the #1 position. The wires came with it.
As it got dark all I could think of to do next needed the starter to be installed first. So now it is my number one objective.
A little bling.
Tuesday
There is a starter in the house.
Hit the boat junkyard today and picked a starter for the motor. $40 bucks later and some cleaning and painting and it will work. I would have bought new but this is cheaper and also comes with a life time warrantee. Cant beat that. For some reason I tend to have to replace them every one or two years so it will pay for itself in know time. That's all I had time for today.
One step closer.
Wednesday
The first thing I did was try to install the starter. I knew there was going to be a issue with the motor mounts I had to build and there was. So today I spent all my time fixing that issue. Again out with the sawzaw and glass stuff. I cut the mount off enough to get the starter in and also enough room to breath. Not really wanting to install the starter for a second time I decided to leave it on and just cover it up with some shrink wrap. Put a new layer of mat and glass on the exposed area and it was all I could do with the little time I had. Plus the glass can set up all night.
It will look better when done.
Thursday
This is unbelievable, I am on hold. For some reason winter has started again. The next 4 days they are calling for highs of 40 and lows of 20. Even if the motor was done I couldn't start it. I would have to winterize it just after I was done with it. Also I am not into working on it in a heavy coat so close to being finished. So I am on hold until it warms up a little.
Updates will follow.
Saturday / Sunday
We got two inches of snow this morning. Its gone now but its still cold and wet.
Looks like nothing is going to happen this weekend.
I could puke!
____________________________________________________________________
Friday The 13th
4/13/2007
This prior week has been cold and nasty. I did get a few things done over a couple nights and I am glad I did. I first worked on the wiring. A lot had to be changed. The starter, Alt and about everything else was on the wrong or other side of the motor then it was before. The whole objective was to see if the wiring would work the way it was set up before or would there have to be major changes. It didn't take long to discover that everything should be fine but one thing that I was not sure of still was the starter wiring. So when I hit the key I thought I was ready for anything but not this.
I hit the key and it works fine except the starter's bendex doesn't hit the flywheel teeth and just spins. This aint good. After some inspection, looking at some old pictures of the rip down and some help from friends I came to the conclusion that the ring gear was on the wrong side. The motor came out of a inboard ski boat and the starter was mounted on the transmission side not the motor's side like I needed it to be. The only way to fix it was (you guessed it) pull the motor back out.
A picture like this is not good at this point.
The lucky thing about it all was I was almost sure that the flywheel was cut on both sides for the ring gear. That was a first for me and a many others but before I bought another flywheel I had to get it off the motor and see.
So on Friday I get home at 5:30 and the motor was unhooked and pulled in a hour. I was just going to get it ready to pull but things were happening fast. I then pulled the bellhousing, damper and flywheel. After fooling with it for a few minutes I saw that the ring gear could definitely be put on the other side of the flywheel. I tapped the ring gear off with a screw driver and a hammer. Heated it up and dropped it on the other side and waited to cool some. Put the flywheel back on the motor, hooked up the starter while it was still hanging and spun the motor. The starter is still a little tight and just needed a shim or two but I will work all that out tomorrow. Finished putting it back together and dropped the motor back in the boat. It will take me a hour or two to get it all back to where it was before today but all and all its not a bad Friday the 13th.
Back it goes again.
____________________________________________________________________
A Dry Day
4/14/2007
Even though they were calling for a monsoon, after 10am it sprinkled two times for 10 seconds each for the rest of the day. Not knowing if it was goig to rain or not (just like the weather folks) I had to take the risk to get some things done. Tomorrow was going to be worse (calling for 1 1/2" of rain in 24 hours) and once it started it wasent going to stop so I kept it so I could make a hastey retreat if needed and went to work.
That's a tight fit.
Before the day was out I had it all together. I mean I was ready to start it for the first time.
There still is a few things I will change before I take my first ride. As I was getting closer and closer to being able to start it and the day was getting shorter and shorter (and still could rain) I just did a few things to "just get them done." Like a couple plug wires are to short and two hoses have to be replaced but I was ready.
There was a few thing I wish I would have installed before I set the motor in the boat. The manifolds are wicked tight to the boat's seat molds. There is enough spacingbetween the two but not enough to get your hand in to do work. To change the spark plugs I may have to pull the motor again. That will change when I get a set of exhaust manifolds. They will be smaller and lighter and should give a little extra room around these things but until then it sure is a tight fit.
So I get everything cleaned up and put away. Out with the hose for water and its ready to go. Hit the key and it will only slowley turn over. Hooked it up to the "jump start" battery charger and it just laughed at it. Left it on for twenty minutes and still not enough to spin up a new motor. So I left everything sit as it started to rain and get dark. With a battery charger on each battery I hope it will be charged enough when I get another chance at it. There is a lot of motor to turn over for the first time but after that it should loosen up a little. Also the batteries haven't been charged since last year. Once the alternator get them up they will be fine........I hope.
____________________________________________________________________
Water
4/26/2007
Well as you can see it has been a few days and there is lot of reasons why.
That battery issue........well it was a little more then that. The reason it started the first time and then the second time it made the starter skip flywheel teeth was a long journey in a short time.
I started with the starter its self. I was almost certain it needed a shim and everything would be better. So the first thing I did is shim the starter with every combination of shims that I have and the motor still turns over real slow and the starter would skip a tooth every now and then. So then hook back up the jump/charger and try starting it so many times and with so many volts (two batteries and a 50amp charger) that I endded up frying my solenoid to the starter cable. Now I know there is something really wrong and just out of dumb luck I check the oil.
Then I see it.
Water in the oil.
I'm thinking and hoping now that the intake gasket must have leaked like has happened before on other motors. I take the intake off and see so much crap (milky oil) in the motor I freeze in my tracks. No matter what it is at this point no simple clean out in a can is going to do for a motor in this condition that has only run for a half hour.
I do what I can and with a couple rainy days in between when I found out the issue and the following weekend so I do what I can to prepared for what would be a weekend of madness.
The motor would have to come out and be broke down to its smallest parts, cleaned out, re-lube and reassembled.
So the weekend comes and in the next three days I pulled the water logged 454 after work on Friday. Cleaned out all the milky crap and rebuilt the motor on Saturday. Sunday I installed it along with a number of other things I needed to do before installing it. I finished up around 7:45pm Sunday night (almost dark, didn't really get started until 12pm) so I waited until after work Monday to do this,
First Start II
.
As the week progresses I keep knocking things out one at a time. Electric has been the major issue so far. My fuse box's ground was loose and I chased that up and down the boat for two hours until I found it. I had to get new plug wires. The old set was a little short in a couple places. The new set was a little tight in some places also. I forgot it takes two sets to get all the right lengths for a marine motor with stock exhaust. And there is lots of little things.
Its now Friday (4/27/2007) and I just got done changing the yoke for the smaller spline on the outdrive. Greased the universal joints and changed the oil in the drive. Tomorrow I will install it and give it a test spin just to make sure its right. Then there isn't much holding me back from a test drive.
Black and blue and back again.
Oh, I almost forgot to tell you how I ended up getting water in my oil. It was my own stupid fault. I left a head bolt installed only finger tight. It only took about 15 minutes and it had backed out enough it was hitting the valve cover. Not my smartest move by a long shot.
____________________________________________________________________
Oil
5/1/2007
You know how the best laid plans go
Of course everything was perfect when it was sitting in the driveway. And it was almost as good when running on the water except for one minor issue. But first the good news. Here are a couple comparisons from the Mopar to the Chevy.
Same speedometer calibrated with GPS last fall - increase of 10mph.
Same prop as run with the Mopar - increase of 600rpm's, there is 2 to 400 more to be had but I couldn't really search for them today because of the other issue and I really didn't want to beat on the motor to hard being new.
The boat rides a lot better then it did before. Plenty of bow lift. I may even put some of the stuff back in the front of the boat where it belongs. It also wants to skip over waves instead of plow through them.
The trim has a real affect now with a lot of range (up and down) and thats with a prop that has some slippage issues (thats why the boat drives so good with it). It was good on gas also for what time I ran it.
The motor ran real gooooood. Smooth as glass and seemed very restraint. Unlike the small block I had that always sounded like it was ready to explode into space.
There still is a few things I need to sort out like why the ignition jumps up when I first start it (the thunderbolt ignition does it not the choke). Then there is some venting that needs to be done to the motor compartment. It also definitely needs a exhaust system (there is another 200rpm easy) and all of that will come in time.
Oh and the motor has to Fu(%^&*! COME BACK OUT AGAIN! 
I have a oil leak. Its just a tiny bit but its coming from the little cut out in the bellhousing where you can see the flywheel. When the flywheel spins it throws it out through the hole and it hits either the motor cover or the exhaust.
That cant stay like that. So the first test drive was short and I have a ton of work ahead of me but I think I am on the right track.
____________________________________________________________________
Almost Done
5/9/2007
Its officially been 6 months from the day I picked the motor up. Hopefully this story is coming to an end and a new chapter will begin.
As I was writing the last entry I was already in the process of getting the motor out of the boat again, fixed and back in before the weekend. All I had to do was pull the oil pan and the rear crank's cap. Install the new rear main seal and put it back together in the few evening daylight hours after work I had. I have already done it a couple times so pulling the motor was easy work. I had it out in about a hour the first night and moved on from there. Step by step until it was ready to go back in. The reason I went for the rear main seal was it was the last of everything on the back of the motor. When I took it apart you could see it was leaking but I couldn't tell from where. So the rear seal was done along with all new oil galley plugs and finally a new oil pan gasket or "everything" on the back of the motor just in case it was any of them.
Again it went like clock work installing the motor and I had everything done by Thursday. Being that it took all week to get done that gave it some time to let the RTV cure. The last time around I had the motor started 24 hours after building it. This time it had about 4 days to dry up.
Saturday comes and I take it to the ramp for a test drive. I think it went quite well with no leaks. See what you think. Test drive II
I still have to readjust some rockers and a couple other minor things. I also need to get some prop work done. 5100 rpm's @ WOT is to high for what I wanted to build. I have worked so many years on the old set up and I am finding that most of what I learned and have done in the past does not apply anymore. So there will be some trial and error but its still early yet. There is plenty of time for tweaks.
The first thing I need to do is find some real numbers so a GPS test drive will have to happen next weekend while recording the rpm's and mph throughout. I'm sure my prop guy will want to know all the numbers but that's if I can find him. I went by his old shop the other day and it was nothing but a gravel parking lot. I did a web search and found a phone number but still haven't got a call back yet.
____________________________________________________________________
Moving On
5/22/2007
I guess I'm done with this project. The motor is in and seems to work fine. I am still chasing a few minor issues but I expected these things being that everything is different and new. I already have a few ideas on upgrades I want to do but they will have to wait until it gets cold again. The money train has come to a end and I have to work out what I have now anyway before I can continue anything else. I also need to see what I have over some time so I will know what steps to take next. Plus its almost June and I would like to just use the boat for a little while before its time to start another project.
____________________________________________________________________
So its back to A New Year (click on the link and it will start where this page leaves off at) for what will be happening next to this motor and the rest of my SuperNova19. Because there is always something happening next.
____________________________________________________________________
I think I may need some new hoses.
____________________________________________________________________
The Bill
Want to know what it cost?
As much as I don't here it is as it happens.
Motor = $660.00
Speed Pro .210 domed pistons = $289.99
Melling H/V oil pump and driveshaft = $47.70
Water pump = $40.00
Speed Pro cam & lifters, matching valve springs, Cloyes true double roller timing set and new rod bolts = $227.86
Re-ring kit (gaskets,bearings, rings) = $161.14
Home Depot (paint, wire brushes and misc) = $37.46
Mount pistons on rods = $60.00
Weld pick up to oil pump = $25.00
Cross Winds "Air Gap" intake manifold = $199.00
Distributor cap and rotor = $30.65
Home Depot (paint, misc) = $16.50
Distributor tune up kit = $30.94
Auto Zone (fan belts) = $14.98
Home Depot (spacers,bolts,paint) = $10.33
Outdrive yoke end = $50.00
Pep Boys (oil dip stick, brass head plugs) = $28.29
Home Depot (m/f paint, bolts) = $11.00
Home Depot (m/f paint) = $22.00
Volvo Bellhousing Kit #3856938 = $565.00
Bellhousing Grease Parts = $27.25
Home Depot (motor mount stuff) = $48.59
Pep Boys (RTV) = $16.27
Home Depot (plumbing parts) = $8.01
Advance Fluid (oil filter bypass hoses) = $50.34
Pep Boys (oil, filter, plugs) $30.50
Starter = $42.00
Pep Boys (electric and misc) = $12.43
West Marine (SS bellhousing bolts) = $15.69
Home Depot (misc) = $11.52
PepBoys (finishing stuff) = $47.47
Grand total = $2837.88
I'm stopping the list here. Anything after this was due to my screw ups so I will pay for it. But it can be done in "real world money" for what I said and even cheaper now that I have done it once.
____________________________________________________________________
Build Sheet
This is subject to change and I'm sure it will.
Started with;
*1986, MIE/340 (7.4) 454 Big Block
Dip it and hone the decks and cylinders
Block was detailed with all casting debris removed
Stock crank (also cleaned up)
Reconditioned rods
ARP Rod bolts
.210 Domed Speed pro pistons and pins. (They should give me 9.38 to 1 with the heads I am using now)
Molly rings
Federal Mogal bearings (cam, main & rod)
Cloyes true double roller timing chain
Speed Pro cam Chevy 396-502 cid, RPM Range 2000-4500,
Adv Dur 296 intake/296 exhaust, Dur @.050 218 intake/218 exhaust, Valve Lift 519 intake/519 exhaust, Lobe C/L 110
Seal Pro lifters
Completely refreshed Chevy 14092360 heads
ARP 1.90 rocker studs
Seal Pro matching valve spring
S/S 1.7 roller rockers
Melling H/V oil pump
Melling HV oil pump shaft
Power Plus, CrossWind Series dual plane, air gap aluminum Intake Manifold from Professional Products
Mercruiser Thunderbolt ignition
Mercruiser Thunderbolt distributor
Super Stock coil
8mm Accell hi performance wires
New single wire alternator
Edelbrock 750 carburetor
Edelbrock chrome air cleaner (with K and N filter)
Brass freeze plugs
Stainless steel bolt set
Stainless steel 4 risers
GLM aluminum manifolds
Sherwood motor mounted raw water pump
--------------------------------------------------------------------------------------------
Don't forget to click this link >>>>> A New Year <<<<<< and pick up where this page leaves off at.
Changes have already been made and more will follow.
------------------------------------------------------------------------------------------
*************Update************
____________________________________________________________________
click to return to you place on the "My SuperNova" page
Started with;
*1986, MIE/340 (7.4) 454 Big Block
Dip it and hone the decks and cylinders (the cylinders did not need to be cut and are standard bore)
Block was detailed with all casting debris removed
Stock seasoned crank (also cleaned up)
Reconditioned connecting rods
ARP Rod bolts
.210 Domed Speed pro pistons and pins. (They should give me 9.38 to 1)
Molly piston rings
Federal Mogal bearings (cam, main & rod)
Cloyes true double roller timing chain
Moroso Chevrolet 454 Stud Girdles #6729 BBC
Crane #132561 hydraulic cam--Duration Advertised: 298° Intake / 306° Exhaust Duration @ .050'' Lift: 228° Intake / 236° Exhaust Valve Lift w/1.7 Rockers: .530'' Intake / .551'' Exhaust Lobe Separation Angle: 114°
Crane #99277 lifters
Comp Cams High-Tech pushrods #7954
Completely refreshed Chevy 14096188 heads / 454 Open / 118cc / 3angle valve
Comp Performance Valve Springs #911-16
Pioneer head bolt sets
ARP 1.90 rocker studs
Norris S/S 1.7 roller rockers
Melling H/V oil pump
Melling HV oil pump shaft
EDELBROCK BBC R2 AIRGAP INTAKE
JEGS 15951 - Mechanical Fuel Pump
Mercruiser Thunderbolt ignition
Mercruiser Thunderbolt distributor
Super Stock coil
8mm Accell Hi performance wires
New single wire alternator
Mini (gear reduction and fully marine) starter
Edelbrock 750 carburetor
Edelbrock chrome air cleaner (with K&N filter)
Brass freeze plugs
Stainless steel bolt set
4 Stainless steel risers
GLM aluminum manifolds
Sherwood motor mounted raw water pump
____________________________________________________________________
Don't forget to click this link >>>>> June 14 <<<<<< and pick up where this page leaves off at.
Changes have already been made and more will follow.
____________________________________________________________________
The SuperNova19 Network